状态机示例
本部分的参考文档解释了状态机的使用方法,并附有示例代码和UML状态图。我们在表示状态图、Spring 状态机配置以及应用程序如何使用状态机之间的关系时使用了一些快捷方式。要获得完整的例子,你应该研究样本仓库。
Samples 是从主源代码分发版在正常的构建周期中直接构建的。本章包括以下示例:
将以下列表展示如何构建示例:
./gradlew clean build -x test每个示例都位于spring-statemachine-samples目录下的独立目录中。这些示例基于Spring Boot,在每个示例项目的build/libs目录下可以找到通常的Boot胖jar文件。
我们在此部分引用的 jars 文件名在文档构建过程中会被填充,意味着如果你从 main 构建示例,你会有带有 BUILD-SNAPSHOT 后缀的文件。 |
38. 转门
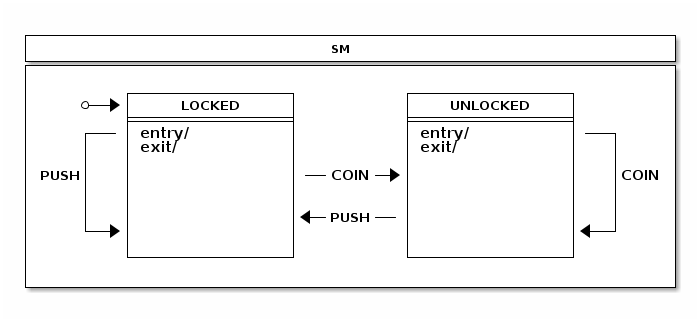
turnstile 是一种简单的设备,如果支付成功则允许通行。它是一个简单到可以用状态机来建模的概念。在最简单的形式中,只有两个状态:LOCKED 和 UNLOCKED。根据是否有付款或尝试通过 turnstile 的行为,可以发生两种事件:COIN 和 PUSH。
以下图像展示了状态机:
以下列表显示了定义可能状态的枚举:
public enum States {
	LOCKED, UNLOCKED
}
以下列表显示了定义事件的枚举:
public enum Events {
	COIN, PUSH
}
以下代码展示了配置状态机的代码:
@Configuration
@EnableStateMachine
public class StateMachineConfiguration
        extends EnumStateMachineConfigurerAdapter<States, Events> {

    @Override
    public void configure(StateMachineStateConfigurer<States, Events> states)
            throws Exception {
        states
                .withStates()
                .initial(States.LOCKED)
                .states(EnumSet.allOf(States.class));
    }

    @Override
    public void configure(StateMachineTransitionConfigurer<States, Events> transitions)
            throws Exception {
        transitions
                .withExternal()
                .source(States.LOCKED)
                .target(States.UNLOCKED)
                .event(Events.COIN)
                .and()
                .withExternal()
                .source(States.UNLOCKED)
                .target(States.LOCKED)
                .event(Events.PUSH);
    }

}
您可以查看此示例状态机与事件的交互方式
通过运行turnstile样本。以下列表显示了如何执行此操作以及命令的输出:
$ java -jar spring-statemachine-samples-turnstile-4.0.1.jar

sm>print
+----------------------------------------------------------------+
|                              SM                                |
+----------------------------------------------------------------+
|                                                                |
|         +----------------+          +----------------+         |
|     *-->|     LOCKED     |          |    UNLOCKED    |         |
|         +----------------+          +----------------+         |
|     +---| entry/         |          | entry/         |---+     |
|     |   | exit/          |          | exit/          |   |     |
|     |   |                |          |                |   |     |
| PUSH|   |                |---COIN-->|                |   |COIN |
|     |   |                |          |                |   |     |
|     |   |                |          |                |   |     |
|     |   |                |<--PUSH---|                |   |     |
|     +-->|                |          |                |<--+     |
|         |                |          |                |         |
|         +----------------+          +----------------+         |
|                                                                |
+----------------------------------------------------------------+

sm>start
State changed to LOCKED
State machine started

sm>event COIN
State changed to UNLOCKED
Event COIN send

sm>event PUSH
State changed to LOCKED
Event PUSH send
39. 转门响应式
Turnstile 响应式增强是基于 Turnstile 样例 的改进,使用了相同的 StateMachine 概念,并添加了一个与 StateMachine 响应式接口进行响应式通信的响应式网络层。
StateMachineController 是一个简单的示例,我们通过依赖注入(@Autowired)来初始化我们的StateMachine。
@Autowired
private StateMachine<States, Events> stateMachine;
我们创建第一个映射以返回机器状态。由于状态不会从机器中主动发出,我们可以延迟它,这样当订阅了返回的Mono时,实际的状态才会被请求。
@GetMapping("/state")
public Mono<States> state() {
	return Mono.defer(() -> Mono.justOrEmpty(stateMachine.getState().getId()));
}
可以使用Flux在输入和输出层将一个事件或多个事件发送到一台机器。这里的EventResult只是一个示例,并且只是简单地包裹了ResultType以及事件。
@PostMapping("/events")
public Flux<EventResult> events(@RequestBody Flux<EventData> eventData) {
	return eventData
		.filter(ed -> ed.getEvent() != null)
		.map(ed -> MessageBuilder.withPayload(ed.getEvent()).build())
		.flatMap(m -> stateMachine.sendEvent(Mono.just(m)))
		.map(EventResult::new);
}
您可以使用以下命令运行示例:
$ java -jar spring-statemachine-samples-turnstilereactive-4.0.1.jar获取状态的示例:
GET http://localhost:8080/state然后会响应:
"LOCKED"事件发送示例:
POST http://localhost:8080/events
content-type: application/json

{
    "event": "COIN"
}
然后会响应:
[
  {
    "event": "COIN",
    "resultType": "ACCEPTED"
  }
]
您可以发布多个事件:
POST http://localhost:8080/events
content-type: application/json

[
    {
        "event": "COIN"
    },
    {
        "event": "PUSH"
    }
]
响应中包含两个事件的结果:
[
  {
    "event": "COIN",
    "resultType": "ACCEPTED"
  },
  {
    "event": "PUSH",
    "resultType": "ACCEPTED"
  }
]
40. 展示
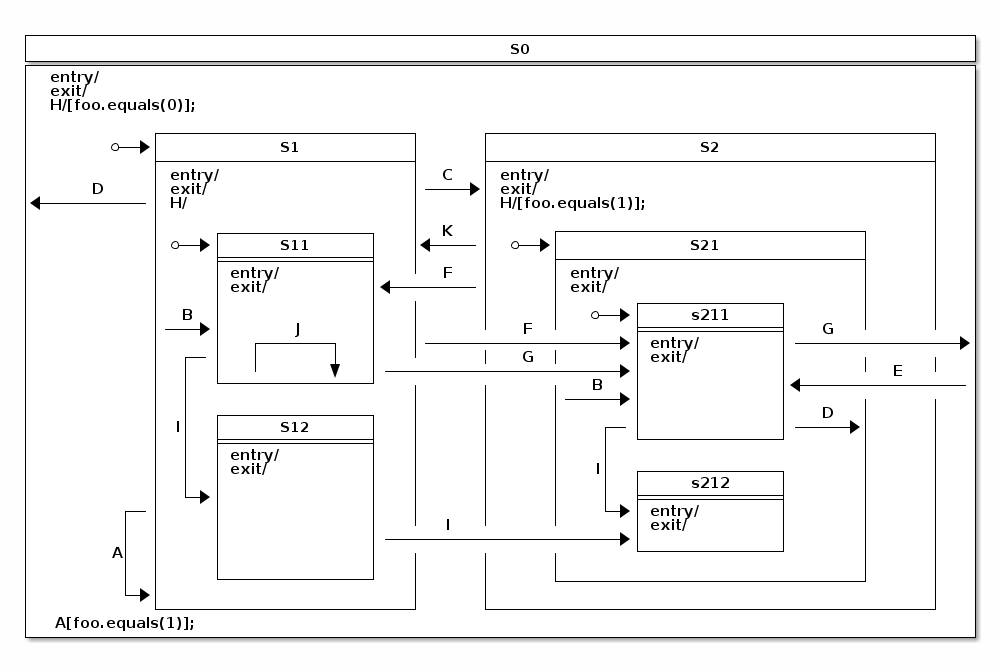
showcase 是一个复杂的状态机,展示了所有可能的状态转换拓扑结构,最多可达四层嵌套状态。 以下图片展示了状态机:

以下列表显示了定义可能状态的枚举:
public enum States {
    S0, S1, S11, S12, S2, S21, S211, S212
}
以下列表显示了定义事件的枚举:
public enum Events {
    A, B, C, D, E, F, G, H, I
}
以下代码展示了配置状态机的代码:
@Override
public void configure(StateMachineStateConfigurer<States, Events> states)
		throws Exception {
	states
		.withStates()
			.initial(States.S0, fooAction())
			.state(States.S0)
			.and()
			.withStates()
				.parent(States.S0)
				.initial(States.S1)
				.state(States.S1)
				.and()
				.withStates()
					.parent(States.S1)
					.initial(States.S11)
					.state(States.S11)
					.state(States.S12)
					.and()
			.withStates()
				.parent(States.S0)
				.state(States.S2)
				.and()
				.withStates()
					.parent(States.S2)
					.initial(States.S21)
					.state(States.S21)
					.and()
					.withStates()
						.parent(States.S21)
						.initial(States.S211)
						.state(States.S211)
						.state(States.S212);
}
以下代码片段展示了配置状态机转换的代码:
@Override
public void configure(StateMachineTransitionConfigurer<States, Events> transitions)
		throws Exception {
	transitions
		.withExternal()
			.source(States.S1).target(States.S1).event(Events.A)
			.guard(foo1Guard())
			.and()
		.withExternal()
			.source(States.S1).target(States.S11).event(Events.B)
			.and()
		.withExternal()
			.source(States.S21).target(States.S211).event(Events.B)
			.and()
		.withExternal()
			.source(States.S1).target(States.S2).event(Events.C)
			.and()
		.withExternal()
			.source(States.S2).target(States.S1).event(Events.C)
			.and()
		.withExternal()
			.source(States.S1).target(States.S0).event(Events.D)
			.and()
		.withExternal()
			.source(States.S211).target(States.S21).event(Events.D)
			.and()
		.withExternal()
			.source(States.S0).target(States.S211).event(Events.E)
			.and()
		.withExternal()
			.source(States.S1).target(States.S211).event(Events.F)
			.and()
		.withExternal()
			.source(States.S2).target(States.S11).event(Events.F)
			.and()
		.withExternal()
			.source(States.S11).target(States.S211).event(Events.G)
			.and()
		.withExternal()
			.source(States.S211).target(States.S0).event(Events.G)
			.and()
		.withInternal()
			.source(States.S0).event(Events.H)
			.guard(foo0Guard())
			.action(fooAction())
			.and()
		.withInternal()
			.source(States.S2).event(Events.H)
			.guard(foo1Guard())
			.action(fooAction())
			.and()
		.withInternal()
			.source(States.S1).event(Events.H)
			.and()
		.withExternal()
			.source(States.S11).target(States.S12).event(Events.I)
			.and()
		.withExternal()
			.source(States.S211).target(States.S212).event(Events.I)
			.and()
		.withExternal()
			.source(States.S12).target(States.S212).event(Events.I);

}
The following listing shows the code that configures the state machine’s actions and guards:
@Bean
public FooGuard foo0Guard() {
	return new FooGuard(0);
}

@Bean
public FooGuard foo1Guard() {
	return new FooGuard(1);
}

@Bean
public FooAction fooAction() {
	return new FooAction();
}
以下列表展示了单个操作的定义:
private static class FooAction implements Action<States, Events> {

	@Override
	public void execute(StateContext<States, Events> context) {
		Map<Object, Object> variables = context.getExtendedState().getVariables();
		Integer foo = context.getExtendedState().get("foo", Integer.class);
		if (foo == null) {
			log.info("Init foo to 0");
			variables.put("foo", 0);
		} else if (foo == 0) {
			log.info("Switch foo to 1");
			variables.put("foo", 1);
		} else if (foo == 1) {
			log.info("Switch foo to 0");
			variables.put("foo", 0);
		}
	}
}
The following listing shows how the single guard is defined:
private static class FooGuard implements Guard<States, Events> {

	private final int match;

	public FooGuard(int match) {
		this.match = match;
	}

	@Override
	public boolean evaluate(StateContext<States, Events> context) {
		Object foo = context.getExtendedState().getVariables().get("foo");
		return !(foo == null || !foo.equals(match));
	}
}
以下列表显示了当此状态机运行并发送各种事件时的输出:
sm>start
Init foo to 0
Entry state S0
Entry state S1
Entry state S11
State machine started

sm>event A
Event A send

sm>sm event C
Exit state S11
Exit state S1
Entry state S2
Entry state S21
Entry state S211
Event C send

sm>event H
Switch foo to 1
Internal transition source=S0
Event H send

sm>event C
Exit state S211
Exit state S21
Exit state S2
Entry state S1
Entry state S11
Event C send

sm>event A
Exit state S11
Exit state S1
Entry state S1
Entry state S11
Event A send
在前面的输出中,我们可以看到:
-
状态机已启动,将其带入初始状态(
S11) 通过超状态(S1)和(S0)。此外,扩展的状态变量foo被初始化为0。 -
我们尝试在状态
S1执行自我转换,触发事件A,但由于该转换由变量foo的值必须为1来保护,因此没有任何事情发生。 -
我们发送事件
C,这将我们带到另一个状态机,在那里初始状态 (S211) 及其超状态被进入。在那里,我们可以使用事件H,它执行一个简单的内部转换来切换变量foo。然后我们通过使用事件C回退。 -
事件
A再次发送,现在S1执行自我转换,因为守卫评估结果为true。
The following example offers a closer look at how hierarchical states and their event handling works:
sm>variables
No variables

sm>start
Init foo to 0
Entry state S0
Entry state S1
Entry state S11
State machine started

sm>variables
foo=0

sm>event H
Internal transition source=S1
Event H send

sm>variables
foo=0

sm>event C
Exit state S11
Exit state S1
Entry state S2
Entry state S21
Entry state S211
Event C send

sm>variables
foo=0

sm>event H
Switch foo to 1
Internal transition source=S0
Event H send

sm>variables
foo=1

sm>event H
Switch foo to 0
Internal transition source=S2
Event H send

sm>variables
foo=0
在前面的示例中:
-
我们打印扩展状态变量在各个阶段。
-
通过事件
H,我们最终运行了一个内部转换, 并记录了其源状态。 -
注意事件
H在不同状态(S0、S1和S2)中的处理方式。这是一个关于如何层级状态及其事件处理机制的很好例子。如果处于状态S2无法因某个条件限制而处理事件H,就会检查其父状态。这保证了当机器处于状态S2时,foo标志始终会翻转。然而,在状态S1中,事件H总是匹配到无条件转移且没有触发器或动作的过渡,因此它永远不会发生。
41. CD播放器
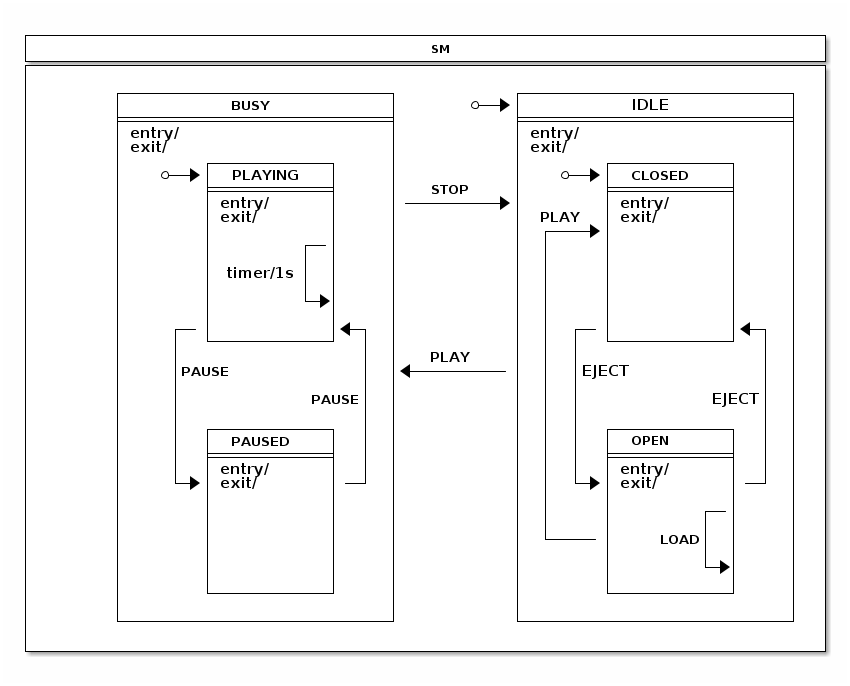
CD Player 是一个样例,类似于很多人在现实世界中使用的情况。CD Player 本身是一个非常简单的实体,允许用户打开唱盘、插入或更换光盘,然后通过按下各种按钮(0、1、2、3、4 和 5)来驱动播放器的功能。
有多少人真正思考过编写与硬件交互以驱动CD播放器的代码需要什么。是的,播放器的概念很简单,但如果我们深入幕后看,事情其实会变得有点复杂。
您可能已经注意到,如果您的唱机是打开状态并且按下播放按钮, 唱机会关闭而一首歌曲开始播放(如果有CD插入的话)。 从某种意义上说,在唱机是打开的状态下,您首先需要将其关闭 然后再次尝试播放(当然前提是实际上插入了CD)。希望您现在已经意识到一个简单的CD播放器其实非常简单。 确实,您可以使用几个布尔变量和一些嵌套的if-else语句来封装所有这些内容。这样做可以解决问题,但如果您需要使这种行为更加复杂呢? 您真的想继续添加更多的标志以及if-else语句吗?
以下图像展示了我们简单的CD播放器的状态机:
此部分内容将详细介绍该示例及其状态机的设计,以及两者之间的交互。以下三个配置部分在EnumStateMachineConfigurerAdapter中使用。
@Override
public void configure(StateMachineStateConfigurer<States, Events> states)
		throws Exception {
	states
		.withStates()
			.initial(States.IDLE)
			.state(States.IDLE)
			.and()
			.withStates()
				.parent(States.IDLE)
				.initial(States.CLOSED)
				.state(States.CLOSED, closedEntryAction(), null)
				.state(States.OPEN)
				.and()
		.withStates()
			.state(States.BUSY)
			.and()
			.withStates()
				.parent(States.BUSY)
				.initial(States.PLAYING)
				.state(States.PLAYING)
				.state(States.PAUSED);

}
@Override
public void configure(StateMachineTransitionConfigurer<States, Events> transitions)
		throws Exception {
	transitions
		.withExternal()
			.source(States.CLOSED).target(States.OPEN).event(Events.EJECT)
			.and()
		.withExternal()
			.source(States.OPEN).target(States.CLOSED).event(Events.EJECT)
			.and()
		.withExternal()
			.source(States.OPEN).target(States.CLOSED).event(Events.PLAY)
			.and()
		.withExternal()
			.source(States.PLAYING).target(States.PAUSED).event(Events.PAUSE)
			.and()
		.withInternal()
			.source(States.PLAYING)
			.action(playingAction())
			.timer(1000)
			.and()
		.withInternal()
			.source(States.PLAYING).event(Events.BACK)
			.action(trackAction())
			.and()
		.withInternal()
			.source(States.PLAYING).event(Events.FORWARD)
			.action(trackAction())
			.and()
		.withExternal()
			.source(States.PAUSED).target(States.PLAYING).event(Events.PAUSE)
			.and()
		.withExternal()
			.source(States.BUSY).target(States.IDLE).event(Events.STOP)
			.and()
		.withExternal()
			.source(States.IDLE).target(States.BUSY).event(Events.PLAY)
			.action(playAction())
			.guard(playGuard())
			.and()
		.withInternal()
			.source(States.OPEN).event(Events.LOAD).action(loadAction());
}
@Bean
public ClosedEntryAction closedEntryAction() {
	return new ClosedEntryAction();
}

@Bean
public LoadAction loadAction() {
	return new LoadAction();
}

@Bean
public TrackAction trackAction() {
	return new TrackAction();
}

@Bean
public PlayAction playAction() {
	return new PlayAction();
}

@Bean
public PlayingAction playingAction() {
	return new PlayingAction();
}

@Bean
public PlayGuard playGuard() {
	return new PlayGuard();
}
在之前的配置中:
-
我们使用
EnumStateMachineConfigurerAdapter来配置状态和 转换。 -
The
CLOSED和OPEN状态被定义为IDLE的子状态, 而PLAYING和PAUSED状态被定义为BUSY的子状态。 -
通过
CLOSED状态,我们添加了一个作为bean调用的入口动作closedEntryAction。 -
在状态转换中,我们主要将事件映射到预期的状态转换,例如
EJECT关闭和打开一个展示区,并且PLAY、STOP和PAUSE执行其自然的转换。对于其他状态转换,我们做了以下处理:-
对于源状态
PLAYING,我们添加了一个定时器触发器,这需要自动跟踪播放轨道内的已用时间,并且提供一个机制来决定何时切换到下一轨道。 -
对于
PLAY事件,如果源状态是IDLE且目标状态是BUSY,我们定义了一个动作称为playAction和一个守卫称为playGuard。 -
对于
LOAD事件和OPEN状态,我们定义了一个内部转换,并且该转换包含一个名为loadAction的动作,用于追踪插入磁盘并使用扩展状态变量。 -
The
PLAYING状态定义了三个内部转换。一个是由计时器触发的,执行的动作称为playingAction,该动作更新扩展的状态变量。其他两个转换使用trackAction并带有不同的事件(分别是BACK和FORWARD),以处理用户想要在曲目之间返回或前进的情况。
-
此机器只有六个状态,这些状态由以下枚举定义:
public enum States {
	// super state of PLAYING and PAUSED
    BUSY,
    PLAYING,
    PAUSED,
	// super state of CLOSED and OPEN
    IDLE,
    CLOSED,
    OPEN
}
事件代表用户可以按下按钮以及是否将光盘放入播放器。以下枚举定义了这些事件:
public enum Events {
    PLAY, STOP, PAUSE, EJECT, LOAD, FORWARD, BACK
}
The cdPlayer 和 library bean 用于驱动应用程序。
以下列表显示了这两个 bean 的定义:
@Bean
public CdPlayer cdPlayer() {
	return new CdPlayer();
}

@Bean
public Library library() {
	return Library.buildSampleLibrary();
}
我们将扩展状态变量键定义为简单的枚举类型,如下列表所示:
public enum Variables {
	CD, TRACK, ELAPSEDTIME
}

public enum Headers {
	TRACKSHIFT
}
我们希望使这个示例类型安全,因此我们定义了自己的
注解(@StatesOnTransition),该注解有一个必需的元
注解(@OnTransition)。
The following listing defines the @StatesOnTransition annotation:
@Target(ElementType.METHOD)
@Retention(RetentionPolicy.RUNTIME)
@OnTransition
public @interface StatesOnTransition {

	States[] source() default {};

	States[] target() default {};

}
0 是进入 <1> 状态的入口动作,如果存在光盘,则向状态机发送一个 <2> 事件。以下代码定义了 <3>:
public static class ClosedEntryAction implements Action<States, Events> {

	@Override
	public void execute(StateContext<States, Events> context) {
		if (context.getTransition() != null
				&& context.getEvent() == Events.PLAY
				&& context.getTransition().getTarget().getId() == States.CLOSED
				&& context.getExtendedState().getVariables().get(Variables.CD) != null) {
			context.getStateMachine()
				.sendEvent(Mono.just(MessageBuilder
					.withPayload(Events.PLAY).build()))
				.subscribe();
		}
	}
}
LoadAction 更新扩展状态变量,如果事件头包含关于要加载的光盘的信息。
以下列表定义了LoadAction:
public static class LoadAction implements Action<States, Events> {

	@Override
	public void execute(StateContext<States, Events> context) {
		Object cd = context.getMessageHeader(Variables.CD);
		context.getExtendedState().getVariables().put(Variables.CD, cd);
	}
}
PlayAction 重置玩家的已用时间,该时间被保存为扩展状态变量。
以下列表定义了 PlayAction:
public static class PlayAction implements Action<States, Events> {

	@Override
	public void execute(StateContext<States, Events> context) {
		context.getExtendedState().getVariables().put(Variables.ELAPSEDTIME, 0l);
		context.getExtendedState().getVariables().put(Variables.TRACK, 0);
	}
}
PlayGuard 保护从 IDLE 到 BUSY 的转换,如果 CD 延伸状态变量没有表明已经加载了磁盘,则在 PLAY 事件发生时生效。
以下是定义 PlayGuard 的列表:
public static class PlayGuard implements Guard<States, Events> {

	@Override
	public boolean evaluate(StateContext<States, Events> context) {
		ExtendedState extendedState = context.getExtendedState();
		return extendedState.getVariables().get(Variables.CD) != null;
	}
}
PlayingAction 更新一个扩展状态变量 ELAPSEDTIME,玩家可以使用该变量来读取和更新其LCD状态显示屏。PlayingAction 还处理用户在歌曲之间向前或向后翻页时的轨道切换。
以下示例定义了 PlayingAction:
public static class PlayingAction implements Action<States, Events> {

	@Override
	public void execute(StateContext<States, Events> context) {
		Map<Object, Object> variables = context.getExtendedState().getVariables();
		Object elapsed = variables.get(Variables.ELAPSEDTIME);
		Object cd = variables.get(Variables.CD);
		Object track = variables.get(Variables.TRACK);
		if (elapsed instanceof Long) {
			long e = ((Long)elapsed) + 1000l;
			if (e > ((Cd) cd).getTracks()[((Integer) track)].getLength()*1000) {
				context.getStateMachine()
					.sendEvent(Mono.just(MessageBuilder
						.withPayload(Events.FORWARD)
						.setHeader(Headers.TRACKSHIFT.toString(), 1).build()))
					.subscribe();
			} else {
				variables.put(Variables.ELAPSEDTIME, e);
			}
		}
	}
}
TrackAction 处理用户在轨道之间向后或向前移动时的切换操作。如果一个轨道是光盘上的最后一个轨道,则播放会停止,并发送 STOP 事件给状态机。
以下示例定义了 TrackAction:
public static class TrackAction implements Action<States, Events> {

	@Override
	public void execute(StateContext<States, Events> context) {
		Map<Object, Object> variables = context.getExtendedState().getVariables();
		Object trackshift = context.getMessageHeader(Headers.TRACKSHIFT.toString());
		Object track = variables.get(Variables.TRACK);
		Object cd = variables.get(Variables.CD);
		if (trackshift instanceof Integer && track instanceof Integer && cd instanceof Cd) {
			int next = ((Integer)track) + ((Integer)trackshift);
			if (next >= 0 &&  ((Cd)cd).getTracks().length > next) {
				variables.put(Variables.ELAPSEDTIME, 0l);
				variables.put(Variables.TRACK, next);
			} else if (((Cd)cd).getTracks().length <= next) {
				context.getStateMachine()
					.sendEvent(Mono.just(MessageBuilder
						.withPayload(Events.STOP).build()))
					.subscribe();
			}
		}
	}
}
其他一个重要方面是状态机有自己的职责(主要是处理状态),并且所有应用级别的逻辑应该保持在外。这意味着应用程序需要有与状态机交互的方法。此外,请注意我们用 @WithStateMachine 注释了 CdPlayer,这告诉状态机从你的 POJO 中查找方法,然后在各种转换中调用这些方法。
以下示例展示了它是如何更新其 LCD 状态显示的:
@OnTransition(target = "BUSY")
public void busy(ExtendedState extendedState) {
	Object cd = extendedState.getVariables().get(Variables.CD);
	if (cd != null) {
		cdStatus = ((Cd)cd).getName();
	}
}
在前面的例子中,我们使用@OnTransition注解来绑定一个回调,在目标状态为BUSY的转换发生时触发。
以下列表展示了我们的状态机如何处理播放器是否关闭的情况:
@StatesOnTransition(target = {States.CLOSED, States.IDLE})
public void closed(ExtendedState extendedState) {
	Object cd = extendedState.getVariables().get(Variables.CD);
	if (cd != null) {
		cdStatus = ((Cd)cd).getName();
	} else {
		cdStatus = "No CD";
	}
	trackStatus = "";
}
@OnTransition (我们在前面的例子中使用过)只能用于匹配枚举字符串。@StatesOnTransition 允许你创建自己的类型安全注解,这些注解可以使用实际的枚举。
该示例展示了这个状态机实际上是如何工作的。
sm>start
Entry state IDLE
Entry state CLOSED
State machine started

sm>lcd
No CD

sm>list
0: Greatest Hits
  0: Bohemian Rhapsody  05:56
  1: Another One Bites the Dust  03:36
1: Greatest Hits II
  0: A Kind of Magic  04:22
  1: Under Pressure  04:08

sm>eject
Exit state CLOSED
Entry state OPEN

sm>load 0
Loading cd Greatest Hits

sm>play
Exit state OPEN
Entry state CLOSED
Exit state CLOSED
Exit state IDLE
Entry state BUSY
Entry state PLAYING

sm>lcd
Greatest Hits Bohemian Rhapsody 00:03

sm>forward

sm>lcd
Greatest Hits Another One Bites the Dust 00:04

sm>stop
Exit state PLAYING
Exit state BUSY
Entry state IDLE
Entry state CLOSED

sm>lcd
Greatest Hits
在之前的运行中:
-
状态机已启动,导致机器初始化。
-
CD播放器的LCD屏幕状态被打印出来了。
-
CD 图书馆的信息已打印。
-
CD播放器的唱头被打开。
-
CD索引为0的碟片已加载到一个唱机中。
-
播放会导致机顶盒立即关闭,因为插入了一张碟片。
-
我们打印LCD状态并请求下一曲。
-
我们停止玩耍。
42. 任务
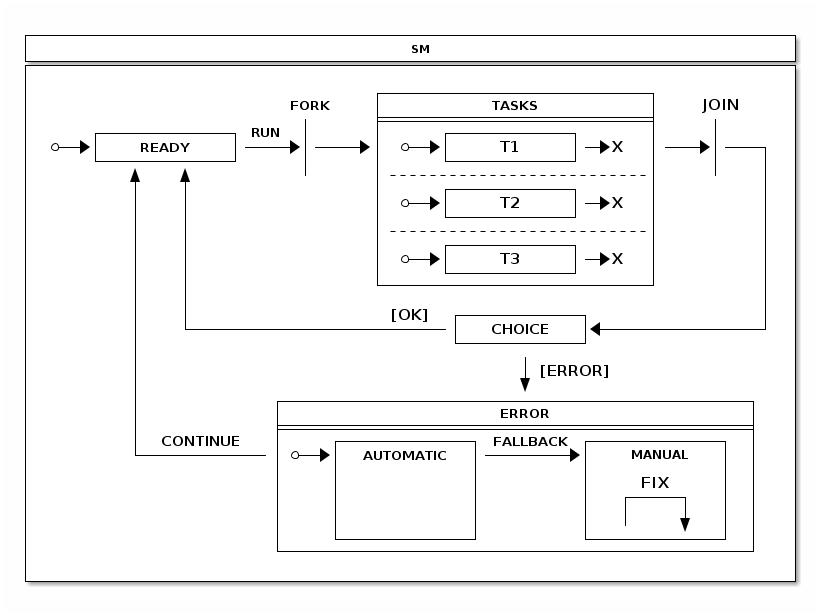
The Tasks 样例展示了在区域内部并行处理任务,并添加了错误处理功能,可以在自动或手动修复问题后继续重新运行这些任务。 以下图片显示了 Tasks 状态机:
在高阶层面上,此状态机中:
-
我们将尽力进入
READY状态,以便可以使用RUN事件来执行任务。 -
The
TASKS状态,由三个独立区域组成,已被放置在FORK和JOIN状态之间,这将导致这些区域进入初始状态,并通过其结束状态连接在一起。 -
从
JOIN状态,我们自动进入CHOICE状态,在该状态下会检查扩展状态变量中的错误标志。任务可以设置这些标志,并且这样做使得CHOICE状态能够进入ERROR状态,在此状态下可以自动或手动处理错误。 -
The
AUTOMATIC状态在ERROR中可以尝试自动修复一个错误,如果成功的话会回到READY状态。如果错误是无法自动处理的,则需要用户干预,并且通过FALLBACK事件将机器置于MANUAL状态。
以下列表显示了定义可能状态的枚举:
public enum States {
    READY,
    FORK, JOIN, CHOICE,
    TASKS, T1, T1E, T2, T2E, T3, T3E,
    ERROR, AUTOMATIC, MANUAL
}
以下列表显示了定义事件的枚举:
public enum Events {
    RUN, FALLBACK, CONTINUE, FIX;
}
The following listing configures the possible states:
@Override
public void configure(StateMachineStateConfigurer<States, Events> states)
		throws Exception {
	states
		.withStates()
			.initial(States.READY)
			.fork(States.FORK)
			.state(States.TASKS)
			.join(States.JOIN)
			.choice(States.CHOICE)
			.state(States.ERROR)
			.and()
			.withStates()
				.parent(States.TASKS)
				.initial(States.T1)
				.end(States.T1E)
				.and()
			.withStates()
				.parent(States.TASKS)
				.initial(States.T2)
				.end(States.T2E)
				.and()
			.withStates()
				.parent(States.TASKS)
				.initial(States.T3)
				.end(States.T3E)
				.and()
			.withStates()
				.parent(States.ERROR)
				.initial(States.AUTOMATIC)
				.state(States.AUTOMATIC, automaticAction(), null)
				.state(States.MANUAL);
}
以下列表配置了可能的转换:
@Override
public void configure(StateMachineTransitionConfigurer<States, Events> transitions)
		throws Exception {
	transitions
		.withExternal()
			.source(States.READY).target(States.FORK)
			.event(Events.RUN)
			.and()
		.withFork()
			.source(States.FORK).target(States.TASKS)
			.and()
		.withExternal()
			.source(States.T1).target(States.T1E)
			.and()
		.withExternal()
			.source(States.T2).target(States.T2E)
			.and()
		.withExternal()
			.source(States.T3).target(States.T3E)
			.and()
		.withJoin()
			.source(States.TASKS).target(States.JOIN)
			.and()
		.withExternal()
			.source(States.JOIN).target(States.CHOICE)
			.and()
		.withChoice()
			.source(States.CHOICE)
			.first(States.ERROR, tasksChoiceGuard())
			.last(States.READY)
			.and()
		.withExternal()
			.source(States.ERROR).target(States.READY)
			.event(Events.CONTINUE)
			.and()
		.withExternal()
			.source(States.AUTOMATIC).target(States.MANUAL)
			.event(Events.FALLBACK)
			.and()
		.withInternal()
			.source(States.MANUAL)
			.action(fixAction())
			.event(Events.FIX);
}
以下条件语句将一个选择入口发送到ERROR状态,并且如果发生错误则需要返回TRUE。该条件检查所有扩展状态变量(T1, T2, 和 T3)是否为TRUE。
@Bean
public Guard<States, Events> tasksChoiceGuard() {
	return new Guard<States, Events>() {

		@Override
		public boolean evaluate(StateContext<States, Events> context) {
			Map<Object, Object> variables = context.getExtendedState().getVariables();
			return !(ObjectUtils.nullSafeEquals(variables.get("T1"), true)
					&& ObjectUtils.nullSafeEquals(variables.get("T2"), true)
					&& ObjectUtils.nullSafeEquals(variables.get("T3"), true));
		}
	};
}
以下操作会向状态机发送事件,请求下一步是回退还是返回到就绪状态。
@Bean
public Action<States, Events> automaticAction() {
	return new Action<States, Events>() {

		@Override
		public void execute(StateContext<States, Events> context) {
			Map<Object, Object> variables = context.getExtendedState().getVariables();
			if (ObjectUtils.nullSafeEquals(variables.get("T1"), true)
					&& ObjectUtils.nullSafeEquals(variables.get("T2"), true)
					&& ObjectUtils.nullSafeEquals(variables.get("T3"), true)) {
				context.getStateMachine()
					.sendEvent(Mono.just(MessageBuilder
						.withPayload(Events.CONTINUE).build()))
					.subscribe();
			} else {
				context.getStateMachine()
					.sendEvent(Mono.just(MessageBuilder
						.withPayload(Events.FALLBACK).build()))
					.subscribe();
			}
		}
	};
}

@Bean
public Action<States, Events> fixAction() {
	return new Action<States, Events>() {

		@Override
		public void execute(StateContext<States, Events> context) {
			Map<Object, Object> variables = context.getExtendedState().getVariables();
			variables.put("T1", true);
			variables.put("T2", true);
			variables.put("T3", true);
			context.getStateMachine()
				.sendEvent(Mono.just(MessageBuilder
					.withPayload(Events.CONTINUE).build()))
				.subscribe();
		}
	};
}
默认区域执行是同步的,意味着一个区域会顺序地被处理。在这个示例中我们仅仅希望所有的任务区域能够并行处理。这可以通过定义RegionExecutionPolicy来实现:
@Override
public void configure(StateMachineConfigurationConfigurer<States, Events> config)
		throws Exception {
	config
		.withConfiguration()
			.regionExecutionPolicy(RegionExecutionPolicy.PARALLEL);
}
以下示例展示了这个状态机实际上是如何工作的:
sm>start
State machine started
Entry state READY

sm>run
Exit state READY
Entry state TASKS
run task on T2
run task on T1
run task on T3
run task on T2 done
run task on T1 done
run task on T3 done
Entry state T2
Entry state T1
Entry state T3
Exit state T2
Exit state T1
Exit state T3
Entry state T3E
Entry state T1E
Entry state T2E
Exit state TASKS
Entry state READY
在之前的列表中,我们可以看到任务会多次运行。 在下一个列表中,我们将介绍错误:
sm>tasks list
Tasks {T1=true, T3=true, T2=true}

sm>tasks fail T1

sm>tasks list
Tasks {T1=false, T3=true, T2=true}

sm>tasks run
Entry state TASKS
run task on T1
run task on T3
run task on T2
run task on T1 done
run task on T3 done
run task on T2 done
Entry state T1
Entry state T3
Entry state T2
Entry state T1E
Entry state T2E
Entry state T3E
Exit state TASKS
Entry state JOIN
Exit state JOIN
Entry state ERROR
Entry state AUTOMATIC
Exit state AUTOMATIC
Exit state ERROR
Entry state READY
在前一个示例中,如果模拟任务 T1 失败,它会自动修复。 在下一个示例中,我们将引入更多的错误:
sm>tasks list
Tasks {T1=true, T3=true, T2=true}

sm>tasks fail T2

sm>tasks run
Entry state TASKS
run task on T2
run task on T1
run task on T3
run task on T2 done
run task on T1 done
run task on T3 done
Entry state T2
Entry state T1
Entry state T3
Entry state T1E
Entry state T2E
Entry state T3E
Exit state TASKS
Entry state JOIN
Exit state JOIN
Entry state ERROR
Entry state AUTOMATIC
Exit state AUTOMATIC
Entry state MANUAL

sm>tasks fix
Exit state MANUAL
Exit state ERROR
Entry state READY在上面的示例中,如果模拟任务T2或T3失败,则状态机将进入MANUAL状态,在此状态下需要手动解决故障,才能返回到READY状态。
43. 洗衣机
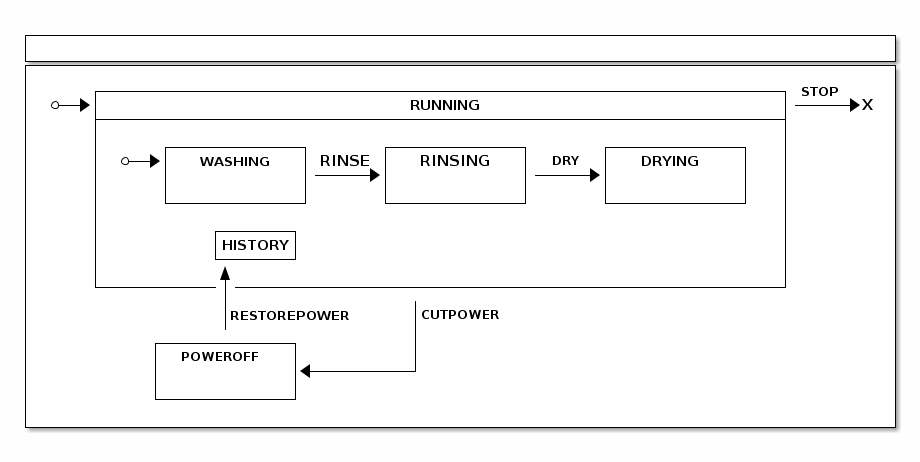
The washer sample demonstrates how to use a history state to recover a running state configuration with a simulated power-off situation.
任何人使用过洗衣机的人都知道,如果你在某个时候暂停了程序, 当再次恢复时,它会从同一状态继续运行。 你可以通过使用历史伪状态在状态机中实现类似的行为。 以下图片展示了我们为洗衣机设计的状态机:
以下列表显示了定义可能状态的枚举:
public enum States {
    RUNNING, HISTORY, END,
    WASHING, RINSING, DRYING,
    POWEROFF
}
以下列表显示了定义事件的枚举:
public enum Events {
    RINSE, DRY, STOP,
    RESTOREPOWER, CUTPOWER
}
The following listing configures the possible states:
@Override
public void configure(StateMachineStateConfigurer<States, Events> states)
		throws Exception {
	states
		.withStates()
			.initial(States.RUNNING)
			.state(States.POWEROFF)
			.end(States.END)
			.and()
			.withStates()
				.parent(States.RUNNING)
				.initial(States.WASHING)
				.state(States.RINSING)
				.state(States.DRYING)
				.history(States.HISTORY, History.SHALLOW);
}
以下列表配置了可能的转换:
@Override
public void configure(StateMachineTransitionConfigurer<States, Events> transitions)
		throws Exception {
	transitions
		.withExternal()
			.source(States.WASHING).target(States.RINSING)
			.event(Events.RINSE)
			.and()
		.withExternal()
			.source(States.RINSING).target(States.DRYING)
			.event(Events.DRY)
			.and()
		.withExternal()
			.source(States.RUNNING).target(States.POWEROFF)
			.event(Events.CUTPOWER)
			.and()
		.withExternal()
			.source(States.POWEROFF).target(States.HISTORY)
			.event(Events.RESTOREPOWER)
			.and()
		.withExternal()
			.source(States.RUNNING).target(States.END)
			.event(Events.STOP);
}
以下示例展示了这个状态机实际上是如何工作的:
sm>start
Entry state RUNNING
Entry state WASHING
State machine started

sm>event RINSE
Exit state WASHING
Entry state RINSING
Event RINSE send

sm>event DRY
Exit state RINSING
Entry state DRYING
Event DRY send

sm>event CUTPOWER
Exit state DRYING
Exit state RUNNING
Entry state POWEROFF
Event CUTPOWER send

sm>event RESTOREPOWER
Exit state POWEROFF
Entry state RUNNING
Entry state WASHING
Entry state DRYING
Event RESTOREPOWER send
在之前的运行中:
-
状态机已启动,导致机器初始化。
-
状态机转移到洗涤状态。
-
状态机进入干燥状态。
-
状态机切断电源并进入POWEROFF状态。
-
状态从 HISTORY 状态恢复,这会将状态机带回其先前已知的状态。
持久化
Persist 是一个示例,它使用了 Persist Recipes来演示如何通过状态机控制数据库条目的更新逻辑。
以下图像展示了状态机逻辑与配置:
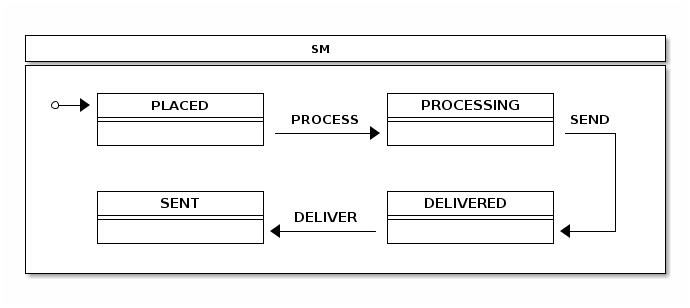
The following listing shows the state machine configuration:
@Configuration
@EnableStateMachine
static class StateMachineConfig
		extends StateMachineConfigurerAdapter<String, String> {

	@Override
	public void configure(StateMachineStateConfigurer<String, String> states)
			throws Exception {
		states
			.withStates()
				.initial("PLACED")
				.state("PROCESSING")
				.state("SENT")
				.state("DELIVERED");
	}

	@Override
	public void configure(StateMachineTransitionConfigurer<String, String> transitions)
			throws Exception {
		transitions
			.withExternal()
				.source("PLACED").target("PROCESSING")
				.event("PROCESS")
				.and()
			.withExternal()
				.source("PROCESSING").target("SENT")
				.event("SEND")
				.and()
			.withExternal()
				.source("SENT").target("DELIVERED")
				.event("DELIVER");
	}

}
以下配置创建了PersistStateMachineHandler:
@Configuration
static class PersistHandlerConfig {

	@Autowired
	private StateMachine<String, String> stateMachine;

	@Bean
	public Persist persist() {
		return new Persist(persistStateMachineHandler());
	}

	@Bean
	public PersistStateMachineHandler persistStateMachineHandler() {
		return new PersistStateMachineHandler(stateMachine);
	}

}
The following listing shows the Order class used with this sample:
public static class Order {
	int id;
	String state;

	public Order(int id, String state) {
		this.id = id;
		this.state = state;
	}

	@Override
	public String toString() {
		return "Order [id=" + id + ", state=" + state + "]";
	}

}
以下示例展示了状态机的输出:
sm>list
Order [id=1, state=PLACED]
Order [id=2, state=PROCESSING]
Order [id=3, state=SENT]
Order [id=4, state=DELIVERED]

sm>process 1
Exit state PLACED
Entry state PROCESSING

sm>list
Order [id=2, state=PROCESSING]
Order [id=3, state=SENT]
Order [id=4, state=DELIVERED]
Order [id=1, state=PROCESSING]

sm>deliver 3
Exit state SENT
Entry state DELIVERED

sm>list
Order [id=2, state=PROCESSING]
Order [id=4, state=DELIVERED]
Order [id=1, state=PROCESSING]
Order [id=3, state=DELIVERED]
在前一次运行中,状态机:
-
以下是从现有嵌入式数据库中列出的行,该数据库已经填充了示例数据。
-
请求将订单
1更新为PROCESSING状态。 -
再次列出数据库条目,看看状态是否已从
PLACED更改为PROCESSING。 -
更新订单
3以将其状态从SENT改为DELIVERED。
|
您可能想知道数据库在哪里,因为在示例代码中根本没有迹象。该示例基于Spring Boot,并且因为必要的类在classpath中,因此会自动创建一个嵌入式的 Spring Boot甚至会创建 |
接下来,我们需要处理状态变更。以下代码片段展示了我们是如何做到的:
public void change(int order, String event) {
	Order o = jdbcTemplate.queryForObject("select id, state from orders where id = ?",
			new RowMapper<Order>() {
				public Order mapRow(ResultSet rs, int rowNum) throws SQLException {
					return new Order(rs.getInt("id"), rs.getString("state"));
				}
			}, new Object[] { order });
	handler.handleEventWithStateReactively(MessageBuilder
			.withPayload(event).setHeader("order", order).build(), o.state)
		.subscribe();
}
最后,我们使用一个 `PersistStateChangeListener` 来更新数据库,如以下列表所示:
private class LocalPersistStateChangeListener implements PersistStateChangeListener {

	@Override
	public void onPersist(State<String, String> state, Message<String> message,
			Transition<String, String> transition, StateMachine<String, String> stateMachine) {
		if (message != null && message.getHeaders().containsKey("order")) {
			Integer order = message.getHeaders().get("order", Integer.class);
			jdbcTemplate.update("update orders set state = ? where id = ?", state.getId(), order);
		}
	}
}
45. Zookeeper
Zookeeper 是一个分布式版本的 Turnstile 样本。
这个示例需要一个外部Zookeeper实例,该实例可以从localhost访问,并且使用默认端口和设置。 |
Configuration of this sample is almost the same as the turnstile sample. We
add only the configuration for the distributed state machine where we
configure StateMachineEnsemble, as the following listing shows:
@Override
public void configure(StateMachineConfigurationConfigurer<String, String> config) throws Exception {
	config
		.withDistributed()
			.ensemble(stateMachineEnsemble());
}
实际的 StateMachineEnsemble 需要作为 bean 创建, 同时还要创建 CuratorFramework 客户端,如下例所示:
@Bean
public StateMachineEnsemble<String, String> stateMachineEnsemble() throws Exception {
	return new ZookeeperStateMachineEnsemble<String, String>(curatorClient(), "/foo");
}

@Bean
public CuratorFramework curatorClient() throws Exception {
	CuratorFramework client = CuratorFrameworkFactory.builder().defaultData(new byte[0])
			.retryPolicy(new ExponentialBackoffRetry(1000, 3))
			.connectString("localhost:2181").build();
	client.start();
	return client;
}
对于下一个示例,我们需要创建两个不同的Shell实例。 首先需要创建一个实例,看看会发生什么,然后再创建第二个实例。 以下命令启动Shell实例(请记住现在只需启动一个实例):
@n1:~# java -jar spring-statemachine-samples-zookeeper-4.0.1.jar当状态机启动时,其初始状态为
LOCKED。然后它发送一个事件
COIN 进入状态
UNLOCKED。
以下示例说明了会发生什么:
sm>start
Entry state LOCKED
State machine started

sm>event COIN
Exit state LOCKED
Entry state UNLOCKED
Event COIN send

sm>state
UNLOCKED
现在您可以在第二个终端实例中打开一个新的状态机,
通过使用启动第一个状态机的相同命令。你应该会看到
分布式状态(UNLOCKED)被进入而不是默认初始状态(LOCKED)。
The following example shows the state machine and its output:
sm>start
State machine started

sm>state
UNLOCKED
然后从任意一个命令行界面(接下来的示例中我们使用第二个实例),发送一个
PUSH 事件以从 UNLOCKED 状态转换到 LOCKED 状态。
以下示例展示了状态机命令及其输出:
sm>event PUSH
Exit state UNLOCKED
Entry state LOCKED
Event PUSH send
在另一个外壳(如果你在第二个外壳中运行了前面的命令,则是在第一个外壳), 你应该会看到状态自动改变, 这是基于Zookeeper保持的分布式状态。 以下示例显示了状态机命令及其输出:
sm>Exit state UNLOCKED
Entry state LOCKED
46. 网站
这是使用 Zookeeper 状态机处理分布式状态的 Web 分布式状态机示例。参见Zookeeper.
| 这个示例旨在在一个或多浏览器会话中,针对一个或多个不同的主机运行。 |
此示例使用了来自 展示 的修改过的状态机结构来处理分布式状态机。下面的图片显示了状态机逻辑:
由于这是一个样本,因此每个单独的样本实例都期望可以从本地主机获取一个Zookeeper状态机的实例。 |
此演示使用了一个示例,启动了三个不同的样本实例。
如果在同一主机上运行不同实例,则需要通过在命令中添加--server.port=<myport>来区分每个实例使用的端口。
否则,默认情况下每个实例使用的端口为8080。
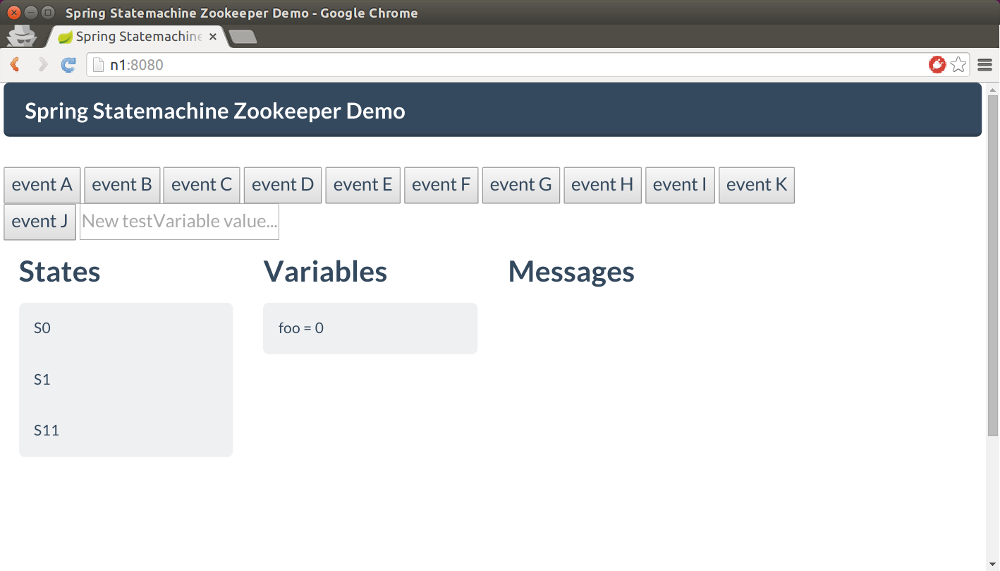
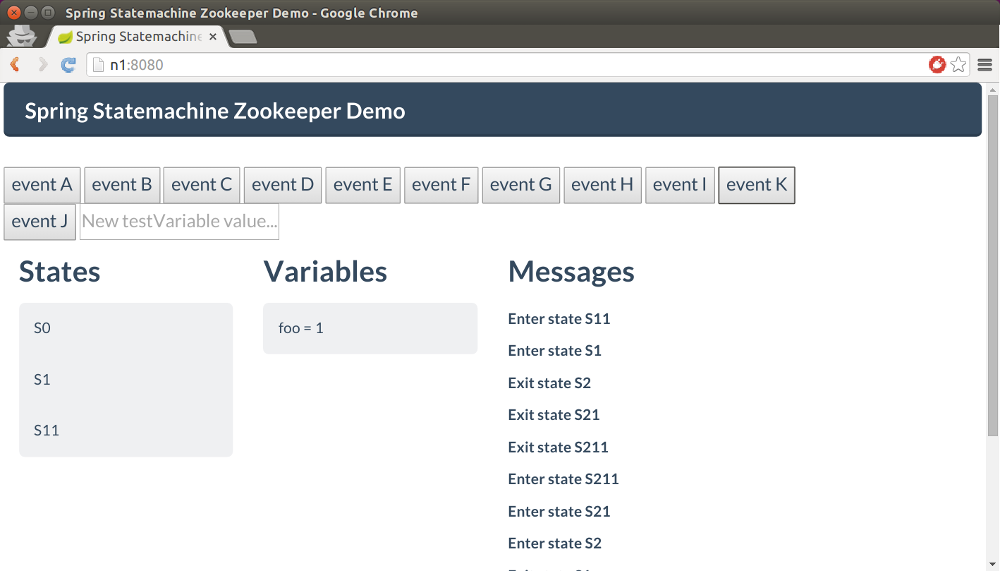
在该示例运行中,我们有三个主机:n1、n2 和 n3。每个主机上运行着一个本地的 zookeeper 实例以及在一个端口 8080 上运行的一个状态机样本。
在不同的终端中,通过运行以下命令启动三个不同的状态机:
# java -jar spring-statemachine-samples-web-4.0.1.jar当所有实例运行时,您应该会看到通过浏览器访问它们时显示类似的信息。状态应为S0、S1和S11。名为foo的扩展状态变量的值应为0。主状态是S11。
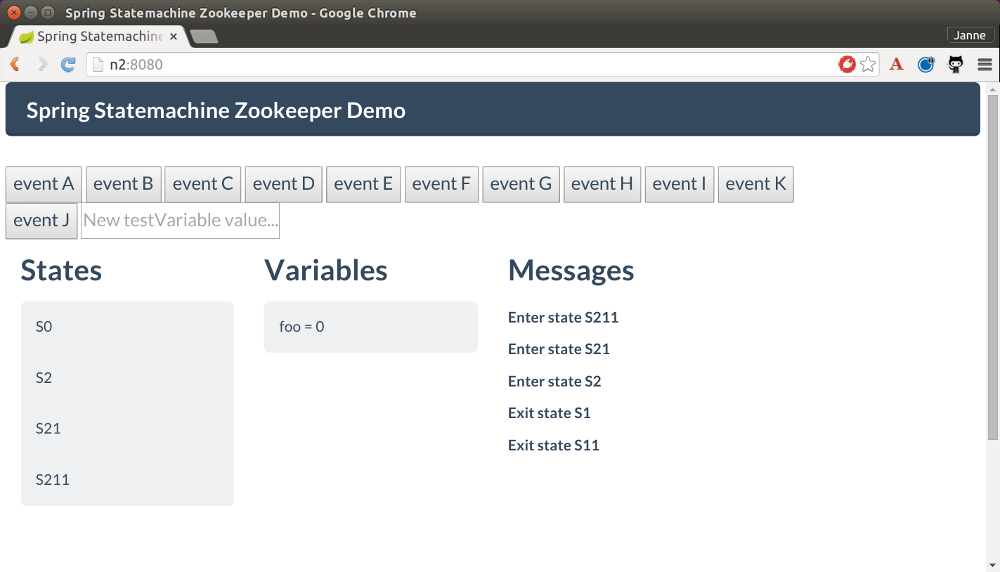
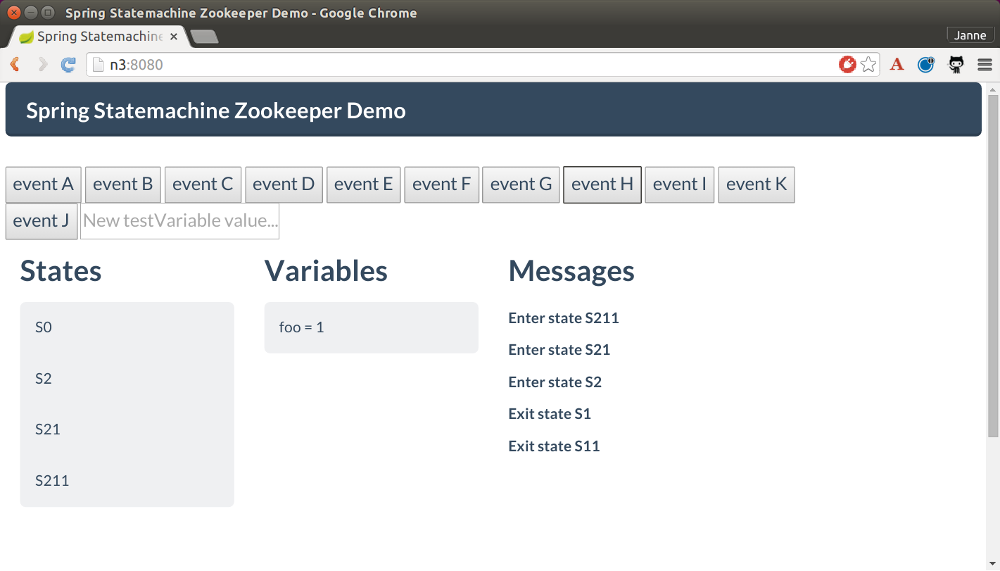
当您在任何浏览器窗口中按下Event C按钮时,分布式状态会更改为S211,,这是与类型为C的事件相关的转换所表示的目标状态。以下图片显示了此变化:
现在我们可以按下 Event H 按钮,观察所有状态机上的内部转换如何运行以将命名为 foo 的扩展状态变量的值从 0 更改为 1。这一改变首先在接收到事件的状态机上完成,然后传播到其他状态机。你应该只看到名为 foo 的变量的值从 0 改变为 1。
最终,我们可以发送 `0`,这会使状态机的状态回到状态 `1`。您应该会在所有浏览器中看到这一结果。以下图片显示了在某个浏览器中的效果:
47. 作用域
Scope是一个使用会话作用域的状态机示例,用于为每位用户提供独立的实例。</p> <p>以下图片显示了Scope状态机内的状态和事件:
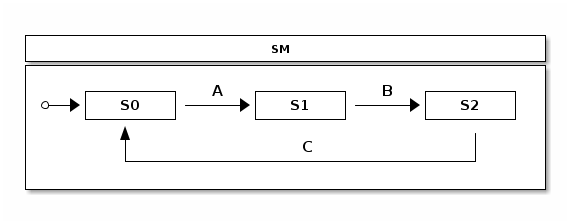
这个简单的状态机有三个状态:S0,S1 和 S2。
这些状态之间的转换由三个事件控制:A、B 和 C。
要启动状态机,请在终端中运行以下命令:
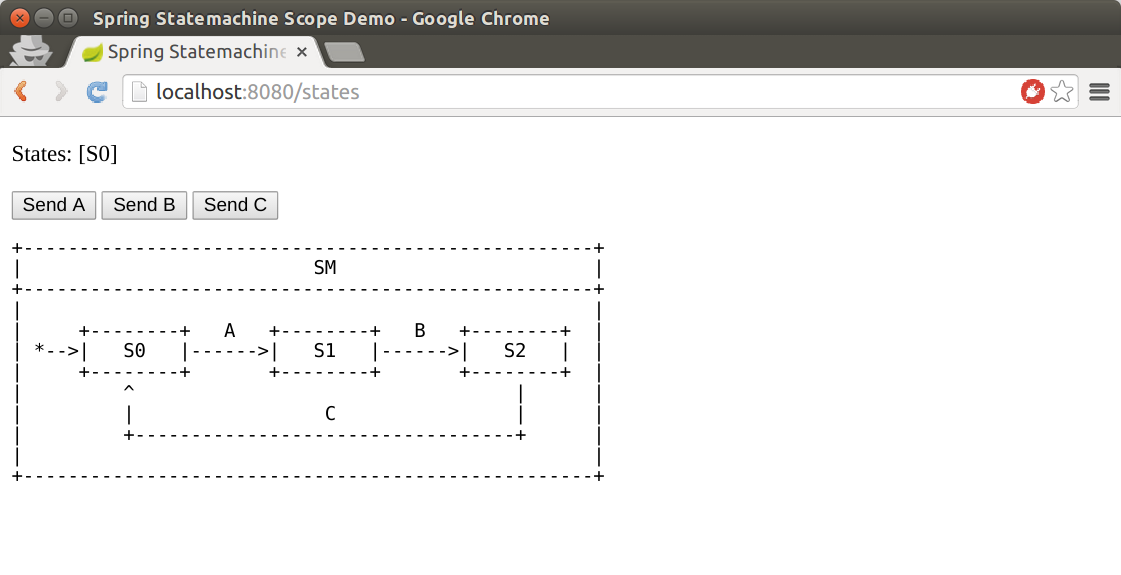
# java -jar spring-statemachine-samples-scope-4.0.1.jar当实例运行时,您可以在浏览器中打开它并与其状态机进行交互。如果在同一时间在不同的浏览器中打开同一个页面(例如,在Chrome和Firefox中),每个用户会话应该都会获得一个新的状态机实例。 以下图片显示了在浏览器中的状态机:
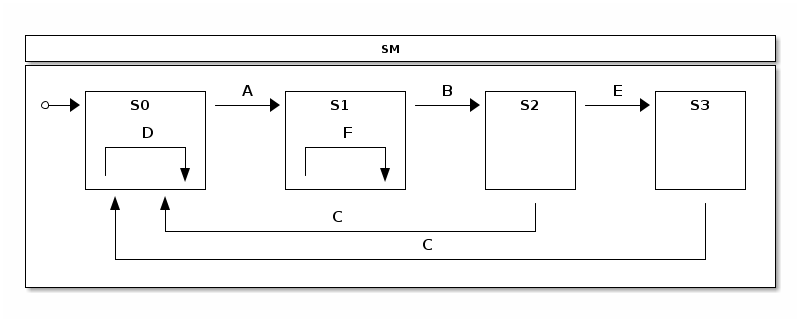
48. 安全性
安全是一个状态机示例,使用了几乎所有可能的安全组合方式来保护状态机。它保护发送事件、转换和动作。 以下图片展示了状态机的状态和事件:
要启动状态机,请运行以下命令:
# java -jar spring-statemachine-samples-secure-4.0.1.jar我们通过要求用户具有角色USER来确保事件发送的安全性。
Spring Security 确保其他用户无法向此状态机发送事件。
以下代码片段用于安全地发送事件:
@Override
public void configure(StateMachineConfigurationConfigurer<States, Events> config)
		throws Exception {
	config
		.withConfiguration()
			.autoStartup(true)
			.and()
		.withSecurity()
			.enabled(true)
			.event("hasRole('USER')");
}
在这个示例中我们定义了两个用户:<br>
-
一个名为
user的用户,其角色为USER -
一个名为
admin的用户具有两个角色:USER和ADMIN
The password for both users is password.
The following listing configures the two users:
static class SecurityConfig {

	@Bean
	public InMemoryUserDetailsManager userDetailsService() {
		UserDetails user = User.withDefaultPasswordEncoder()
				.username("user")
				.password("password")
				.roles("USER")
				.build();
		UserDetails admin = User.withDefaultPasswordEncoder()
				.username("admin")
				.password("password")
				.roles("USER", "ADMIN")
				.build();
		return new InMemoryUserDetailsManager(user, admin);
	}
}
我们根据示例开头的状态图定义了各种状态之间的转换。只有具有活动ADMIN角色的用户可以运行从S2到S3的外部转换。同样,只有ADMIN角色才能运行从S1状态的内部转换。
以下列表定义了这些转换及其安全性:
@Override
public void configure(StateMachineTransitionConfigurer<States, Events> transitions)
		throws Exception {
	transitions
		.withExternal()
			.source(States.S0).target(States.S1).event(Events.A)
			.and()
		.withExternal()
			.source(States.S1).target(States.S2).event(Events.B)
			.and()
		.withExternal()
			.source(States.S2).target(States.S0).event(Events.C)
			.and()
		.withExternal()
			.source(States.S2).target(States.S3).event(Events.E)
			.secured("ROLE_ADMIN", ComparisonType.ANY)
			.and()
		.withExternal()
			.source(States.S3).target(States.S0).event(Events.C)
			.and()
		.withInternal()
			.source(States.S0).event(Events.D)
			.action(adminAction())
			.and()
		.withInternal()
			.source(States.S1).event(Events.F)
			.action(transitionAction())
			.secured("ROLE_ADMIN", ComparisonType.ANY);
}
The following listing uses a method called adminAction whose return type is Action to
specify that the action is secured with a role of ADMIN:
@Scope(proxyMode = ScopedProxyMode.TARGET_CLASS)
@Bean
public Action<States, Events> adminAction() {
	return new Action<States, Events>() {

		@Secured("ROLE_ADMIN")
		@Override
		public void execute(StateContext<States, Events> context) {
			log.info("Executed only for admin role");
		}
	};
}
以下的代码在状态`1`接收到事件`2`时执行内部转换到状态`0`。
@Bean
public Action<States, Events> transitionAction() {
	return new Action<States, Events>() {

		@Override
		public void execute(StateContext<States, Events> context) {
			log.info("Executed only for admin role");
		}
	};
}
The transition itself is secured with a
role of ADMIN, so this transition does not run if the current user
does not have that role.
49. 事件服务
The event service example shows how you can use state machine concepts as a processing engine for events. This sample evolved from a question:
我可以使用Spring StateMachine作为微服务来向不同的状态机实例发送事件吗?实际上,Spring StateMachine可以向数百万个不同的状态机实例发送事件。
此示例使用一个Redis实例来持久化状态机实例。
显然,在JVM中实例化一百万种状态机将会因为内存限制而是一个糟糕的想法。这促使了Spring Statemachine中的其他功能,这些功能允许你持久化一个StateMachineContext并重用现有的实例。
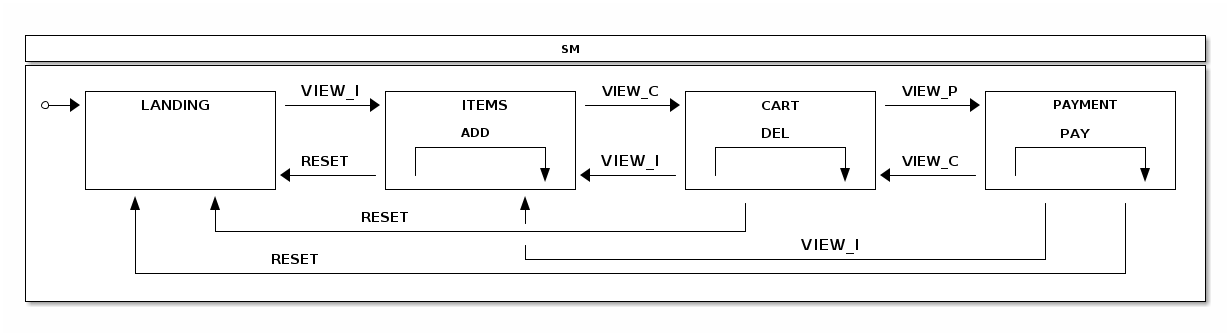
对于这个示例,我们假设一个购物应用会向一个单独的微服务发送不同类型PageView事件,然后该微服务通过使用状态机来跟踪用户行为。以下图片展示了状态模型,其中包括几个表示用户浏览商品列表、添加和移除购物车中的项目、进入支付页面以及发起支付操作的状态:
以下是一个实际的购物应用会将这些事件发送到此服务的例子(例如)通过使用rest调用。更多关于这个的内容稍后介绍。
记得重点是构建一个应用程序,该应用暴露一个REST API,用户可以通过它发送事件,这些事件可以由状态机为每个请求处理。 |
The following state machine configuration models what we have in a
state chart. Various actions update the state machine’s Extended
State to track the number of entries into various states and also how
many times the internal transitions for ADD and DEL are called and whether
PAY has been executed:
@Bean(name = "stateMachineTarget")
@Scope(scopeName="prototype")
public StateMachine<States, Events> stateMachineTarget() throws Exception {
	Builder<States, Events> builder = StateMachineBuilder.<States, Events>builder();

	builder.configureConfiguration()
		.withConfiguration()
			.autoStartup(true);

	builder.configureStates()
		.withStates()
			.initial(States.HOME)
			.states(EnumSet.allOf(States.class));

	builder.configureTransitions()
		.withInternal()
			.source(States.ITEMS).event(Events.ADD)
			.action(addAction())
			.and()
		.withInternal()
			.source(States.CART).event(Events.DEL)
			.action(delAction())
			.and()
		.withInternal()
			.source(States.PAYMENT).event(Events.PAY)
			.action(payAction())
			.and()
		.withExternal()
			.source(States.HOME).target(States.ITEMS)
			.action(pageviewAction())
			.event(Events.VIEW_I)
			.and()
		.withExternal()
			.source(States.CART).target(States.ITEMS)
			.action(pageviewAction())
			.event(Events.VIEW_I)
			.and()
		.withExternal()
			.source(States.ITEMS).target(States.CART)
			.action(pageviewAction())
			.event(Events.VIEW_C)
			.and()
		.withExternal()
			.source(States.PAYMENT).target(States.CART)
			.action(pageviewAction())
			.event(Events.VIEW_C)
			.and()
		.withExternal()
			.source(States.CART).target(States.PAYMENT)
			.action(pageviewAction())
			.event(Events.VIEW_P)
			.and()
		.withExternal()
			.source(States.ITEMS).target(States.HOME)
			.action(resetAction())
			.event(Events.RESET)
			.and()
		.withExternal()
			.source(States.CART).target(States.HOME)
			.action(resetAction())
			.event(Events.RESET)
			.and()
		.withExternal()
			.source(States.PAYMENT).target(States.HOME)
			.action(resetAction())
			.event(Events.RESET);

	return builder.build();
}
现在不要关注stateMachineTarget或
@Scope,因为我们会在本节后面详细解释它们。
我们设置了一个RedisConnectionFactory,默认为
localhost 和默认端口。我们使用了StateMachinePersist并结合一个
RepositoryStateMachinePersist 实现。最后,我们创建了一个
RedisStateMachinePersister,它使用了一个之前创建的
StateMachinePersist bean。
这些内容然后被用于处理REST调用,如下所示的示例中所见:
@Bean
public RedisConnectionFactory redisConnectionFactory() {
	return new JedisConnectionFactory();
}

@Bean
public StateMachinePersist<States, Events, String> stateMachinePersist(RedisConnectionFactory connectionFactory) {
	RedisStateMachineContextRepository<States, Events> repository =
			new RedisStateMachineContextRepository<States, Events>(connectionFactory);
	return new RepositoryStateMachinePersist<States, Events>(repository);
}

@Bean
public RedisStateMachinePersister<States, Events> redisStateMachinePersister(
		StateMachinePersist<States, Events, String> stateMachinePersist) {
	return new RedisStateMachinePersister<States, Events>(stateMachinePersist);
}
我们创建了一个名为stateMachineTarget的 bean。
状态机实例化是一项相对昂贵的操作,因此最好尝试使用池而不是为每个请求每次都实例化一个新的实例。为此,首先
创建一个 poolTargetSource来包装 stateMachineTarget并以最大容量为三的方式将其放入池中。然后通过使用 request 范围的 ProxyFactoryBean 将这个 poolTargetSource 代理。这意味着每个REST请求都会从 bean 工厂获取一个已池化的状态机实例。后来,我们将展示这些实例如何使用。
以下代码片段显示了我们是如何创建 ProxyFactoryBean 并设置目标源的:
@Bean
@Scope(value = "request", proxyMode = ScopedProxyMode.TARGET_CLASS)
public ProxyFactoryBean stateMachine() {
	ProxyFactoryBean pfb = new ProxyFactoryBean();
	pfb.setTargetSource(poolTargetSource());
	return pfb;
}
The following listing shows we set the maximum size and set the target bean name:
@Bean
public CommonsPool2TargetSource poolTargetSource() {
	CommonsPool2TargetSource pool = new CommonsPool2TargetSource();
	pool.setMaxSize(3);
	pool.setTargetBeanName("stateMachineTarget");
	return pool;
}
现在我们可以进行实际演示。您需要在本地主机上运行一个带有默认设置的 Redis 服务器,然后通过运行以下命令来启动基于 Boot 的示例应用程序:
# java -jar spring-statemachine-samples-eventservice-4.0.1.jar在浏览器中,您将看到以下内容:
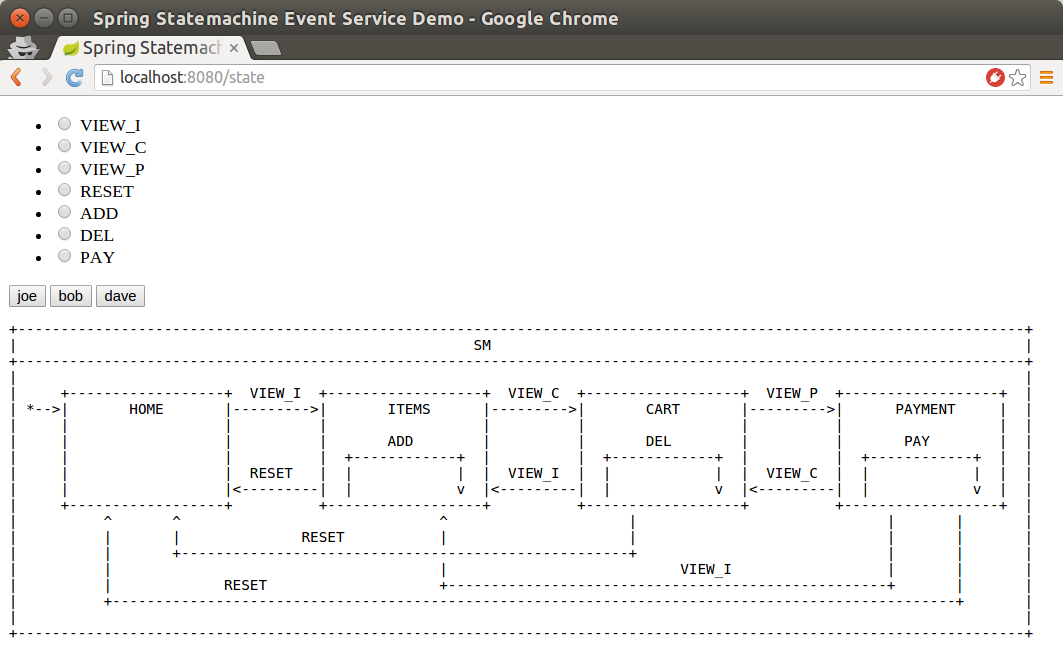
在该用户界面中,您可以使用三个用户:joe、bob 和 dave。点击按钮会显示当前状态和扩展状态。在点击按钮前勾选一个单选按钮会发送特定事件给该用户。这种安排可以让您尝试不同的操作。
在我们的StateMachineController中,我们使用@Autowired注入了StateMachine和
StateMachinePersister。StateMachine是request作用域的bean,因此每次请求都会得到一个新的实例,而StateMachinePersist是一个普通的单例bean。
以下示例中我们注入了StateMachine和
StateMachinePersist:
@Autowired
private StateMachine<States, Events> stateMachine;

@Autowired
private StateMachinePersister<States, Events, String> stateMachinePersister;
在以下示例中,feedAndGetState用于UI以执行与实际的REST API可能执行的相同操作:
@RequestMapping("/state")
public String feedAndGetState(@RequestParam(value = "user", required = false) String user,
		@RequestParam(value = "id", required = false) Events id, Model model) throws Exception {
	model.addAttribute("user", user);
	model.addAttribute("allTypes", Events.values());
	model.addAttribute("stateChartModel", stateChartModel);
	// we may get into this page without a user so
	// do nothing with a state machine
	if (StringUtils.hasText(user)) {
		resetStateMachineFromStore(user);
		if (id != null) {
			feedMachine(user, id);
		}
		model.addAttribute("states", stateMachine.getState().getIds());
		model.addAttribute("extendedState", stateMachine.getExtendedState().getVariables());
	}
	return "states";
}
在以下示例中,feedPageview 是一个接受带有 JSON 内容的 POST 请求的方法 REST。
@RequestMapping(value = "/feed",method= RequestMethod.POST)
@ResponseStatus(HttpStatus.OK)
public void feedPageview(@RequestBody(required = true) Pageview event) throws Exception {
	Assert.notNull(event.getUser(), "User must be set");
	Assert.notNull(event.getId(), "Id must be set");
	resetStateMachineFromStore(event.getUser());
	feedMachine(event.getUser(), event.getId());
}
在以下代码示例中,feedMachine 向一个 StateMachine 发送了一个事件,并通过使用 StateMachinePersister 来保持其状态:
private void feedMachine(String user, Events id) throws Exception {
	stateMachine
		.sendEvent(Mono.just(MessageBuilder
			.withPayload(id).build()))
		.blockLast();
	stateMachinePersister.persist(stateMachine, "testprefix:" + user);
}
以下代码示例展示了用于恢复特定用户状态机的resetStateMachineFromStore:
private StateMachine<States, Events> resetStateMachineFromStore(String user) throws Exception {
	return stateMachinePersister.restore(stateMachine, "testprefix:" + user);
}
正如你通常会通过使用 UI 来发送事件一样,你也可以通过使用 REST 调用来实现同样的效果, 以下 curl 命令展示了这一点:
# curl http://localhost:8080/feed -H "Content-Type: application/json" --data '{"user":"joe","id":"VIEW_I"}'在此步骤中,您应该已经将内容存储在Redis中,并设置了键为
testprefix:joe。以下是一个示例:
$ ./redis-cli
127.0.0.1:6379> KEYS *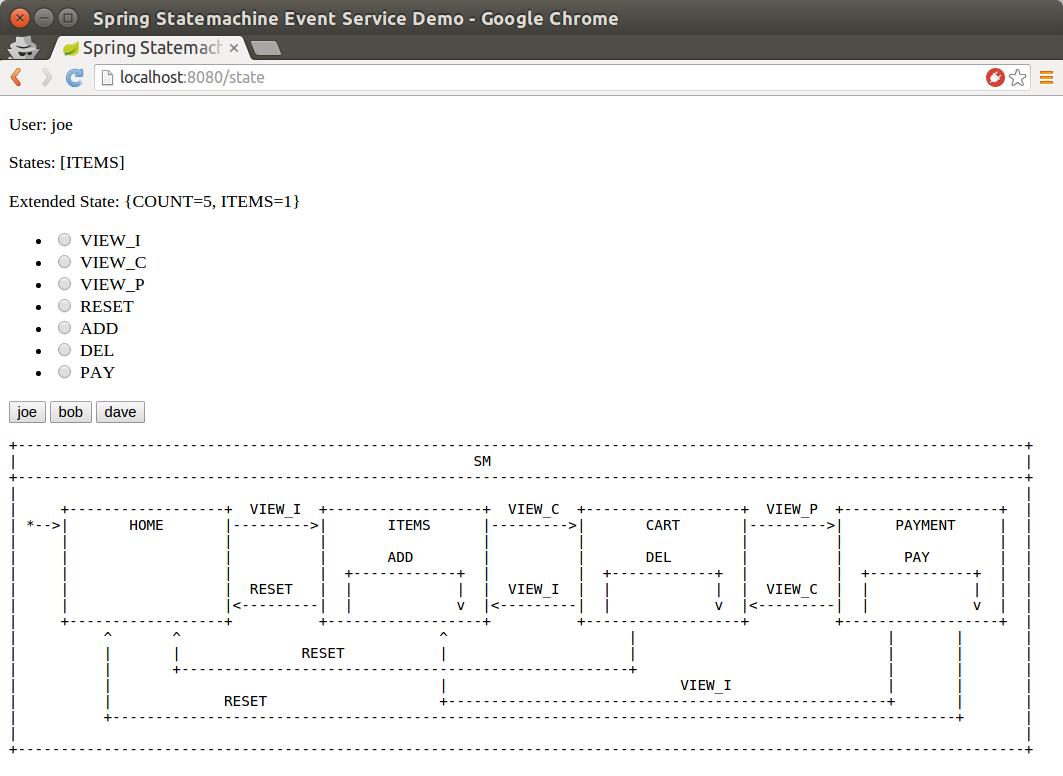
1) "testprefix:joe"以下三个图像展示了当状态从HOME变为ITEMS以及ADD动作被执行时的情况。
以下展示了发送的ADD事件:

你现在仍然处于ITEMS状态,而内部转换导致了COUNT扩展状态变量增加到1,如下图所示:

现在您可以多次运行以下curl REST 调用(或通过界面操作),并观察COUNT变量随每次调用递增:
# curl http://localhost:8080/feed -H "Content-Type: application/json" # --data '{"user":"joe","id":"ADD"}'以下图片展示了这些操作的结果:
部署
The deploy example shows how you can use state machine concepts with UML modeling to provide a generic error handling state. This state machine is a relatively complex example of how you can use various features to provide a centralized error handling concept. The following image shows the deploy state machine:
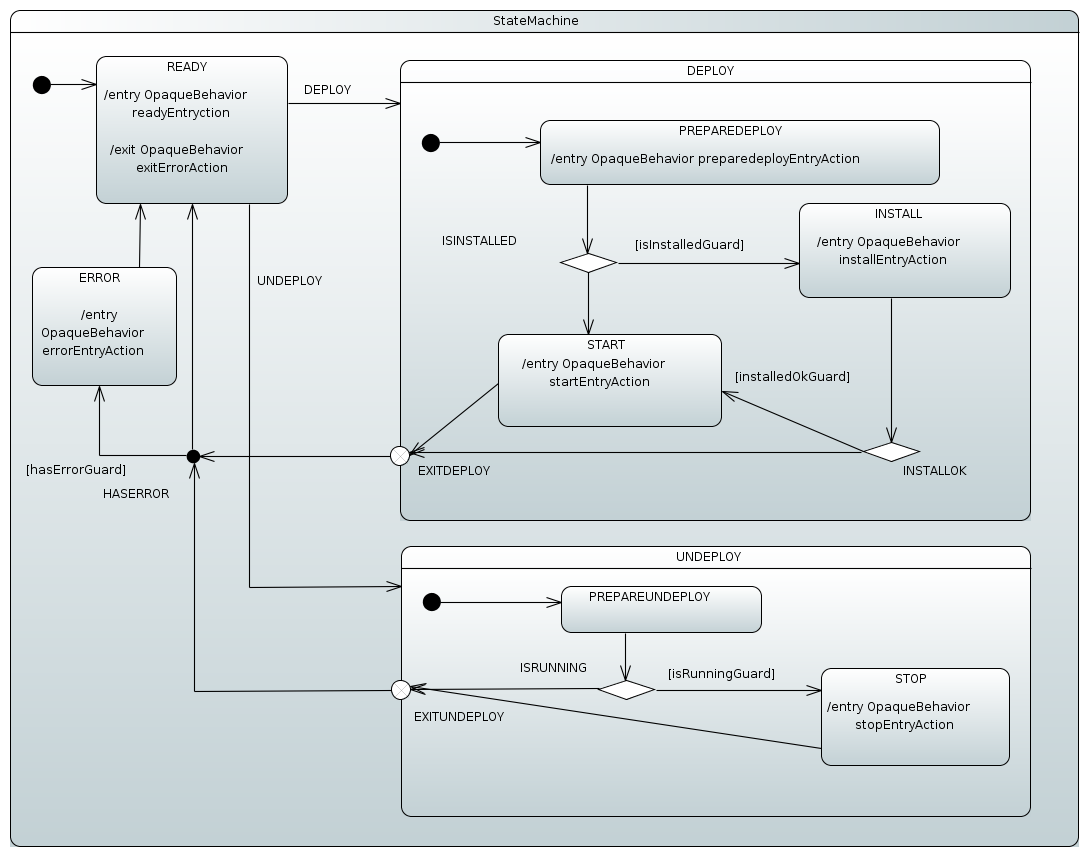
| The preceding state chart was designed by using the Eclipse Papyrus Plugin (seeEclipse Modeling Support) and imported into Spring StateMachine through the resulting UML model file. Actions and guards defined in a model are resolved from a Spring Application Context. |
在该状态机场景中,用户尝试执行两种不同的行为(DEPLOY 和 UNDEPLOY)。
在前面的状态图中:
-
在
DEPLOY状态,INSTALL和START状态会根据条件进入。如果我们已经安装了一个产品,则可以直接进入START状态,如果安装失败则无需尝试START操作。 -
在
UNDEPLOY状态,我们有条件地进入STOP状态,如果应用已经运行。 -
条件选择对于
DEPLOY和UNDEPLOY是通过状态内的选择伪状态完成的,这些选择由守卫来选定。 -
我们使用退出点伪状态来更受控地从
DEPLOY和UNDEPLOY状态中退出。 -
在退出从
DEPLOY和UNDEPLOY之后,我们通过一个分支综合状态来选择是否经过一个ERROR状态(如果扩展状态中添加了错误的话). -
最终,我们回到
READY状态来处理新的请求。
现在我们可以开始实际演示了。通过运行以下命令可以启动基于 Boot 的示例应用程序:
# java -jar spring-statemachine-samples-deploy-4.0.1.jar在浏览器中,你可以看到以下图片类似的内容:
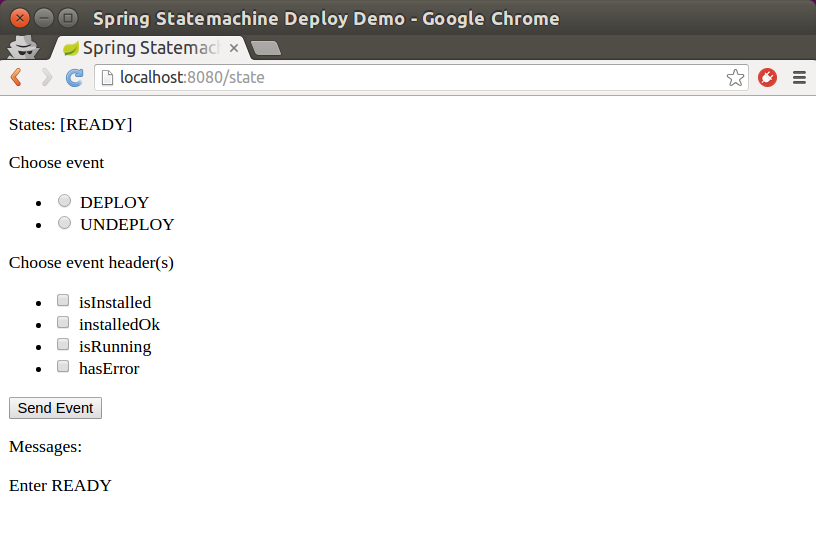
| 由于我们没有实际的安装、启动或停止功能,我们通过检查特定消息头的存在来模拟故障。 |
现在您可以开始向机器发送事件,并选择各种消息标头以驱动功能。
51. 订单发货
订单发货示例展示了如何使用状态机概念来构建一个简单的订单处理系统。
以下图像显示了一个状态图,它驱动了此订单发货示例。
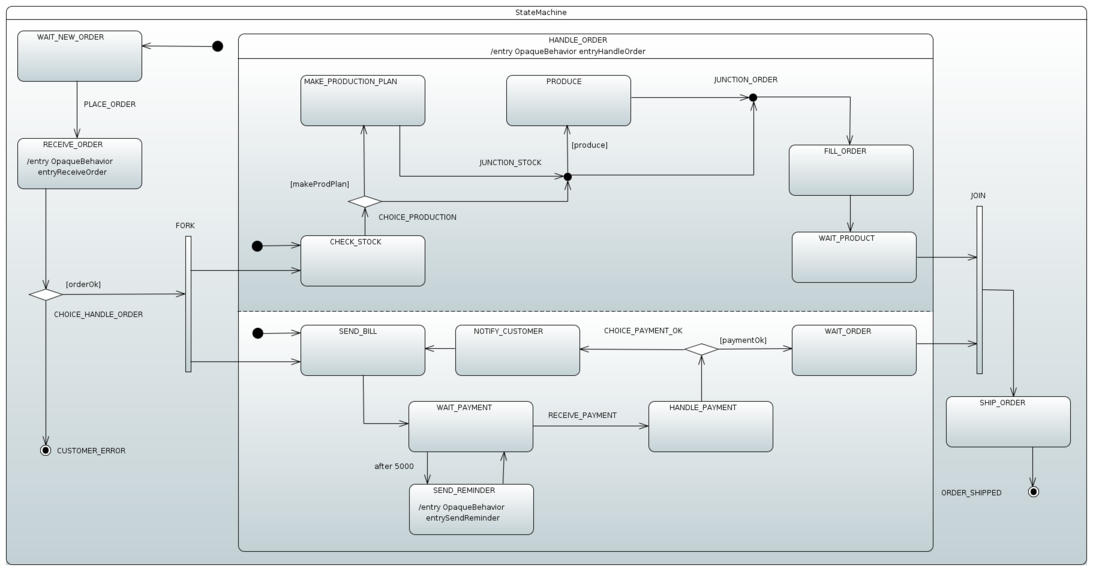
在前面的状态图中:
-
The state machine enters the
WAIT_NEW_ORDER(default) state. -
The event
PLACE_ORDER转移至状态RECEIVE_ORDER,并执行入口动作(entryReceiveOrder)。 -
如果订单状态为
OK,状态机将进入两个区域,一个处理订单生成,另一个处理用户级支付。否则,状态机将进入CUSTOMER_ERROR,这是一个最终状态。 -
状态机在较低区域循环提醒用户支付,直到成功发送
RECEIVE_PAYMENT以指示正确的支付。 -
两个区域进入等待状态(
WAIT_PRODUCT和WAIT_ORDER),在这些状态下,它们会合并,并且在退出父级正交状态(HANDLE_ORDER)之前保持此状态。 -
最终,状态机从
SHIP_ORDER转移到其最终状态(ORDER_SHIPPED)。
The following command runs the sample:
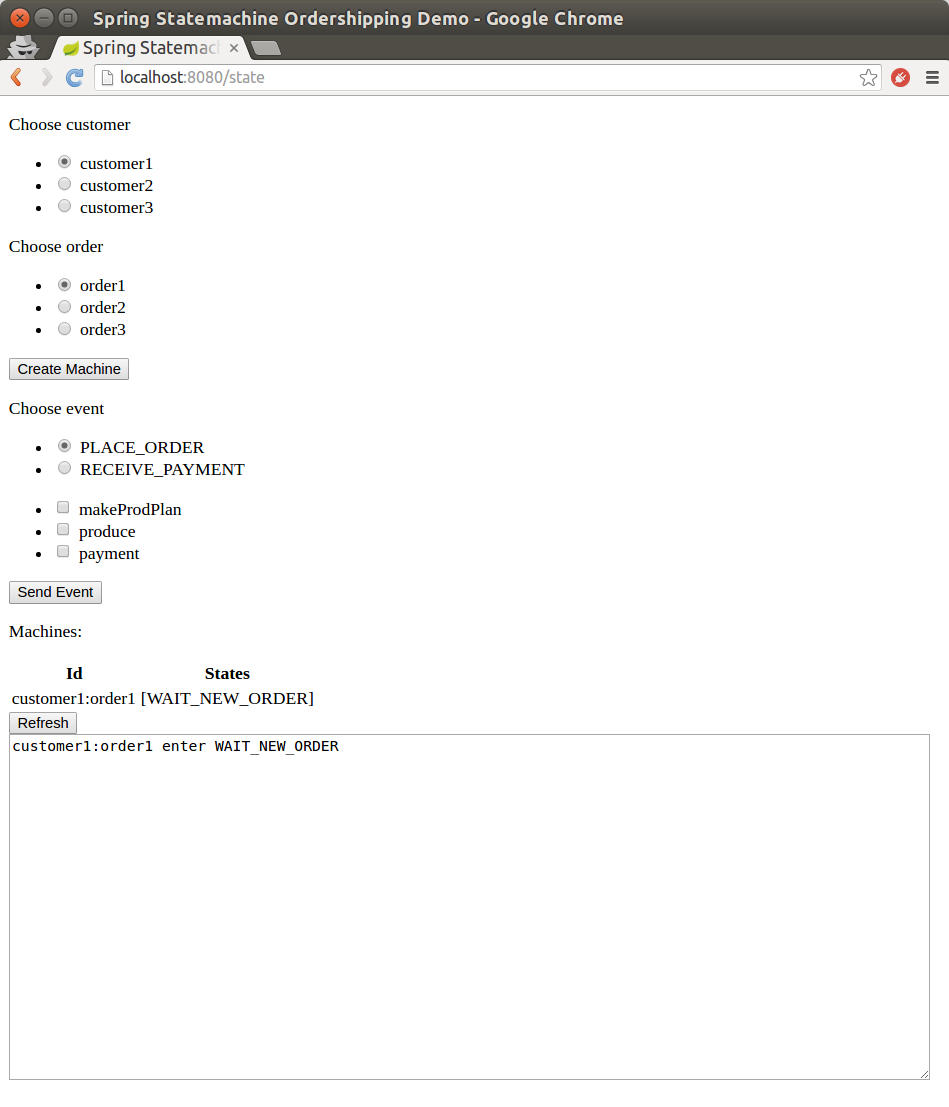
# java -jar spring-statemachine-samples-ordershipping-4.0.1.jar在浏览器中,您可以看到类似于以下图像的内容。您可以从选择一个客户和一个订单开始创建状态机。
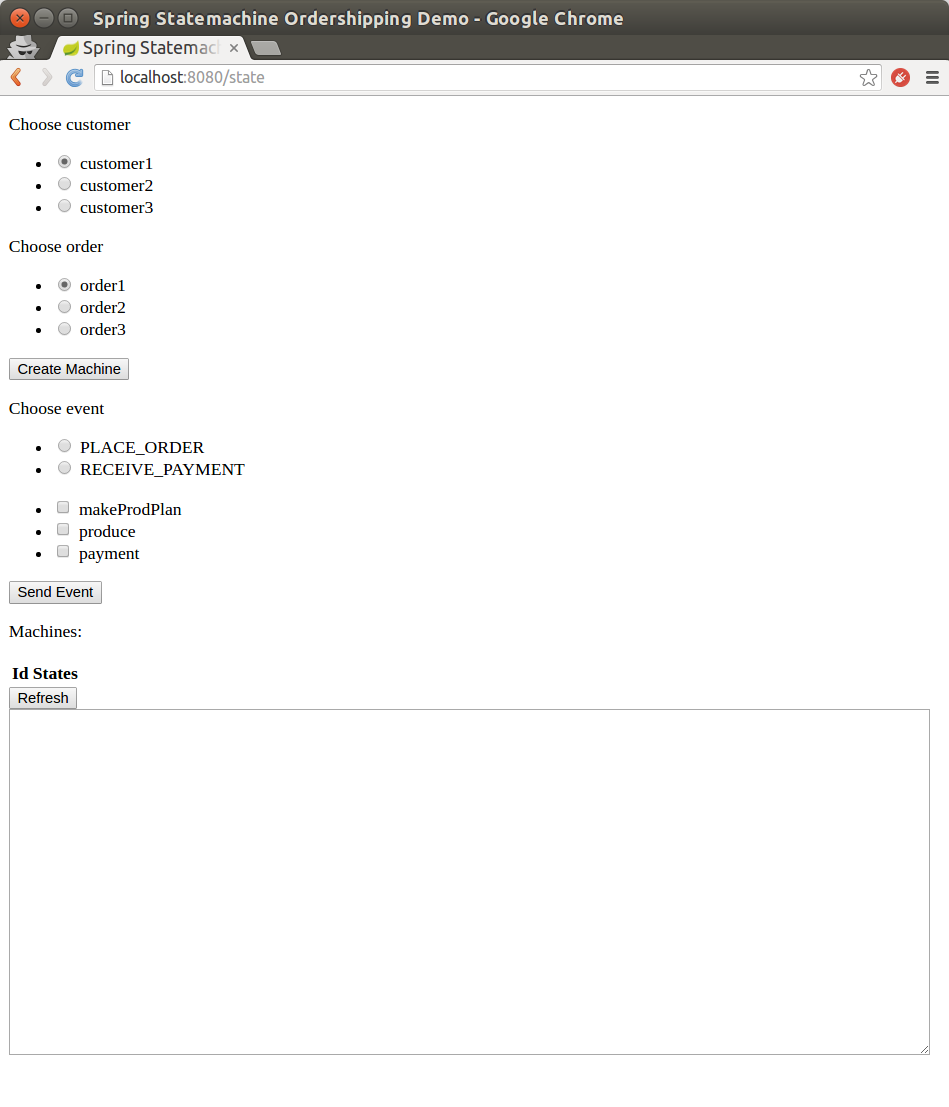
某个订单的状态机现在已经创建,您可以开始尝试下单和支付。
其他设置(例如makeProdPlan、produce和payment)允许您控制状态机的工作方式。
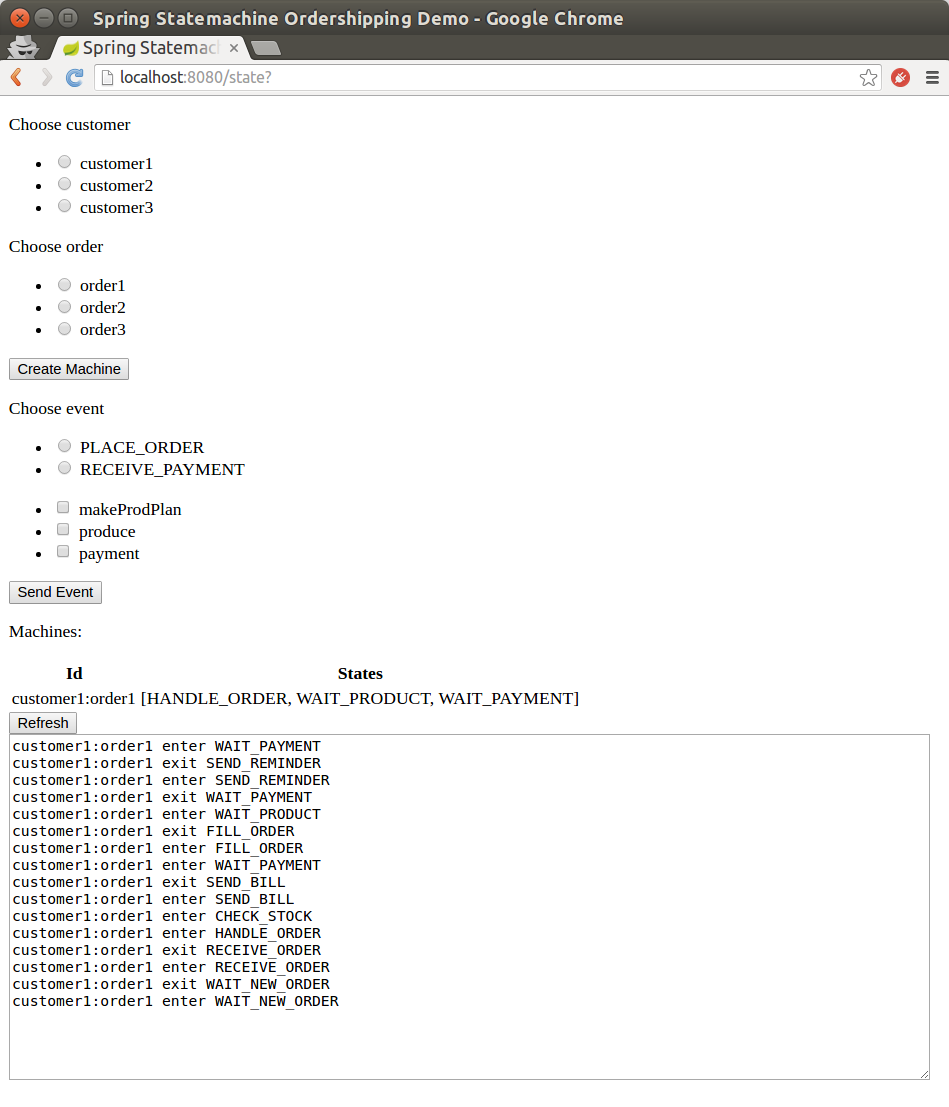
以下图片展示了等待接收订单的状态机:
终于,您可以刷新页面查看机器所做的工作,如下图所示:
52. JPA 配置
The JPA配置示例展示了如何使用状态机概念,同时将机器配置保存在数据库中。此样本使用嵌入式H2数据库以及H2控制台(以便更轻松地与数据库进行交互)。
这个示例使用了spring-statemachine-autoconfigure(默认情况下,它会自动配置所需的JPA仓库和实体类)。因此,你只需要@SpringBootApplication。下面的示例展示了带有@SpringBootApplication注解的Application类:
@SpringBootApplication
public class Application {

	public static void main(String[] args) {
		SpringApplication.run(Application.class, args);
	}
}
The following example shows how to create a RepositoryStateMachineModelFactory:
@Configuration
@EnableStateMachineFactory
public static class Config extends StateMachineConfigurerAdapter<String, String> {

	@Autowired
	private StateRepository<? extends RepositoryState> stateRepository;

	@Autowired
	private TransitionRepository<? extends RepositoryTransition> transitionRepository;

	@Override
	public void configure(StateMachineModelConfigurer<String, String> model) throws Exception {
		model
			.withModel()
				.factory(modelFactory());
	}

	@Bean
	public StateMachineModelFactory<String, String> modelFactory() {
		return new RepositoryStateMachineModelFactory(stateRepository, transitionRepository);
	}
}
您可以使用以下命令运行示例:
# java -jar spring-statemachine-samples-datajpa-4.0.1.jar访问应用在 http://localhost:8080 会为每个请求构建一个新的机器。然后你可以选择向该机器发送事件。每次请求都会从数据库中更新可能的事件和机器配置。
以下图片展示了 UI 及当此状态机启动时创建的初始事件:
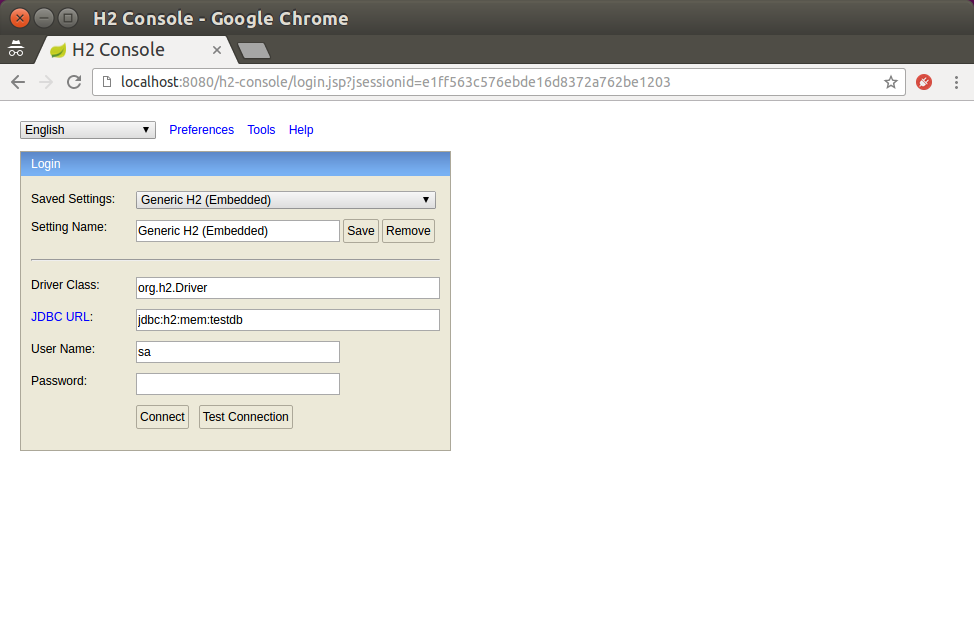
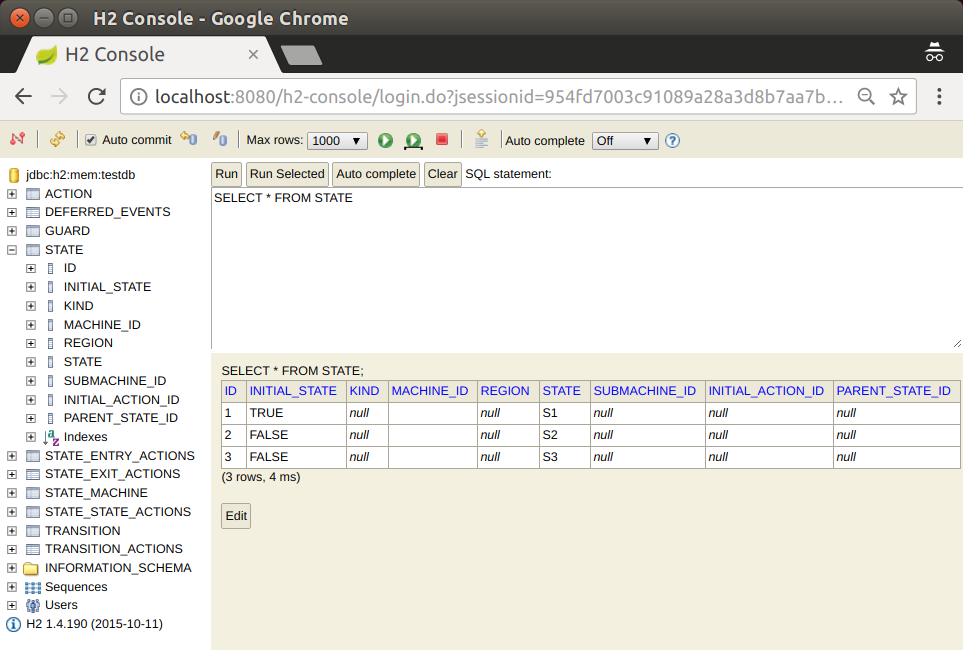
要访问嵌入的控制台,可以使用JDBC URL(如果没有设置,默认是jdbc:h2:mem:testdb)。
以下图片展示了H2控制台:
从控制台中,你可以看到数据库表并根据需要进行修改。 以下图片展示了在UI中执行简单查询的结果:
现在,您已经走到了这一步,可能想知道那些默认状态和转换是如何被填充到数据库中的。Spring Data 有一个很不错的特性可以自动填充仓库,并且我们通过 Jackson2RepositoryPopulatorFactoryBean 使用了这个功能。以下示例展示了我们如何创建这样一个 bean:
@Bean
public StateMachineJackson2RepositoryPopulatorFactoryBean jackson2RepositoryPopulatorFactoryBean() {
	StateMachineJackson2RepositoryPopulatorFactoryBean factoryBean = new StateMachineJackson2RepositoryPopulatorFactoryBean();
	factoryBean.setResources(new Resource[]{new ClassPathResource("data.json")});
	return factoryBean;
}
The following listing shows the source of the data with which we populate the database:
[
	{
		"@id": "10",
		"_class": "org.springframework.statemachine.data.jpa.JpaRepositoryAction",
		"spel": "T(System).out.println('hello exit S1')"
	},
	{
		"@id": "11",
		"_class": "org.springframework.statemachine.data.jpa.JpaRepositoryAction",
		"spel": "T(System).out.println('hello entry S2')"
	},
	{
		"@id": "12",
		"_class": "org.springframework.statemachine.data.jpa.JpaRepositoryAction",
		"spel": "T(System).out.println('hello state S3')"
	},
	{
		"@id": "13",
		"_class": "org.springframework.statemachine.data.jpa.JpaRepositoryAction",
		"spel": "T(System).out.println('hello')"
	},
	{
		"@id": "1",
		"_class": "org.springframework.statemachine.data.jpa.JpaRepositoryState",
		"initial": true,
		"state": "S1",
		"exitActions": ["10"]
	},
	{
		"@id": "2",
		"_class": "org.springframework.statemachine.data.jpa.JpaRepositoryState",
		"initial": false,
		"state": "S2",
		"entryActions": ["11"]
	},
	{
		"@id": "3",
		"_class": "org.springframework.statemachine.data.jpa.JpaRepositoryState",
		"initial": false,
		"state": "S3",
		"stateActions": ["12"]
	},
	{
		"_class": "org.springframework.statemachine.data.jpa.JpaRepositoryTransition",
		"source": "1",
		"target": "2",
		"event": "E1",
		"kind": "EXTERNAL"
	},
	{
		"_class": "org.springframework.statemachine.data.jpa.JpaRepositoryTransition",
		"source": "2",
		"target": "3",
		"event": "E2",
		"actions": ["13"]
	}
]
53. 数据持久化
The data persist样本展示了如何使用外部存储库中的持久化状态机概念。 该示例使用嵌入式H2数据库和H2控制台(以便于轻松操作数据库)。您也可以选择启用Redis或MongoDB。
这个示例使用了spring-statemachine-autoconfigure(默认情况下,它会自动配置所需的JPA仓库和实体类)。因此,你只需要@SpringBootApplication。下面的示例展示了带有@SpringBootApplication注解的Application类:
@SpringBootApplication
public class Application {

	public static void main(String[] args) {
		SpringApplication.run(Application.class, args);
	}
}
The StateMachineRuntimePersister接口在StateMachine的运行时级别工作。其实现,JpaPersistingStateMachineInterceptor, 旨在与JPA一起使用。
以下列表创建了一个StateMachineRuntimePersister bean:
@Configuration
@Profile("jpa")
public static class JpaPersisterConfig {

	@Bean
	public StateMachineRuntimePersister<States, Events, String> stateMachineRuntimePersister(
			JpaStateMachineRepository jpaStateMachineRepository) {
		return new JpaPersistingStateMachineInterceptor<>(jpaStateMachineRepository);
	}
}
以下示例展示了如何使用非常相似的配置来为 MongoDB 创建一个 bean:
@Configuration
@Profile("mongo")
public static class MongoPersisterConfig {

	@Bean
	public StateMachineRuntimePersister<States, Events, String> stateMachineRuntimePersister(
			MongoDbStateMachineRepository mongoDbStateMachineRepository) {
		return new MongoDbPersistingStateMachineInterceptor<>(mongoDbStateMachineRepository);
	}
}
以下示例展示了如何使用非常相似的配置来为 Redis 创建一个 bean:
@Configuration
@Profile("redis")
public static class RedisPersisterConfig {

	@Bean
	public StateMachineRuntimePersister<States, Events, String> stateMachineRuntimePersister(
			RedisStateMachineRepository redisStateMachineRepository) {
		return new RedisPersistingStateMachineInterceptor<>(redisStateMachineRepository);
	}
}
您可以配置StateMachine以使用运行时持久性,通过使用withPersistence配置方法。以下示例展示了如何实现:
@Autowired
private StateMachineRuntimePersister<States, Events, String> stateMachineRuntimePersister;

@Override
public void configure(StateMachineConfigurationConfigurer<States, Events> config)
		throws Exception {
	config
		.withPersistence()
			.runtimePersister(stateMachineRuntimePersister);
}
这个示例还使用了DefaultStateMachineService,这使得在多台机器上工作更加容易。
以下清单展示了如何创建一个DefaultStateMachineService的实例:
@Bean
public StateMachineService<States, Events> stateMachineService(
		StateMachineFactory<States, Events> stateMachineFactory,
		StateMachineRuntimePersister<States, Events, String> stateMachineRuntimePersister) {
	return new DefaultStateMachineService<States, Events>(stateMachineFactory, stateMachineRuntimePersister);
}
The following listing shows the logic that drives the StateMachineService in this sample:
private synchronized StateMachine<States, Events> getStateMachine(String machineId) throws Exception {
	listener.resetMessages();
	if (currentStateMachine == null) {
		currentStateMachine = stateMachineService.acquireStateMachine(machineId);
		currentStateMachine.addStateListener(listener);
		currentStateMachine.startReactively().block();
	} else if (!ObjectUtils.nullSafeEquals(currentStateMachine.getId(), machineId)) {
		stateMachineService.releaseStateMachine(currentStateMachine.getId());
		currentStateMachine.stopReactively().block();
		currentStateMachine = stateMachineService.acquireStateMachine(machineId);
		currentStateMachine.addStateListener(listener);
		currentStateMachine.startReactively().block();
	}
	return currentStateMachine;
}
您可以使用以下命令运行示例:
# java -jar spring-statemachine-samples-datapersist-4.0.1.jar|
默认情况下, |
访问应用程序请前往 http://localhost:8080。每次请求都会构建一个新的状态机,并且你可以选择向某个状态机发送事件。可能的事件和机器配置会在每次请求时从数据库中更新。
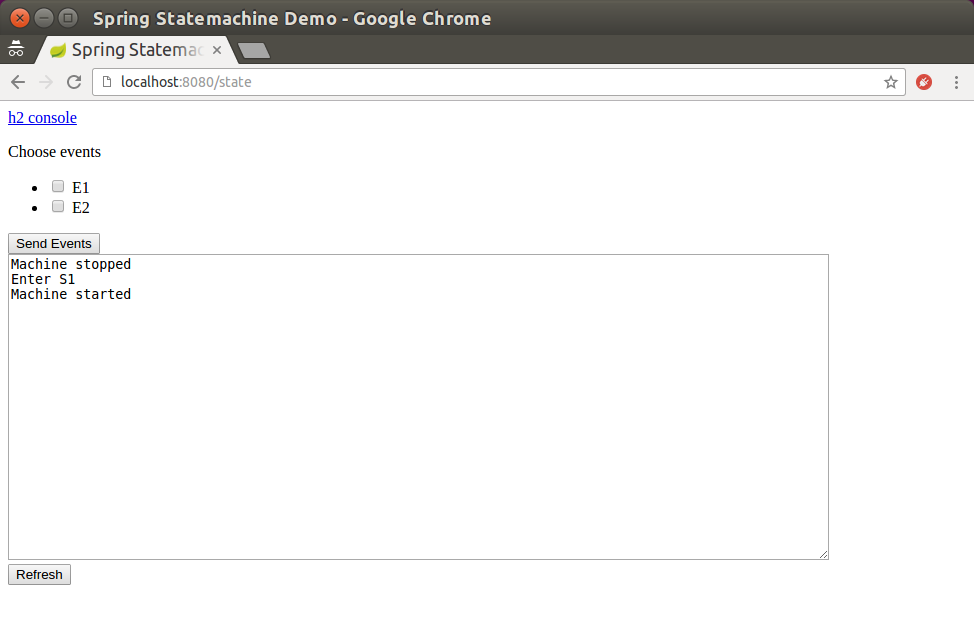
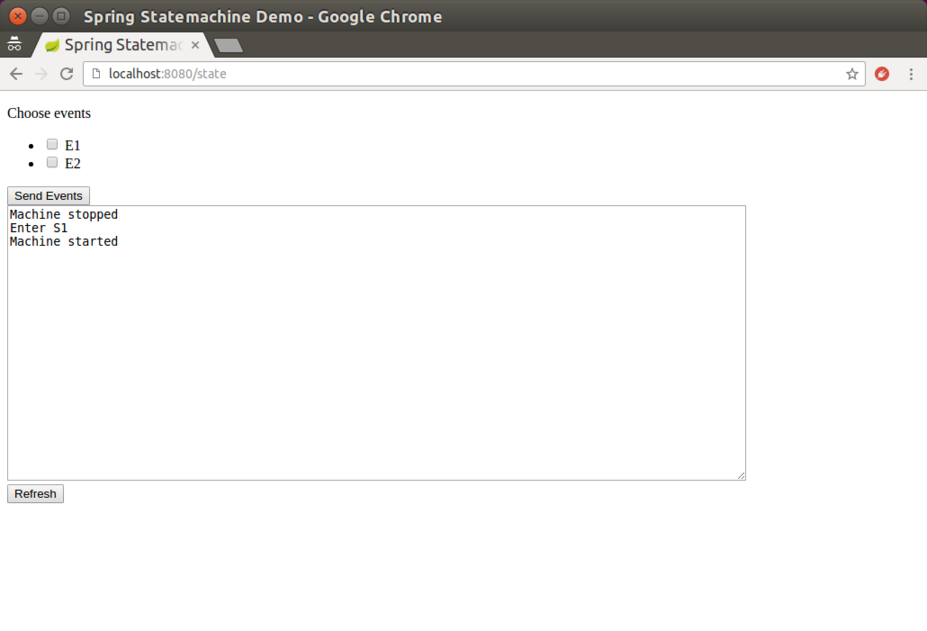
该示例中的状态机具有简单的配置,状态从 'S1' 到 'S6',事件从 'E1' 到 'E6' 用于在这些状态之间转换状态机。您可以使用两个状态机标识符(0 和 1)来请求特定的状态机。 以下图像显示了可供您选择一个机器和一个事件并查看执行结果的用户界面:

The sample defaults to using machine '数据jpapersist1' and goes to its initial state 'S1'. The following image shows the result of using those defaults:
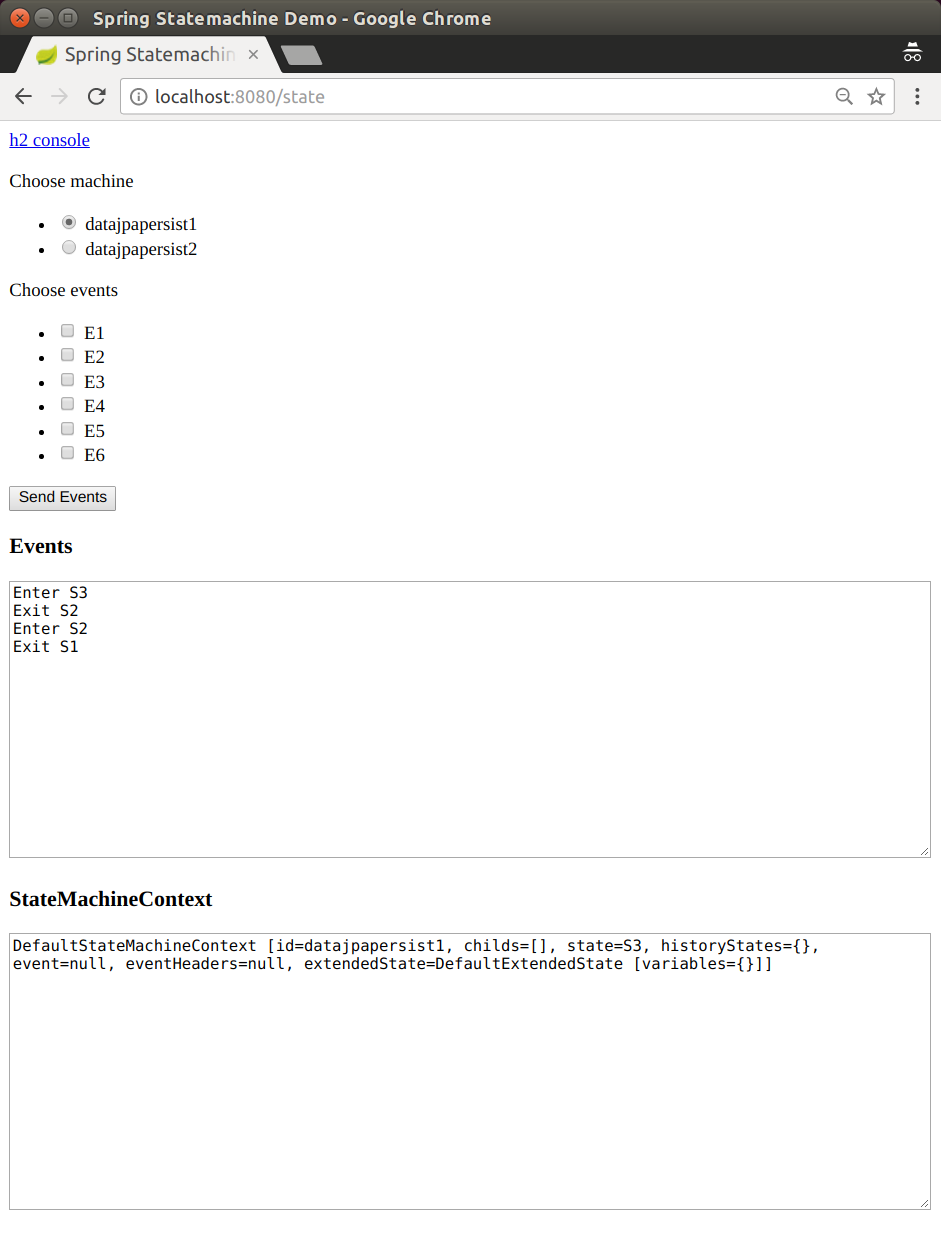
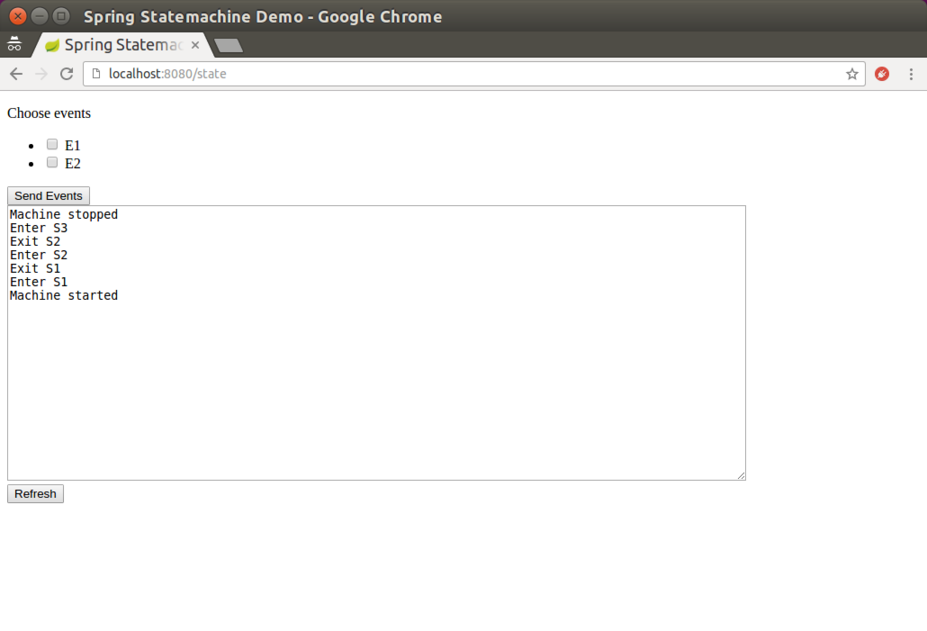
如果您向datajpapersist1状态机发送事件E1和E2,其状态会被保存为'S3'。
以下图片展示了这一结果:
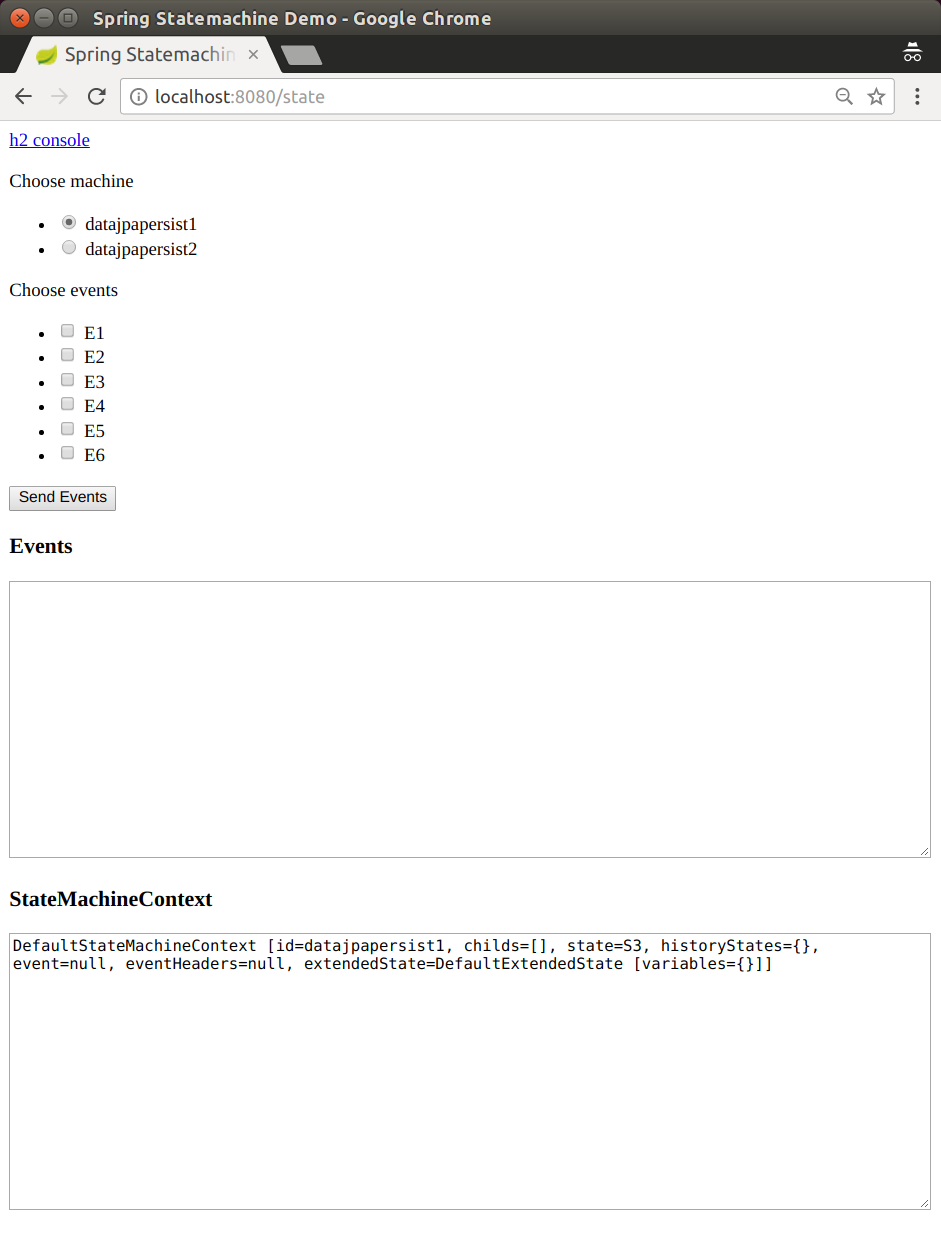
如果然后请求状态机datajpapersist1但不发送任何事件,
状态机将恢复到其持久化状态S3。
54. 数据多路持久化
The data multi ersist 样本 是两个其他样本的扩展: JPA 配置 和 数据持久化。 我们仍然将机器配置存储在数据库中,并将其持久化到数据库。然而,这次我们也有一台包含两个正交区域的机器,以展示这些区域如何独立地被持久化。此样本还使用了一个嵌入式的 H2 数据库以及 H2 控制台(方便进行数据库操作)。
这个示例使用了spring-statemachine-autoconfigure(默认情况下,它会自动配置所需的JPA仓库和实体类)。因此,你只需要@SpringBootApplication。下面的示例展示了带有@SpringBootApplication注解的Application类:
@SpringBootApplication
public class Application {

	public static void main(String[] args) {
		SpringApplication.run(Application.class, args);
	}
}
作为其他数据驱动示例中的内容,我们再次创建了一个 StateMachineRuntimePersister,如以下列表所示:
@Bean
public StateMachineRuntimePersister<String, String, String> stateMachineRuntimePersister(
		JpaStateMachineRepository jpaStateMachineRepository) {
	return new JpaPersistingStateMachineInterceptor<>(jpaStateMachineRepository);
}
一个 StateMachineService 颗bean使得与机器交互变得更加容易。下面的示例展示了如何创建这样的bean:
@Bean
public StateMachineService<String, String> stateMachineService(
		StateMachineFactory<String, String> stateMachineFactory,
		StateMachineRuntimePersister<String, String, String> stateMachineRuntimePersister) {
	return new DefaultStateMachineService<String, String>(stateMachineFactory, stateMachineRuntimePersister);
}
我们使用JSON数据导入配置。 以下示例创建一个bean来实现这一点:
@Bean
public StateMachineJackson2RepositoryPopulatorFactoryBean jackson2RepositoryPopulatorFactoryBean() {
	StateMachineJackson2RepositoryPopulatorFactoryBean factoryBean = new StateMachineJackson2RepositoryPopulatorFactoryBean();
	factoryBean.setResources(new Resource[] { new ClassPathResource("datajpamultipersist.json") });
	return factoryBean;
}
以下代码片段展示了我们如何获取一个RepositoryStateMachineModelFactory:
@Configuration
@EnableStateMachineFactory
public static class Config extends StateMachineConfigurerAdapter<String, String> {

	@Autowired
	private StateRepository<? extends RepositoryState> stateRepository;

	@Autowired
	private TransitionRepository<? extends RepositoryTransition> transitionRepository;

	@Autowired
	private StateMachineRuntimePersister<String, String, String> stateMachineRuntimePersister;

	@Override
	public void configure(StateMachineConfigurationConfigurer<String, String> config)
			throws Exception {
		config
			.withPersistence()
				.runtimePersister(stateMachineRuntimePersister);
	}

	@Override
	public void configure(StateMachineModelConfigurer<String, String> model)
			throws Exception {
		model
			.withModel()
				.factory(modelFactory());
	}

	@Bean
	public StateMachineModelFactory<String, String> modelFactory() {
		return new RepositoryStateMachineModelFactory(stateRepository, transitionRepository);
	}
}
您可以使用以下命令运行示例:
# java -jar spring-statemachine-samples-datajpamultipersist-4.0.1.jar访问应用在http://localhost:8080会为每个请求构建一个新的机器,并允许您向机器发送事件。每
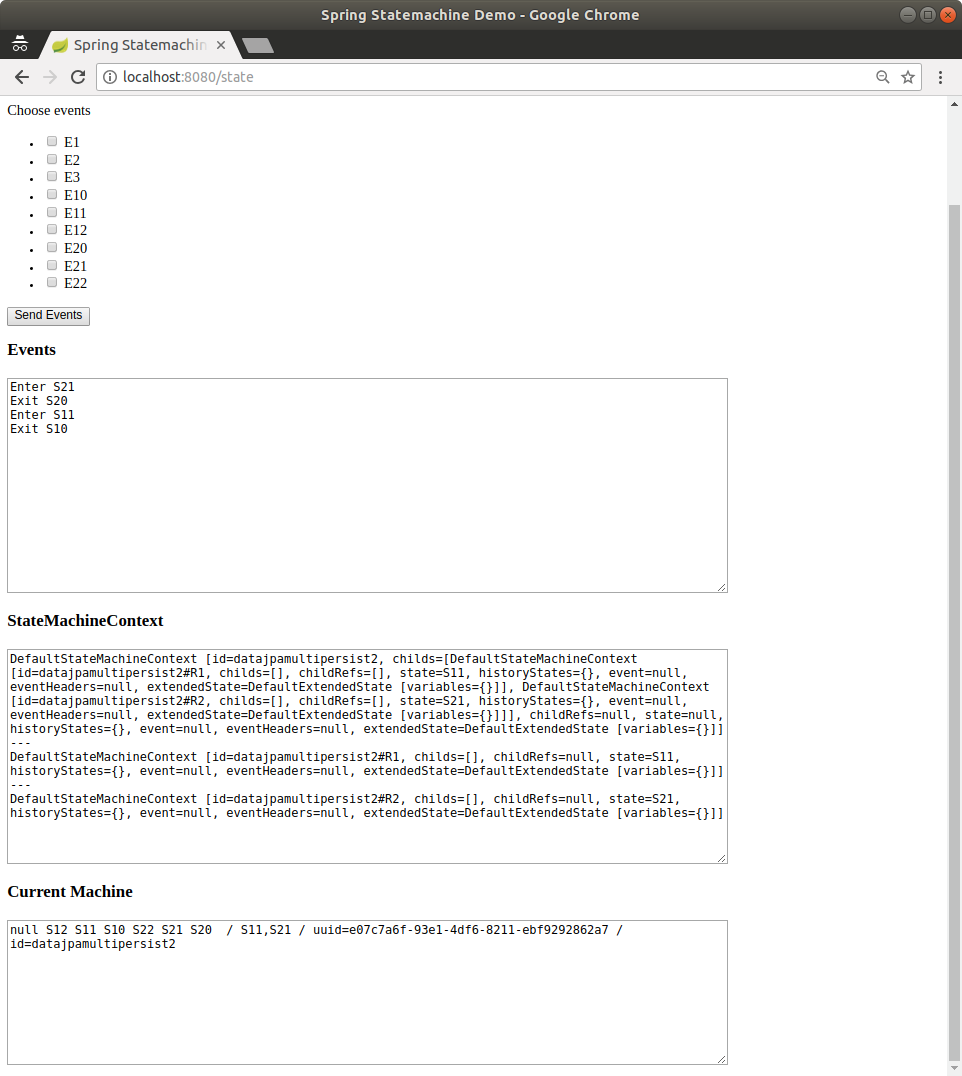
个请求都会从数据库中更新可能的事件和状态机配置。我们还会打印出所有状态机上下文以及当前根机器,如下图所示:
The state machine named datajpamultipersist1 是一个简单的“平坦”状态机,其中状态S1、
S2 和S3分别由事件E1、E2和E3转换。
然而,命名为 datajpamultipersist2 的状态机包含两个直接在根级别下的区域(R1 和R2)。这就是为什么这个根级别的状态机实际上没有状态的原因。
我们需要那个根级别的状态机来托管这些区域。
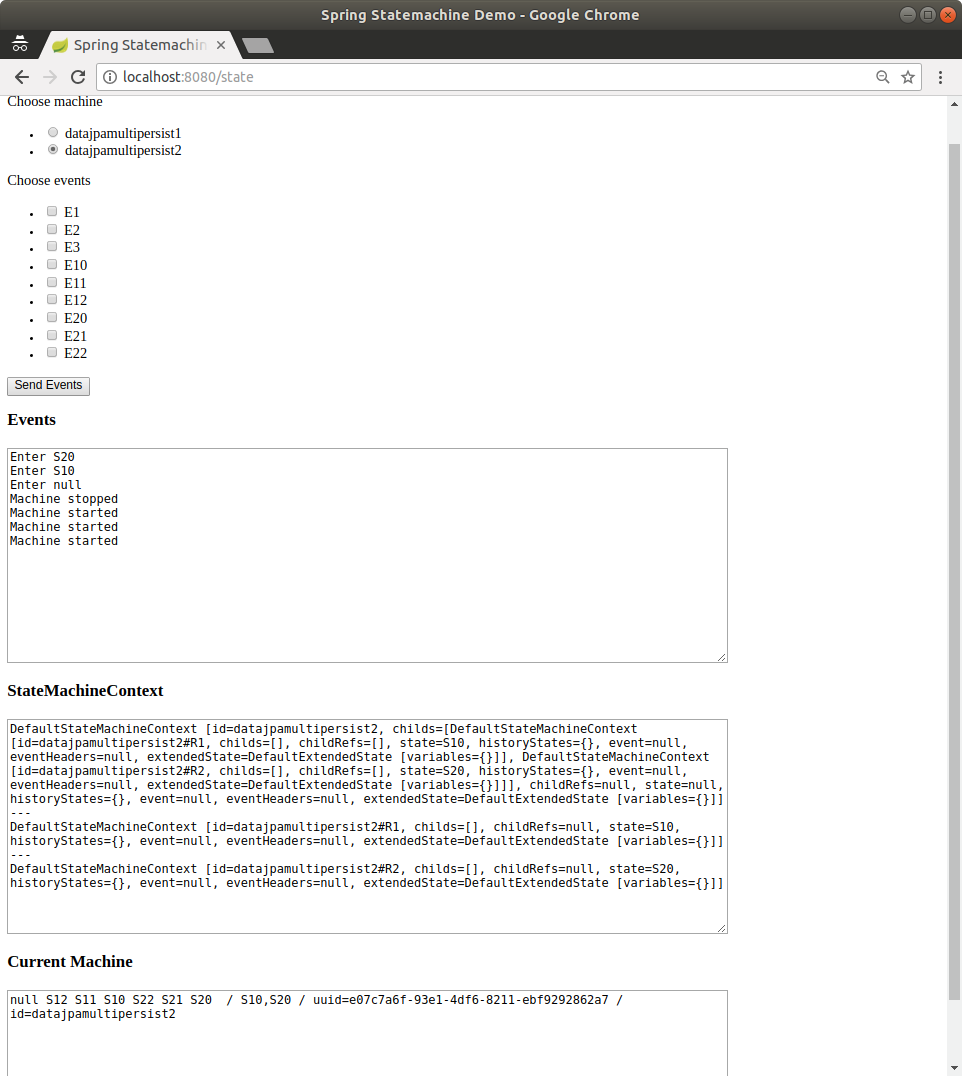
Regions R1 and R2 in the datajpamultipersist2 state machine contains states
S10, S11, and S12 and S20, S21, and S22 (respectively). Events
E10, E11, and E12 are used for region R1 and events E20, E21,
and event E22 is used for region R2. The following images shows what happens when we
send events E10 and E20 to the
datajpamultipersist2 state machine:
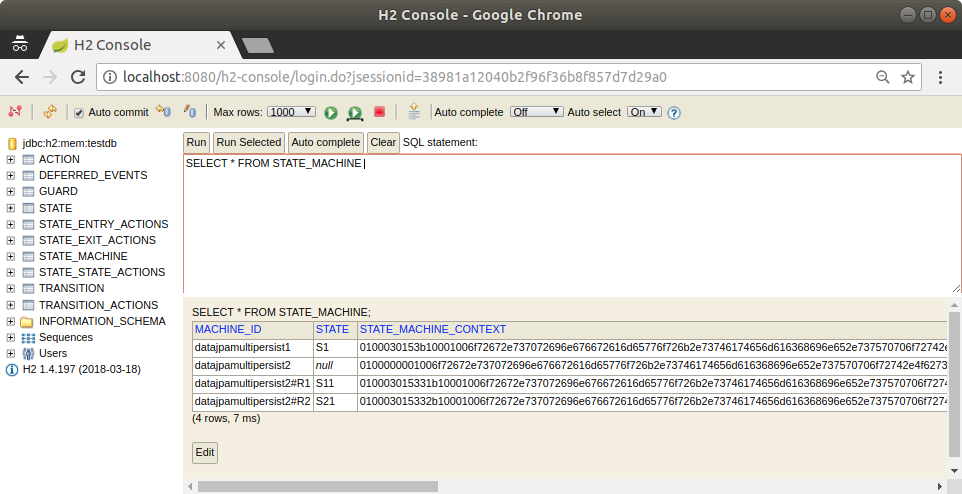
地区有自己的上下文和自己的ID,实际的
ID会在区域ID后面附加#。如下图所示,
数据库中的不同区域具有不同的上下文:
55. Data JPA 持久化
The data persist样本展示了如何使用外部存储库中的持久化状态机概念。 该示例使用嵌入式H2数据库和H2控制台(以便于轻松操作数据库)。您也可以选择启用Redis或MongoDB。
这个示例使用了spring-statemachine-autoconfigure(默认情况下,它会自动配置所需的JPA仓库和实体类)。因此,你只需要@SpringBootApplication。下面的示例展示了带有@SpringBootApplication注解的Application类:
@SpringBootApplication
public class Application {

	public static void main(String[] args) {
		SpringApplication.run(Application.class, args);
	}
}
The StateMachineRuntimePersister接口在StateMachine的运行时级别工作。其实现,JpaPersistingStateMachineInterceptor, 旨在与JPA一起使用。
以下列表创建了一个StateMachineRuntimePersister bean:
@Configuration
@Profile("jpa")
public static class JpaPersisterConfig {

	@Bean
	public StateMachineRuntimePersister<States, Events, String> stateMachineRuntimePersister(
			JpaStateMachineRepository jpaStateMachineRepository) {
		return new JpaPersistingStateMachineInterceptor<>(jpaStateMachineRepository);
	}
}
以下示例展示了如何使用非常相似的配置来为 MongoDB 创建一个 bean:
@Configuration
@Profile("mongo")
public static class MongoPersisterConfig {

	@Bean
	public StateMachineRuntimePersister<States, Events, String> stateMachineRuntimePersister(
			MongoDbStateMachineRepository mongoDbStateMachineRepository) {
		return new MongoDbPersistingStateMachineInterceptor<>(mongoDbStateMachineRepository);
	}
}
以下示例展示了如何使用非常相似的配置来为 Redis 创建一个 bean:
@Configuration
@Profile("redis")
public static class RedisPersisterConfig {

	@Bean
	public StateMachineRuntimePersister<States, Events, String> stateMachineRuntimePersister(
			RedisStateMachineRepository redisStateMachineRepository) {
		return new RedisPersistingStateMachineInterceptor<>(redisStateMachineRepository);
	}
}
您可以配置StateMachine以使用运行时持久性,通过使用withPersistence配置方法。以下示例展示了如何实现:
@Autowired
private StateMachineRuntimePersister<States, Events, String> stateMachineRuntimePersister;

@Override
public void configure(StateMachineConfigurationConfigurer<States, Events> config)
		throws Exception {
	config
		.withPersistence()
			.runtimePersister(stateMachineRuntimePersister);
}
这个示例还使用了DefaultStateMachineService,这使得在多台机器上工作更加容易。
以下清单展示了如何创建一个DefaultStateMachineService的实例:
@Bean
public StateMachineService<States, Events> stateMachineService(
		StateMachineFactory<States, Events> stateMachineFactory,
		StateMachineRuntimePersister<States, Events, String> stateMachineRuntimePersister) {
	return new DefaultStateMachineService<States, Events>(stateMachineFactory, stateMachineRuntimePersister);
}
The following listing shows the logic that drives the StateMachineService in this sample:
private synchronized StateMachine<States, Events> getStateMachine(String machineId) throws Exception {
	listener.resetMessages();
	if (currentStateMachine == null) {
		currentStateMachine = stateMachineService.acquireStateMachine(machineId);
		currentStateMachine.addStateListener(listener);
		currentStateMachine.startReactively().block();
	} else if (!ObjectUtils.nullSafeEquals(currentStateMachine.getId(), machineId)) {
		stateMachineService.releaseStateMachine(currentStateMachine.getId());
		currentStateMachine.stopReactively().block();
		currentStateMachine = stateMachineService.acquireStateMachine(machineId);
		currentStateMachine.addStateListener(listener);
		currentStateMachine.startReactively().block();
	}
	return currentStateMachine;
}
您可以使用以下命令运行示例:
# java -jar spring-statemachine-samples-datapersist-4.0.1.jar|
默认情况下, |
访问应用程序请前往 http://localhost:8080。每次请求都会构建一个新的状态机,并且你可以选择向某个状态机发送事件。可能的事件和机器配置会在每次请求时从数据库中更新。
该示例中的状态机具有简单的配置,状态从 'S1' 到 'S6',事件从 'E1' 到 'E6' 用于在这些状态之间转换状态机。您可以使用两个状态机标识符(0 和 1)来请求特定的状态机。 以下图像显示了可供您选择一个机器和一个事件并查看执行结果的用户界面:
The sample defaults to using machine '数据jpapersist1' and goes to its initial state 'S1'. The following image shows the result of using those defaults:
如果您向datajpapersist1状态机发送事件E1和E2,其状态会被保存为'S3'。
以下图片展示了这一结果:
如果然后请求状态机datajpapersist1但不发送任何事件,
状态机将恢复到其持久化状态S3。
监控
监控示例展示了如何使用状态机概念来 监控状态机转换和动作。 以下列表配置了我们用于此示例的状态机:
@Configuration
@EnableStateMachine
public static class Config extends StateMachineConfigurerAdapter<String, String> {

	@Override
	public void configure(StateMachineStateConfigurer<String, String> states)
			throws Exception {
		states
			.withStates()
				.initial("S1")
				.state("S2", null, (c) -> {System.out.println("hello");})
				.state("S3", (c) -> {System.out.println("hello");}, null);
	}

	@Override
	public void configure(StateMachineTransitionConfigurer<String, String> transitions)
			throws Exception {
		transitions
			.withExternal()
				.source("S1").target("S2").event("E1")
				.action((c) -> {System.out.println("hello");})
				.and()
			.withExternal()
				.source("S2").target("S3").event("E2");
	}
}
您可以使用以下命令运行示例:
# java -jar spring-statemachine-samples-monitoring-4.0.1.jar以下图片展示了状态机的初始状态:
The following image shows the state of the state machine after we have performed some actions:
您可以通过运行以下两个curl命令(显示其输出)来查看Spring Boot的度量指标:
# curl http://localhost:8080/actuator/metrics/ssm.transition.duration

{
  "name":"ssm.transition.duration",
  "measurements":[
    {
      "statistic":"COUNT",
      "value":3.0
    },
    {
      "statistic":"TOTAL_TIME",
      "value":0.007
    },
    {
      "statistic":"MAX",
      "value":0.004
    }
  ],
  "availableTags":[
    {
      "tag":"transitionName",
      "values":[
        "INITIAL_S1",
        "EXTERNAL_S1_S2"
      ]
    }
  ]
}
# curl http://localhost:8080/actuator/metrics/ssm.transition.transit
{
"name":"ssm.transition.transit",
"measurements":[
{
"statistic":"COUNT",
"value":3.0
}
],
"availableTags":[
{
"tag":"transitionName",
"values":[
"EXTERNAL_S1_S2",
"INITIAL_S1"
]
}
]
}您也可以通过运行以下 curl
命令(显示其输出)来查看来自 Spring Boot 的跟踪:
# curl http://localhost:8080/actuator/statemachinetrace

[
  {
    "timestamp":"2018-02-11T06:44:12.723+0000",
    "info":{
      "duration":2,
      "machine":null,
      "transition":"EXTERNAL_S1_S2"
    }
  },
  {
    "timestamp":"2018-02-11T06:44:12.720+0000",
    "info":{
      "duration":0,
      "machine":null,
      "action":"demo.monitoring.StateMachineConfig$Config$$Lambda$576/1499688007@22b47b2f"
    }
  },
  {
    "timestamp":"2018-02-11T06:44:12.714+0000",
    "info":{
      "duration":1,
      "machine":null,
      "transition":"INITIAL_S1"
    }
  },
  {
    "timestamp":"2018-02-11T06:44:09.689+0000",
    "info":{
      "duration":4,
      "machine":null,
      "transition":"INITIAL_S1"
    }
  }
]