State Machine Examples
This part of the reference documentation explains the use of state machines together with sample code and UML state charts. We use a few shortcuts when representing the relationship between a state chart, Spring Statemachine configuration, and what an application does with a state machine. For complete examples, you should study the samples repository.
Samples are built directly from a main source distribution during a normal build cycle. This chapter includes the following samples:
The following listing shows how to build the samples:
./gradlew clean build -x testEvery sample is located in its own directory under
spring-statemachine-samples. The samples are based on Spring Boot and
Spring Shell, and you can find the usual Boot fat jars under every sample
project’s build/libs directory.
The filenames for the jars to which we refer in this section are populated during a
build of this document, meaning that, if you build samples from
main, you have files with a BUILD-SNAPSHOT postfix.
|
38. Turnstile
Turnstile is a simple device that gives you access if payment is
made. It is a concept that is simple to model using a state machine. In its
simplest, form there are only two states: LOCKED and UNLOCKED. Two
events, COIN and PUSH can happen, depending on whether someone
makes a payment or tries to go through the turnstile.
The following image shows the state machine:

The following listing shows the enumeration that defines the possible states:
public enum States {
    LOCKED, UNLOCKED
}
The following listing shows the enumeration that defines the events:
public enum Events {
    COIN, PUSH
}
The following listing shows the code that configures the state machine:
@Configuration
@EnableStateMachine
static class StateMachineConfig
		extends EnumStateMachineConfigurerAdapter<States, Events> {

	@Override
	public void configure(StateMachineStateConfigurer<States, Events> states)
			throws Exception {
		states
			.withStates()
				.initial(States.LOCKED)
				.states(EnumSet.allOf(States.class));
	}

	@Override
	public void configure(StateMachineTransitionConfigurer<States, Events> transitions)
			throws Exception {
		transitions
			.withExternal()
				.source(States.LOCKED)
				.target(States.UNLOCKED)
				.event(Events.COIN)
				.and()
			.withExternal()
				.source(States.UNLOCKED)
				.target(States.LOCKED)
				.event(Events.PUSH);
	}

}
You can see how this sample state machine interacts with events by
running the turnstile sample. The following listing shows how to do so
and shows the command’s output:
$ java -jar spring-statemachine-samples-turnstile-4.0.1-SNAPSHOT.jar

sm>sm print
+----------------------------------------------------------------+
|                              SM                                |
+----------------------------------------------------------------+
|                                                                |
|         +----------------+          +----------------+         |
|     *-->|     LOCKED     |          |    UNLOCKED    |         |
|         +----------------+          +----------------+         |
|     +---| entry/         |          | entry/         |---+     |
|     |   | exit/          |          | exit/          |   |     |
|     |   |                |          |                |   |     |
| PUSH|   |                |---COIN-->|                |   |COIN |
|     |   |                |          |                |   |     |
|     |   |                |          |                |   |     |
|     |   |                |<--PUSH---|                |   |     |
|     +-->|                |          |                |<--+     |
|         |                |          |                |         |
|         +----------------+          +----------------+         |
|                                                                |
+----------------------------------------------------------------+

sm>sm start
State changed to LOCKED
State machine started

sm>sm event COIN
State changed to UNLOCKED
Event COIN send

sm>sm event PUSH
State changed to LOCKED
Event PUSH send
39. Turnstile Reactive
Turnstile reactive is an enhacement to Turnstile sample using same StateMachine concept and adding a reactive web layer communicating reactively with a StateMachine reactive interfaces.
StateMachineController is a simple @RestController where we autowire our StateMachine.
@Autowired
private StateMachine<States, Events> stateMachine;
We create first mapping to return a machine state. As state doesn’t come out from
a machine reactively, we can defer it so that when a returned Mono is subscribed,
actual state is requested.
@GetMapping("/state")
public Mono<States> state() {
	return Mono.defer(() -> Mono.justOrEmpty(stateMachine.getState().getId()));
}
To send a single event or multiple events to a machine we can use a Flux in both
incoming and outgoing layers. EventResult here is just for this sample and simply
wraps ResultType and event.
@PostMapping("/events")
public Flux<EventResult> events(@RequestBody Flux<EventData> eventData) {
	return eventData
		.filter(ed -> ed.getEvent() != null)
		.map(ed -> MessageBuilder.withPayload(ed.getEvent()).build())
		.flatMap(m -> stateMachine.sendEvent(Mono.just(m)))
		.map(EventResult::new);
}
You can use the following command to run the sample:
$ java -jar spring-statemachine-samples-turnstilereactive-4.0.1-SNAPSHOT.jarExample of getting a state:
GET http://localhost:8080/stateWould then response:
"LOCKED"Example of sending an event:
POST http://localhost:8080/events
content-type: application/json

{
    "event": "COIN"
}
Would then response:
[
  {
    "event": "COIN",
    "resultType": "ACCEPTED"
  }
]
You can post multiple events:
POST http://localhost:8080/events
content-type: application/json

[
    {
        "event": "COIN"
    },
    {
        "event": "PUSH"
    }
]
Response then contains results for both events:
[
{
"event": "COIN",
"resultType": "ACCEPTED"
},
{
"event": "PUSH",
"resultType": "ACCEPTED"
}
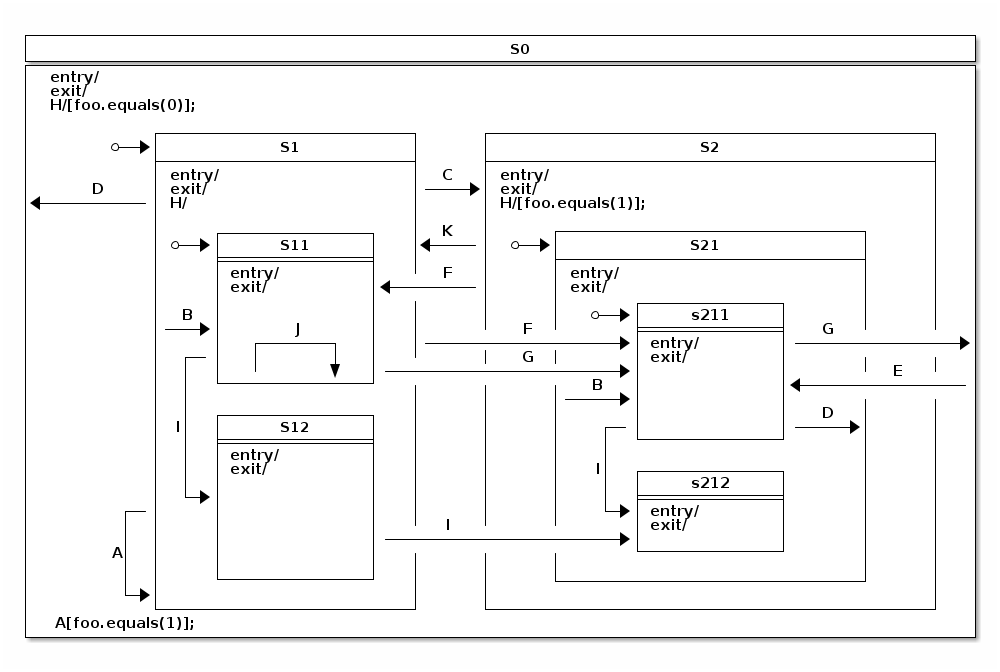
]40. Showcase
Showcase is a complex state machine that shows all possible transition topologies up to four levels of state nesting. The following image shows the state machine:
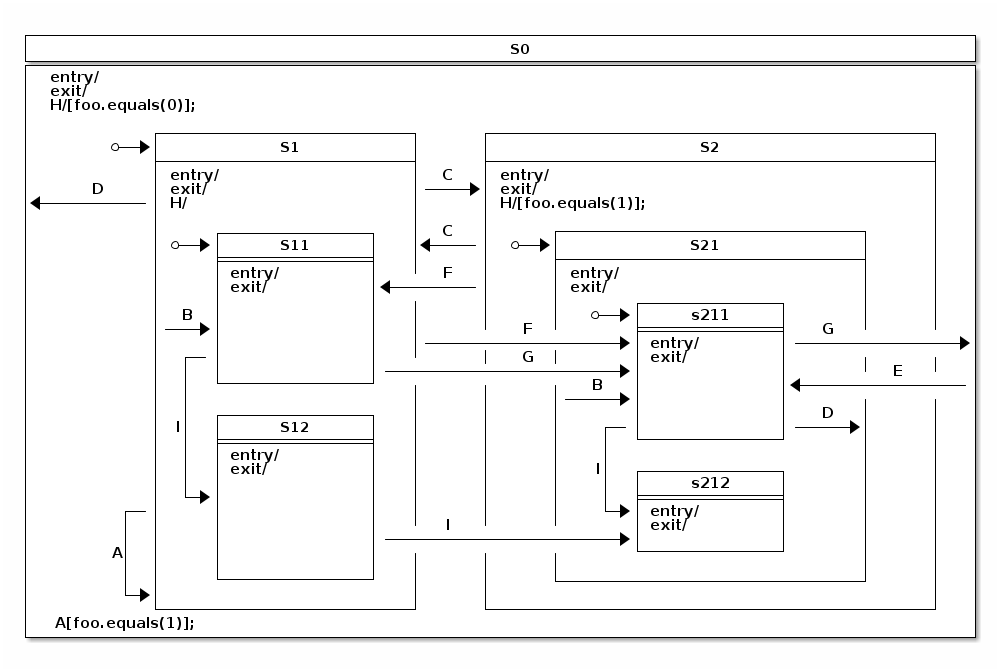
The following listing shows the enumeration that defines the possible states:
public enum States {
    S0, S1, S11, S12, S2, S21, S211, S212
}
The following listing shows the enumeration that defines the events:
public enum Events {
    A, B, C, D, E, F, G, H, I
}
The following listing shows the code that configures the state machine:
@Override
public void configure(StateMachineStateConfigurer<States, Events> states)
		throws Exception {
	states
		.withStates()
			.initial(States.S0, fooAction())
			.state(States.S0)
			.and()
			.withStates()
				.parent(States.S0)
				.initial(States.S1)
				.state(States.S1)
				.and()
				.withStates()
					.parent(States.S1)
					.initial(States.S11)
					.state(States.S11)
					.state(States.S12)
					.and()
			.withStates()
				.parent(States.S0)
				.state(States.S2)
				.and()
				.withStates()
					.parent(States.S2)
					.initial(States.S21)
					.state(States.S21)
					.and()
					.withStates()
						.parent(States.S21)
						.initial(States.S211)
						.state(States.S211)
						.state(States.S212);
}
The following listing shows the code that configures the state machine’s transitions:
@Override
public void configure(StateMachineTransitionConfigurer<States, Events> transitions)
		throws Exception {
	transitions
		.withExternal()
			.source(States.S1).target(States.S1).event(Events.A)
			.guard(foo1Guard())
			.and()
		.withExternal()
			.source(States.S1).target(States.S11).event(Events.B)
			.and()
		.withExternal()
			.source(States.S21).target(States.S211).event(Events.B)
			.and()
		.withExternal()
			.source(States.S1).target(States.S2).event(Events.C)
			.and()
		.withExternal()
			.source(States.S2).target(States.S1).event(Events.C)
			.and()
		.withExternal()
			.source(States.S1).target(States.S0).event(Events.D)
			.and()
		.withExternal()
			.source(States.S211).target(States.S21).event(Events.D)
			.and()
		.withExternal()
			.source(States.S0).target(States.S211).event(Events.E)
			.and()
		.withExternal()
			.source(States.S1).target(States.S211).event(Events.F)
			.and()
		.withExternal()
			.source(States.S2).target(States.S11).event(Events.F)
			.and()
		.withExternal()
			.source(States.S11).target(States.S211).event(Events.G)
			.and()
		.withExternal()
			.source(States.S211).target(States.S0).event(Events.G)
			.and()
		.withInternal()
			.source(States.S0).event(Events.H)
			.guard(foo0Guard())
			.action(fooAction())
			.and()
		.withInternal()
			.source(States.S2).event(Events.H)
			.guard(foo1Guard())
			.action(fooAction())
			.and()
		.withInternal()
			.source(States.S1).event(Events.H)
			.and()
		.withExternal()
			.source(States.S11).target(States.S12).event(Events.I)
			.and()
		.withExternal()
			.source(States.S211).target(States.S212).event(Events.I)
			.and()
		.withExternal()
			.source(States.S12).target(States.S212).event(Events.I);

}
The following listing shows the code that configures the state machine’s actions and guards:
@Bean
public FooGuard foo0Guard() {
	return new FooGuard(0);
}

@Bean
public FooGuard foo1Guard() {
	return new FooGuard(1);
}

@Bean
public FooAction fooAction() {
	return new FooAction();
}
The following listing shows how the single action is defined:
private static class FooAction implements Action<States, Events> {

	@Override
	public void execute(StateContext<States, Events> context) {
		Map<Object, Object> variables = context.getExtendedState().getVariables();
		Integer foo = context.getExtendedState().get("foo", Integer.class);
		if (foo == null) {
			log.info("Init foo to 0");
			variables.put("foo", 0);
		} else if (foo == 0) {
			log.info("Switch foo to 1");
			variables.put("foo", 1);
		} else if (foo == 1) {
			log.info("Switch foo to 0");
			variables.put("foo", 0);
		}
	}
}
The following listing shows how the single guard is defined:
private static class FooGuard implements Guard<States, Events> {

	private final int match;

	public FooGuard(int match) {
		this.match = match;
	}

	@Override
	public boolean evaluate(StateContext<States, Events> context) {
		Object foo = context.getExtendedState().getVariables().get("foo");
		return !(foo == null || !foo.equals(match));
	}
}
The following listing shows the output that this state machine produces when it runs and various events are sent to it:
sm>sm start
Init foo to 0
Entry state S0
Entry state S1
Entry state S11
State machine started

sm>sm event A
Event A send

sm>sm event C
Exit state S11
Exit state S1
Entry state S2
Entry state S21
Entry state S211
Event C send

sm>sm event H
Switch foo to 1
Internal transition source=S0
Event H send

sm>sm event C
Exit state S211
Exit state S21
Exit state S2
Entry state S1
Entry state S11
Event C send

sm>sm event A
Exit state S11
Exit state S1
Entry state S1
Entry state S11
Event A send
In the preceding output, we can see that:
-
The state machine is started, which takes it to its initial state (
S11) through superstates (S1) and (S0). Also, the extended state variable,foo, is initialized to0. -
We try to execute a self transition in state
S1with eventA, but nothing happens because the transition is guarded by variablefooto be1. -
We send event
C, which takes us to the other state machine, where the initial state (S211) and its superstates are entered. In there, we can use eventH, which does a simple internal transition to flip thefoovariable. Then we go back by using eventC. -
Event
Ais sent again, and nowS1does a self transition because the guard evaluates totrue.
The following example offers a closer look at how hierarchical states and their event handling works:
sm>sm variables
No variables

sm>sm start
Init foo to 0
Entry state S0
Entry state S1
Entry state S11
State machine started

sm>sm variables
foo=0

sm>sm event H
Internal transition source=S1
Event H send

sm>sm variables
foo=0

sm>sm event C
Exit state S11
Exit state S1
Entry state S2
Entry state S21
Entry state S211
Event C send

sm>sm variables
foo=0

sm>sm event H
Switch foo to 1
Internal transition source=S0
Event H send

sm>sm variables
foo=1

sm>sm event H
Switch foo to 0
Internal transition source=S2
Event H send

sm>sm variables
foo=0
In the preceding sample:
-
We print extended state variables in various stages.
-
With event
H, we end up running an internal transition, which is logged with its source state. -
Note how event
His handled in different states (S0,S1, andS2). This is a good example of how hierarchical states and their event handling works. If stateS2is unable to handle eventHdue to a guard condition, its parent is checked next. This guarantees that, while the machine is on stateS2, thefooflag is always flipped around. However, in stateS1, eventHalways matches to its dummy transition without guard or action, so it never happens.
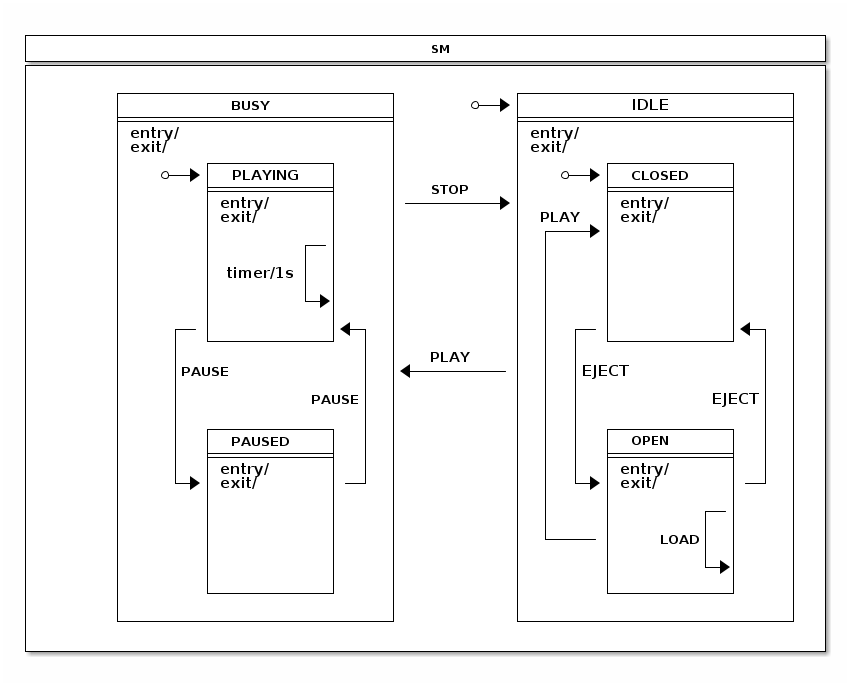
41. CD Player
CD Player is a sample which resembles a use case that many people have
used in the real world. CD Player itself is a really simple entity that allows a
user to open a deck, insert or change a disk, and then drive the player’s
functionality by pressing various buttons (eject, play,
stop, pause, rewind, and backward).
How many of us have really given thought to what it will take to make code that interacts with hardware to drive a CD Player. Yes, the concept of a player is simple, but, if you look behind the scenes, things actually get a bit convoluted.
You have probably noticed that, if your deck is open and you press play, the deck closes and a song starts to play (if a CD was inserted). In a sense, when the deck is open, you first need to close it and then try to start playing (again, if a CD is actually inserted). Hopefully, you have now realized that a simple CD Player is so simple. Sure, you can wrap all this with a simple class that has a few boolean variables and probably a few nested if-else clauses. That will do the job, but what about if you need to make all this behavior much more complex? Do you really want to keep adding more flags and if-else clauses?
The following image shows the state machine for our simple CD player:
The rest of this section goes through how this sample and its state machine is designed and
how those two interacts with each other. The following three configuration sections
are used within an EnumStateMachineConfigurerAdapter.
@Override
public void configure(StateMachineStateConfigurer<States, Events> states)
		throws Exception {
	states
		.withStates()
			.initial(States.IDLE)
			.state(States.IDLE)
			.and()
			.withStates()
				.parent(States.IDLE)
				.initial(States.CLOSED)
				.state(States.CLOSED, closedEntryAction(), null)
				.state(States.OPEN)
				.and()
		.withStates()
			.state(States.BUSY)
			.and()
			.withStates()
				.parent(States.BUSY)
				.initial(States.PLAYING)
				.state(States.PLAYING)
				.state(States.PAUSED);

}
@Override
public void configure(StateMachineTransitionConfigurer<States, Events> transitions)
		throws Exception {
	transitions
		.withExternal()
			.source(States.CLOSED).target(States.OPEN).event(Events.EJECT)
			.and()
		.withExternal()
			.source(States.OPEN).target(States.CLOSED).event(Events.EJECT)
			.and()
		.withExternal()
			.source(States.OPEN).target(States.CLOSED).event(Events.PLAY)
			.and()
		.withExternal()
			.source(States.PLAYING).target(States.PAUSED).event(Events.PAUSE)
			.and()
		.withInternal()
			.source(States.PLAYING)
			.action(playingAction())
			.timer(1000)
			.and()
		.withInternal()
			.source(States.PLAYING).event(Events.BACK)
			.action(trackAction())
			.and()
		.withInternal()
			.source(States.PLAYING).event(Events.FORWARD)
			.action(trackAction())
			.and()
		.withExternal()
			.source(States.PAUSED).target(States.PLAYING).event(Events.PAUSE)
			.and()
		.withExternal()
			.source(States.BUSY).target(States.IDLE).event(Events.STOP)
			.and()
		.withExternal()
			.source(States.IDLE).target(States.BUSY).event(Events.PLAY)
			.action(playAction())
			.guard(playGuard())
			.and()
		.withInternal()
			.source(States.OPEN).event(Events.LOAD).action(loadAction());
}
@Bean
public ClosedEntryAction closedEntryAction() {
	return new ClosedEntryAction();
}

@Bean
public LoadAction loadAction() {
	return new LoadAction();
}

@Bean
public TrackAction trackAction() {
	return new TrackAction();
}

@Bean
public PlayAction playAction() {
	return new PlayAction();
}

@Bean
public PlayingAction playingAction() {
	return new PlayingAction();
}

@Bean
public PlayGuard playGuard() {
	return new PlayGuard();
}
In the preceding configuration:
-
We used
EnumStateMachineConfigurerAdapterto configure states and transitions. -
The
CLOSEDandOPENstates are defined as substates ofIDLE, and thePLAYINGandPAUSEDstates are defined as substates ofBUSY. -
With the
CLOSEDstate, we added an entry action as a bean calledclosedEntryAction. -
In the transitions we mostly map events to expected state transitions, such as
EJECTclosing and opening a deck andPLAY,STOP, andPAUSEdoing their natural transitions. For other transitions, we did the following:-
For source state
PLAYING, we added a timer trigger, which is needed to automatically track elapsed time within a playing track and to have a facility for making the decision about when to switch the to next track. -
For the
PLAYevent, if the source state isIDLEand the target state isBUSY, we defined an action calledplayActionand a guard calledplayGuard. -
For the
LOADevent and theOPENstate, we defined an internal transition with an action calledloadAction, which tracks inserting a disc with extended-state variables. -
The
PLAYINGstate defines three internal transitions. One is triggered by a timer that runs an action calledplayingAction, which updates the extended state variables. The other two transitions usetrackActionwith different events (BACKandFORWARD, respectively) to handle when the user wants to go back or forward in tracks.
-
This machine has only have six states, which are defined by the following enumeration:
public enum States {
	// super state of PLAYING and PAUSED
    BUSY,
    PLAYING,
    PAUSED,
	// super state of CLOSED and OPEN
    IDLE,
    CLOSED,
    OPEN
}
Events represent the buttons the user can press and whether the user loads a disc into the player. The following enumeration defines the events:
public enum Events {
    PLAY, STOP, PAUSE, EJECT, LOAD, FORWARD, BACK
}
The cdPlayer and library beans are used to drive the application.
The following listing shows the definition of these two beans:
@Bean
public CdPlayer cdPlayer() {
	return new CdPlayer();
}

@Bean
public Library library() {
	return Library.buildSampleLibrary();
}
We define extended state variable keys as simple enumerations, as the following listing shows:
public enum Variables {
	CD, TRACK, ELAPSEDTIME
}

public enum Headers {
	TRACKSHIFT
}
We wanted to make this sample type safe, so we define our own
annotation (@StatesOnTransition), which has a mandatory meta
annotation (@OnTransition).
The following listing defines the @StatesOnTransition annotation:
@Target(ElementType.METHOD)
@Retention(RetentionPolicy.RUNTIME)
@OnTransition
public @interface StatesOnTransition {

	States[] source() default {};

	States[] target() default {};

}
ClosedEntryAction is an entry action for the CLOSED state, to
send a PLAY event to the state machine if a disc is present.
The following listing defines ClosedEntryAction:
public static class ClosedEntryAction implements Action<States, Events> {

	@Override
	public void execute(StateContext<States, Events> context) {
		if (context.getTransition() != null
				&& context.getEvent() == Events.PLAY
				&& context.getTransition().getTarget().getId() == States.CLOSED
				&& context.getExtendedState().getVariables().get(Variables.CD) != null) {
			context.getStateMachine()
				.sendEvent(Mono.just(MessageBuilder
					.withPayload(Events.PLAY).build()))
				.subscribe();
		}
	}
}
LoadAction update an extended state variable if event
headers contain information about a disc to load.
The following listing defines LoadAction:
public static class LoadAction implements Action<States, Events> {

	@Override
	public void execute(StateContext<States, Events> context) {
		Object cd = context.getMessageHeader(Variables.CD);
		context.getExtendedState().getVariables().put(Variables.CD, cd);
	}
}
PlayAction resets the player’s elapsed time, which is kept as
an extended state variable.
The following listing defines PlayAction:
public static class PlayAction implements Action<States, Events> {

	@Override
	public void execute(StateContext<States, Events> context) {
		context.getExtendedState().getVariables().put(Variables.ELAPSEDTIME, 0l);
		context.getExtendedState().getVariables().put(Variables.TRACK, 0);
	}
}
PlayGuard guards the transition from IDLE to BUSY with the
PLAY event if the CD extended state variable does not indicate that a
disc has been loaded.
The following listing defines PlayGuard:
public static class PlayGuard implements Guard<States, Events> {

	@Override
	public boolean evaluate(StateContext<States, Events> context) {
		ExtendedState extendedState = context.getExtendedState();
		return extendedState.getVariables().get(Variables.CD) != null;
	}
}
PlayingAction updates an extended state variable called ELAPSEDTIME, which
the player can use to read and update its LCD status display. PlayingAction also handles
track shifting when the user goe back or forward in tracks.
The following example defines PlayingAction:
public static class PlayingAction implements Action<States, Events> {

	@Override
	public void execute(StateContext<States, Events> context) {
		Map<Object, Object> variables = context.getExtendedState().getVariables();
		Object elapsed = variables.get(Variables.ELAPSEDTIME);
		Object cd = variables.get(Variables.CD);
		Object track = variables.get(Variables.TRACK);
		if (elapsed instanceof Long) {
			long e = ((Long)elapsed) + 1000l;
			if (e > ((Cd) cd).getTracks()[((Integer) track)].getLength()*1000) {
				context.getStateMachine()
					.sendEvent(Mono.just(MessageBuilder
						.withPayload(Events.FORWARD)
						.setHeader(Headers.TRACKSHIFT.toString(), 1).build()))
					.subscribe();
			} else {
				variables.put(Variables.ELAPSEDTIME, e);
			}
		}
	}
}
TrackAction handles track shift actions when the user goes back or forward
in tracks. If a track is the last on a disc, playing is stopped and the STOP
event is sent to a state machine.
The following example defines TrackAction:
public static class TrackAction implements Action<States, Events> {

	@Override
	public void execute(StateContext<States, Events> context) {
		Map<Object, Object> variables = context.getExtendedState().getVariables();
		Object trackshift = context.getMessageHeader(Headers.TRACKSHIFT.toString());
		Object track = variables.get(Variables.TRACK);
		Object cd = variables.get(Variables.CD);
		if (trackshift instanceof Integer && track instanceof Integer && cd instanceof Cd) {
			int next = ((Integer)track) + ((Integer)trackshift);
			if (next >= 0 &&  ((Cd)cd).getTracks().length > next) {
				variables.put(Variables.ELAPSEDTIME, 0l);
				variables.put(Variables.TRACK, next);
			} else if (((Cd)cd).getTracks().length <= next) {
				context.getStateMachine()
					.sendEvent(Mono.just(MessageBuilder
						.withPayload(Events.STOP).build()))
					.subscribe();
			}
		}
	}
}
One other important aspect of state machines is that they have their
own responsibilities (mostly around handling states) and that all application
level logic should be kept outside. This means that applications need
to have a ways to interact with a state machine. Also, note
that we annotated CdPlayer with @WithStateMachine, which instructs a
state machine to find methods from your POJO, which are then called
with various transitions.
The following example shows how it updates its LCD status display:
@OnTransition(target = "BUSY")
public void busy(ExtendedState extendedState) {
	Object cd = extendedState.getVariables().get(Variables.CD);
	if (cd != null) {
		cdStatus = ((Cd)cd).getName();
	}
}
In the preceding example, we use the @OnTransition annotation to hook a callback
when a transition happens with a target state of BUSY.
The following listing shows how our state machine handles whether the player is closed:
@StatesOnTransition(target = {States.CLOSED, States.IDLE})
public void closed(ExtendedState extendedState) {
	Object cd = extendedState.getVariables().get(Variables.CD);
	if (cd != null) {
		cdStatus = ((Cd)cd).getName();
	} else {
		cdStatus = "No CD";
	}
	trackStatus = "";
}
@OnTransition (which we used in the preceding examples) can only be
used with strings that are matched from enumerations. @StatesOnTransition
lets you create your own type-safe annotations that use real enumerations.
The following example shows how this state machine actually works.
sm>sm start
Entry state IDLE
Entry state CLOSED
State machine started

sm>cd lcd
No CD

sm>cd library
0: Greatest Hits
  0: Bohemian Rhapsody  05:56
  1: Another One Bites the Dust  03:36
1: Greatest Hits II
  0: A Kind of Magic  04:22
  1: Under Pressure  04:08

sm>cd eject
Exit state CLOSED
Entry state OPEN

sm>cd load 0
Loading cd Greatest Hits

sm>cd play
Exit state OPEN
Entry state CLOSED
Exit state CLOSED
Exit state IDLE
Entry state BUSY
Entry state PLAYING

sm>cd lcd
Greatest Hits Bohemian Rhapsody 00:03

sm>cd forward

sm>cd lcd
Greatest Hits Another One Bites the Dust 00:04

sm>cd stop
Exit state PLAYING
Exit state BUSY
Entry state IDLE
Entry state CLOSED

sm>cd lcd
Greatest Hits
In the preceding run:
-
The state machine is started, which causes the machine to be initialized.
-
The CD player’s LCD screen status is printed.
-
The CD library is printed.
-
The CD player’s deck is opened.
-
The CD with index 0 is loaded into a deck.
-
Play causes the deck to get closed and immediate play, because a disc was inserted.
-
We print the LCD status and request the next track.
-
We stop playing.
42. Tasks
The Tasks sample demonstrates parallel task handling within regions and adds error handling to either automatically or manually fix task problems before continuing back to a state where the tasks can be run again. The following image shows the Tasks state machine:
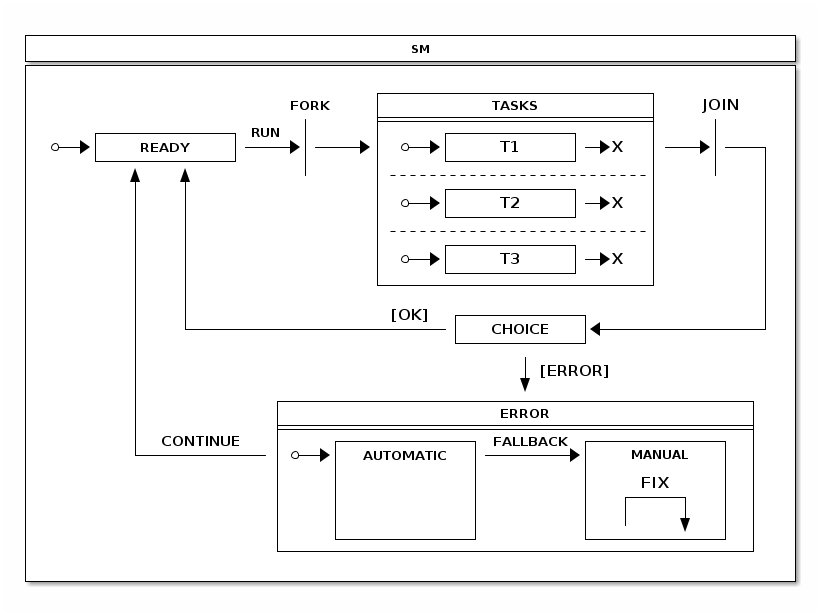
On a high level, in this state machine:
-
We always try to get into the
READYstate so that we can use the RUN event to execute tasks. -
The
TASKSstate, which is composed of three independent regions, has been put in the middle ofFORKandJOINstates, which will cause the regions to go into their initial states and to be joined by their end states. -
From the
JOINstate, we automatically go into aCHOICEstate, which checks for the existence of error flags in extended state variables. Tasks can set these flags, and doing so gives theCHOICEstate the ability to go into theERRORstate, where errors can be handled either automatically or manually. -
The
AUTOMATICstate inERRORcan try to automatically fix an error and goes back toREADYif it succeeds. If the error is something what cannot be handled automatically, user intervention is needed and the machine is put into theMANUALstate by theFALLBACKevent.
The following listing shows the enumeration that defines the possible states:
public enum States {
    READY,
    FORK, JOIN, CHOICE,
    TASKS, T1, T1E, T2, T2E, T3, T3E,
    ERROR, AUTOMATIC, MANUAL
}
The following listing shows the enumeration that defines the events:
public enum Events {
    RUN, FALLBACK, CONTINUE, FIX;
}
The following listing configures the possible states:
@Override
public void configure(StateMachineStateConfigurer<States, Events> states)
		throws Exception {
	states
		.withStates()
			.initial(States.READY)
			.fork(States.FORK)
			.state(States.TASKS)
			.join(States.JOIN)
			.choice(States.CHOICE)
			.state(States.ERROR)
			.and()
			.withStates()
				.parent(States.TASKS)
				.initial(States.T1)
				.end(States.T1E)
				.and()
			.withStates()
				.parent(States.TASKS)
				.initial(States.T2)
				.end(States.T2E)
				.and()
			.withStates()
				.parent(States.TASKS)
				.initial(States.T3)
				.end(States.T3E)
				.and()
			.withStates()
				.parent(States.ERROR)
				.initial(States.AUTOMATIC)
				.state(States.AUTOMATIC, automaticAction(), null)
				.state(States.MANUAL);
}
The following listing configures the possible transitions:
@Override
public void configure(StateMachineTransitionConfigurer<States, Events> transitions)
		throws Exception {
	transitions
		.withExternal()
			.source(States.READY).target(States.FORK)
			.event(Events.RUN)
			.and()
		.withFork()
			.source(States.FORK).target(States.TASKS)
			.and()
		.withExternal()
			.source(States.T1).target(States.T1E)
			.and()
		.withExternal()
			.source(States.T2).target(States.T2E)
			.and()
		.withExternal()
			.source(States.T3).target(States.T3E)
			.and()
		.withJoin()
			.source(States.TASKS).target(States.JOIN)
			.and()
		.withExternal()
			.source(States.JOIN).target(States.CHOICE)
			.and()
		.withChoice()
			.source(States.CHOICE)
			.first(States.ERROR, tasksChoiceGuard())
			.last(States.READY)
			.and()
		.withExternal()
			.source(States.ERROR).target(States.READY)
			.event(Events.CONTINUE)
			.and()
		.withExternal()
			.source(States.AUTOMATIC).target(States.MANUAL)
			.event(Events.FALLBACK)
			.and()
		.withInternal()
			.source(States.MANUAL)
			.action(fixAction())
			.event(Events.FIX);
}
The following guard sends a choice entry into the ERROR state and needs to
return TRUE if an error has happened. This guard checks that
all extended state variables(T1, T2, and T3) are TRUE.
@Bean
public Guard<States, Events> tasksChoiceGuard() {
	return new Guard<States, Events>() {

		@Override
		public boolean evaluate(StateContext<States, Events> context) {
			Map<Object, Object> variables = context.getExtendedState().getVariables();
			return !(ObjectUtils.nullSafeEquals(variables.get("T1"), true)
					&& ObjectUtils.nullSafeEquals(variables.get("T2"), true)
					&& ObjectUtils.nullSafeEquals(variables.get("T3"), true));
		}
	};
}
The following actions below send events to the state machine to request the next step, which is either to fall back or to continue back to ready.
@Bean
public Action<States, Events> automaticAction() {
	return new Action<States, Events>() {

		@Override
		public void execute(StateContext<States, Events> context) {
			Map<Object, Object> variables = context.getExtendedState().getVariables();
			if (ObjectUtils.nullSafeEquals(variables.get("T1"), true)
					&& ObjectUtils.nullSafeEquals(variables.get("T2"), true)
					&& ObjectUtils.nullSafeEquals(variables.get("T3"), true)) {
				context.getStateMachine()
					.sendEvent(Mono.just(MessageBuilder
						.withPayload(Events.CONTINUE).build()))
					.subscribe();
			} else {
				context.getStateMachine()
					.sendEvent(Mono.just(MessageBuilder
						.withPayload(Events.FALLBACK).build()))
					.subscribe();
			}
		}
	};
}

@Bean
public Action<States, Events> fixAction() {
	return new Action<States, Events>() {

		@Override
		public void execute(StateContext<States, Events> context) {
			Map<Object, Object> variables = context.getExtendedState().getVariables();
			variables.put("T1", true);
			variables.put("T2", true);
			variables.put("T3", true);
			context.getStateMachine()
				.sendEvent(Mono.just(MessageBuilder
					.withPayload(Events.CONTINUE).build()))
				.subscribe();
		}
	};
}
Default region execution is synchronous meaning a regions would be processed
sequentially. In this sample we simply want all task regions to get processed
parallel. This can be accomplished by defining RegionExecutionPolicy:
@Override
public void configure(StateMachineConfigurationConfigurer<States, Events> config)
		throws Exception {
	config
		.withConfiguration()
			.regionExecutionPolicy(RegionExecutionPolicy.PARALLEL);
}
The following example shows how this state machine actually works:
sm>sm start
State machine started
Entry state READY

sm>tasks run
Exit state READY
Entry state TASKS
run task on T2
run task on T1
run task on T3
run task on T2 done
run task on T1 done
run task on T3 done
Entry state T2
Entry state T1
Entry state T3
Exit state T2
Exit state T1
Exit state T3
Entry state T3E
Entry state T1E
Entry state T2E
Exit state TASKS
Entry state READY
In the preceding listing, we can see that tasks run multiple times. In the next listing, we introduce errors:
sm>tasks list
Tasks {T1=true, T3=true, T2=true}

sm>tasks fail T1

sm>tasks list
Tasks {T1=false, T3=true, T2=true}

sm>tasks run
Entry state TASKS
run task on T1
run task on T3
run task on T2
run task on T1 done
run task on T3 done
run task on T2 done
Entry state T1
Entry state T3
Entry state T2
Entry state T1E
Entry state T2E
Entry state T3E
Exit state TASKS
Entry state JOIN
Exit state JOIN
Entry state ERROR
Entry state AUTOMATIC
Exit state AUTOMATIC
Exit state ERROR
Entry state READY
In the preceding listing, if we simulate a failure for task T1, it is fixed automatically. In the next listing, we introduce more errors:
sm>tasks list
Tasks {T1=true, T3=true, T2=true}

sm>tasks fail T2

sm>tasks run
Entry state TASKS
run task on T2
run task on T1
run task on T3
run task on T2 done
run task on T1 done
run task on T3 done
Entry state T2
Entry state T1
Entry state T3
Entry state T1E
Entry state T2E
Entry state T3E
Exit state TASKS
Entry state JOIN
Exit state JOIN
Entry state ERROR
Entry state AUTOMATIC
Exit state AUTOMATIC
Entry state MANUAL

sm>tasks fix
Exit state MANUAL
Exit state ERROR
Entry state READY
In the precding example, if we simulate failure for either task T2 or T3, the state
machine goes to the MANUAL state, where problem needs to be fixed manually
before it can go back to the READY state.
43. Washer
The washer sample demonstrates how to use a history state to recover a running state configuration with a simulated power-off situation.
Anyone who has ever used a washing machine knows that if you somehow pause the program, it continue from the same state when unpaused. You can implement this kind of behavior in a state machine by using a history pseudo state. The following image shows our state machine for a washer:
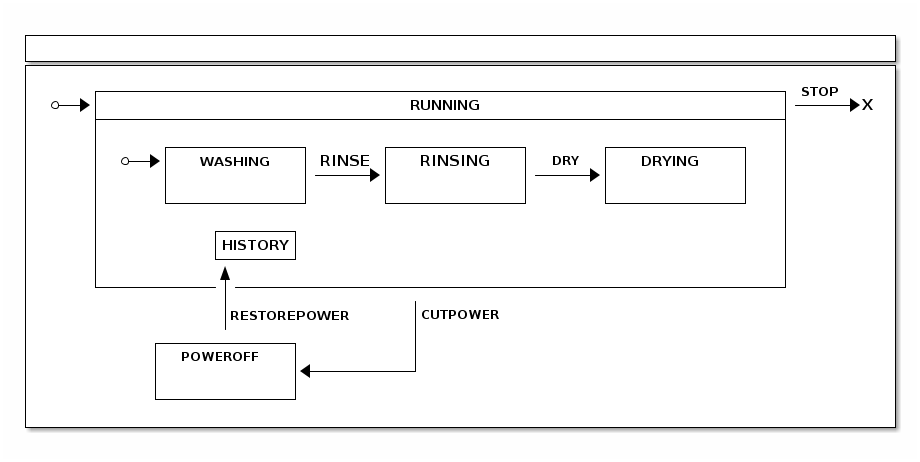
The following listing shows the enumeration that defines the possible states:
public enum States {
    RUNNING, HISTORY, END,
    WASHING, RINSING, DRYING,
    POWEROFF
}
The following listing shows the enumeration that defines the events:
public enum Events {
    RINSE, DRY, STOP,
    RESTOREPOWER, CUTPOWER
}
The following listing configures the possible states:
@Override
public void configure(StateMachineStateConfigurer<States, Events> states)
		throws Exception {
	states
		.withStates()
			.initial(States.RUNNING)
			.state(States.POWEROFF)
			.end(States.END)
			.and()
			.withStates()
				.parent(States.RUNNING)
				.initial(States.WASHING)
				.state(States.RINSING)
				.state(States.DRYING)
				.history(States.HISTORY, History.SHALLOW);
}
The following listing configures the possible transitions:
@Override
public void configure(StateMachineTransitionConfigurer<States, Events> transitions)
		throws Exception {
	transitions
		.withExternal()
			.source(States.WASHING).target(States.RINSING)
			.event(Events.RINSE)
			.and()
		.withExternal()
			.source(States.RINSING).target(States.DRYING)
			.event(Events.DRY)
			.and()
		.withExternal()
			.source(States.RUNNING).target(States.POWEROFF)
			.event(Events.CUTPOWER)
			.and()
		.withExternal()
			.source(States.POWEROFF).target(States.HISTORY)
			.event(Events.RESTOREPOWER)
			.and()
		.withExternal()
			.source(States.RUNNING).target(States.END)
			.event(Events.STOP);
}
The following example shows how this state machine actually works:
sm>sm start
Entry state RUNNING
Entry state WASHING
State machine started

sm>sm event RINSE
Exit state WASHING
Entry state RINSING
Event RINSE send

sm>sm event DRY
Exit state RINSING
Entry state DRYING
Event DRY send

sm>sm event CUTPOWER
Exit state DRYING
Exit state RUNNING
Entry state POWEROFF
Event CUTPOWER send

sm>sm event RESTOREPOWER
Exit state POWEROFF
Entry state RUNNING
Entry state WASHING
Entry state DRYING
Event RESTOREPOWER send
In the preceding run:
-
The state machine is started, which causes machine to get initialized.
-
The state machine goes to RINSING state.
-
The state machine goes to DRYING state.
-
The state machine cuts power and goes to POWEROFF state.
-
The state is restored from the HISTORY state, which takes state machine back to its previous known state.
44. Persist
Persist is a sample that uses the Persist recipe to demonstrate how database entry update logic can be controlled by a state machine.
The following image shows the state machine logic and configuration:
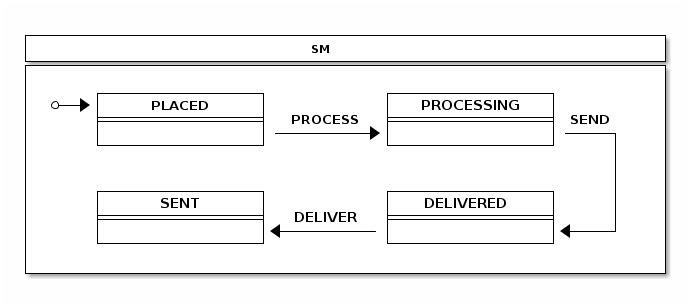
The following listing shows the state machine configuration:
@Configuration
@EnableStateMachine
static class StateMachineConfig
		extends StateMachineConfigurerAdapter<String, String> {

	@Override
	public void configure(StateMachineStateConfigurer<String, String> states)
			throws Exception {
		states
			.withStates()
				.initial("PLACED")
				.state("PROCESSING")
				.state("SENT")
				.state("DELIVERED");
	}

	@Override
	public void configure(StateMachineTransitionConfigurer<String, String> transitions)
			throws Exception {
		transitions
			.withExternal()
				.source("PLACED").target("PROCESSING")
				.event("PROCESS")
				.and()
			.withExternal()
				.source("PROCESSING").target("SENT")
				.event("SEND")
				.and()
			.withExternal()
				.source("SENT").target("DELIVERED")
				.event("DELIVER");
	}

}
The following configuration creates PersistStateMachineHandler:
@Configuration
static class PersistHandlerConfig {

	@Autowired
	private StateMachine<String, String> stateMachine;

	@Bean
	public Persist persist() {
		return new Persist(persistStateMachineHandler());
	}

	@Bean
	public PersistStateMachineHandler persistStateMachineHandler() {
		return new PersistStateMachineHandler(stateMachine);
	}

}
The following listing shows the Order class used with this sample:
public static class Order {
	int id;
	String state;

	public Order(int id, String state) {
		this.id = id;
		this.state = state;
	}

	@Override
	public String toString() {
		return "Order [id=" + id + ", state=" + state + "]";
	}

}
The following example shows the state machine’s output:
sm>persist db
Order [id=1, state=PLACED]
Order [id=2, state=PROCESSING]
Order [id=3, state=SENT]
Order [id=4, state=DELIVERED]

sm>persist process 1
Exit state PLACED
Entry state PROCESSING

sm>persist db
Order [id=2, state=PROCESSING]
Order [id=3, state=SENT]
Order [id=4, state=DELIVERED]
Order [id=1, state=PROCESSING]

sm>persist deliver 3
Exit state SENT
Entry state DELIVERED

sm>persist db
Order [id=2, state=PROCESSING]
Order [id=4, state=DELIVERED]
Order [id=1, state=PROCESSING]
Order [id=3, state=DELIVERED]
In the preceding run, the state machine:
-
Listed rows from an existing embedded database, which is already populated with sample data.
-
Requested to update order
1into thePROCESSINGstate. -
List database entries again and see that the state has been changed from
PLACEDtoPROCESSING. -
Update order
3to update its state fromSENTtoDELIVERED.
|
You may wonder where the database is, because there are literally no
signs of it in the sample code. The sample is based on Spring Boot and,
because the necessary classes are in a classpath, an embedded Spring Boot even creates an instance of |
Next, we need to handle state changes. The following listing shows how we do so:
public void change(int order, String event) {
	Order o = jdbcTemplate.queryForObject("select id, state from orders where id = ?",
			new RowMapper<Order>() {
				public Order mapRow(ResultSet rs, int rowNum) throws SQLException {
					return new Order(rs.getInt("id"), rs.getString("state"));
				}
			}, new Object[] { order });
	handler.handleEventWithStateReactively(MessageBuilder
			.withPayload(event).setHeader("order", order).build(), o.state)
		.subscribe();
}
Finally, we use a PersistStateChangeListener to update the database, as the
following listing shows:
private class LocalPersistStateChangeListener implements PersistStateChangeListener {

	@Override
	public void onPersist(State<String, String> state, Message<String> message,
			Transition<String, String> transition, StateMachine<String, String> stateMachine) {
		if (message != null && message.getHeaders().containsKey("order")) {
			Integer order = message.getHeaders().get("order", Integer.class);
			jdbcTemplate.update("update orders set state = ? where id = ?", state.getId(), order);
		}
	}
}
45. Zookeeper
Zookeeper is a distributed version from the Turnstile sample.
This sample needs an external Zookeeper instance that is accessible from
localhost and has the default port and settings.
|
Configuration of this sample is almost the same as the turnstile sample. We
add only the configuration for the distributed state machine where we
configure StateMachineEnsemble, as the following listing shows:
@Override
public void configure(StateMachineConfigurationConfigurer<String, String> config) throws Exception {
	config
		.withDistributed()
			.ensemble(stateMachineEnsemble());
}
The actual StateMachineEnsemble needs to be created as a bean, together
with the CuratorFramework client, as the following example shows:
@Bean
public StateMachineEnsemble<String, String> stateMachineEnsemble() throws Exception {
	return new ZookeeperStateMachineEnsemble<String, String>(curatorClient(), "/foo");
}

@Bean
public CuratorFramework curatorClient() throws Exception {
	CuratorFramework client = CuratorFrameworkFactory.builder().defaultData(new byte[0])
			.retryPolicy(new ExponentialBackoffRetry(1000, 3))
			.connectString("localhost:2181").build();
	client.start();
	return client;
}
For the next example, we need to create two different shell instances. We need to create one instance, see what happens, and then create the second instance. The following command starts the shell instances (remember to start only one instance for now):
@n1:~# java -jar spring-statemachine-samples-zookeeper-4.0.1-SNAPSHOT.jarWhen state machine is started, its initial state is
LOCKED. Then it sends a COIN event to transition into UNLOCKED state.
The following example shows what happens:
sm>sm start
Entry state LOCKED
State machine started

sm>sm event COIN
Exit state LOCKED
Entry state UNLOCKED
Event COIN send

sm>sm state
UNLOCKED
Now you can open a second shell instance and start a state machine,
by using the same command that you used to start the first state machine. You should see
that the distributed state (UNLOCKED) is entered instead of the default
initial state (LOCKED).
The following example shows the state machine and its output:
sm>sm start
State machine started

sm>sm state
UNLOCKED
Then from either shell (we use second instance in the next example), send a
PUSH event to transit from the UNLOCKED into the LOCKED state.
The following example shows the state machine command and its output:
sm>sm event PUSH
Exit state UNLOCKED
Entry state LOCKED
Event PUSH send
In the other shell (the first shell if you ran the preceding command in the second shell), you should see the state be changed automatically, based on distributed state kept in Zookeeper. The following example shows the state machine command and its output:
sm>Exit state UNLOCKED
Entry state LOCKED
46. Web
Web is a distributed state machine example that uses a zookeeper state machine to handle distributed state. See Zookeeper.
| This example is meant to be run on multiple browser sessions against multiple different hosts. |
This sample uses a modified state machine structure from Showcase to work with a distributed state machine. The following image shows the state machine logic:
Due to the nature of this sample, an instance of a Zookeeper state machine is expected to
be available from a localhost for every individual sample instance.
|
This demonstration uses an example that starts three different sample instances.
If you run different instances on the same host, you need to
distinguish the port each one uses by adding --server.port=<myport> to the command.
Otherwise the default port for each host is 8080.
In this sample run, we have three hosts: n1, n2, and n3. Each one
has a local zookeeper instance running and a state machine sample running
on a port 8080.
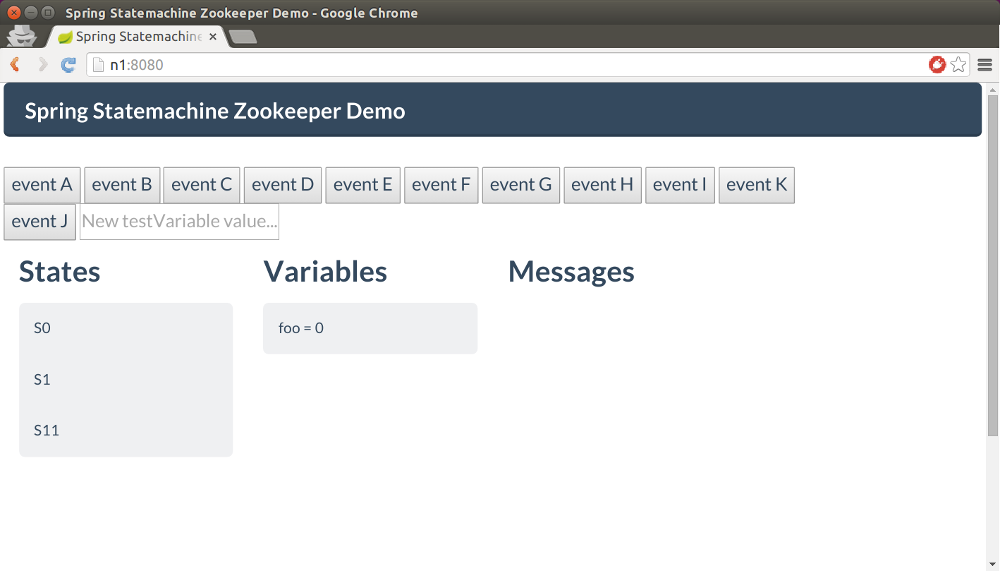
In there different terminals, start the three different state machines by running the following command:
# java -jar spring-statemachine-samples-web-4.0.1-SNAPSHOT.jarWhen all instances are running, you should see that all show similar
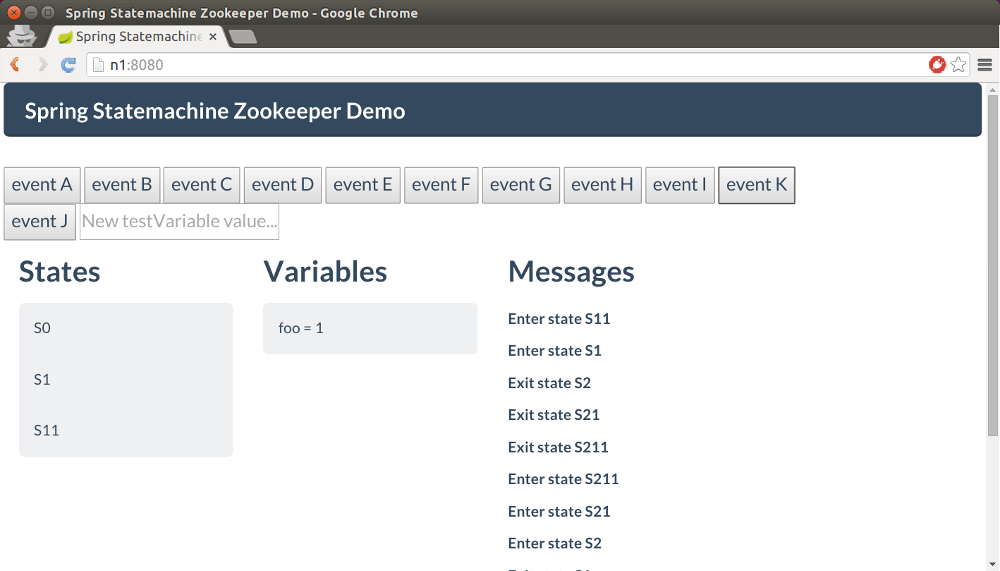
information when you access them with a browser. The states should be S0, S1, and S11.
The extended state variable named foo should have a value of 0. The main state is S11.
When you press the Event C button in any of the browser windows, the
distributed state is changed to S211, which is the target state
denoted by the transition associated with an event of type C.
The following image shows the change:

Now we can press the Event H button and see that the
internal transition runs on all state machines to change the
the value of the extended state variable named foo from 0 to 1. This change is
first done on the state machine that receives the event and is then propagated
to the other state machines. You should see only the variable named foo change
from 0 to 1.
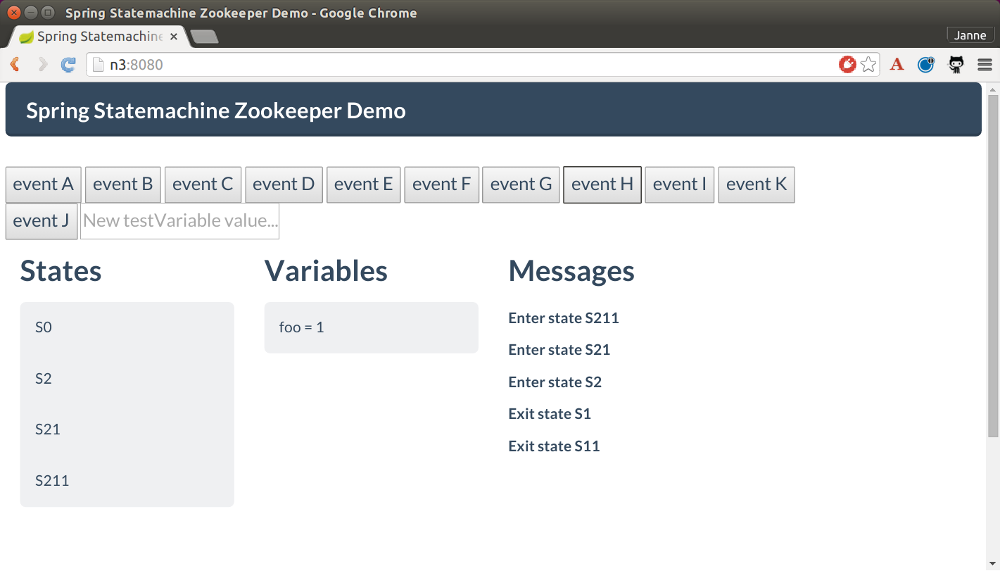
Finally, we can send Event K, which takes the state
machine state back to state S11. You should see this happen in
all of the browsers. The following image shows the result in one browser:
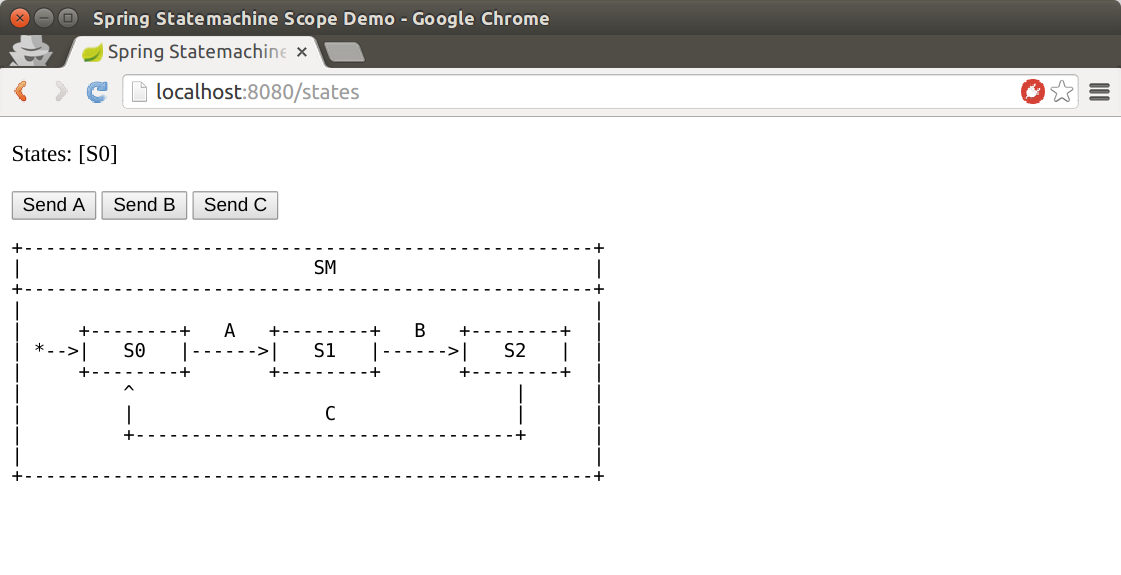
47. Scope
Scope is a state machine example that uses session scope to provide an individual instance for every user. The following image shows the states and events within the Scope state machine:
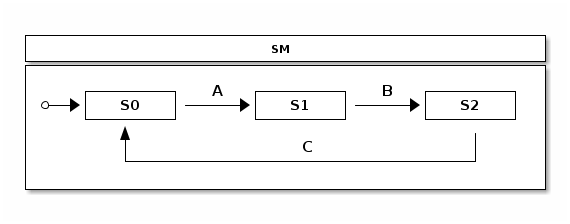
This simple state machine has three states: S0, S1, and S2.
Transitions between those are controlled by three events: A, B, and C.
To start the state machine, run the following command in a terminal:
# java -jar spring-statemachine-samples-scope-4.0.1-SNAPSHOT.jarWhen the instance is running, you can open a browser and play with the state machine. If you open the same page in a different browser, (for example, one in Chrome and one in Firefox), you should get a new state machine instance for each user session. The following image shows the state machine in a browser:
48. Security
Security is a state machine example that uses most of the possible combinations of securing a state machine. It secures sending events, transitions, and actions. The following image shows the state machine’s states and events:
To start the state machine, run the following command:
# java -jar spring-statemachine-samples-secure-4.0.1-SNAPSHOT.jarWe secure event sending by requiring that users have a role of USER.
Spring Security ensures that no other users can send events to this
state machine.
The following listing secures event sending:
@Override
public void configure(StateMachineConfigurationConfigurer<States, Events> config)
		throws Exception {
	config
		.withConfiguration()
			.autoStartup(true)
			.and()
		.withSecurity()
			.enabled(true)
			.event("hasRole('USER')");
}
In this sample we define two users:
-
A user named
userwho has a role ofUSER -
A user named
adminwho has two roles:USERandADMIN
The password for both users is password.
The following listing configures the two users:
static class SecurityConfig {

	@Bean
	public InMemoryUserDetailsManager userDetailsService() {
		UserDetails user = User.withDefaultPasswordEncoder()
				.username("user")
				.password("password")
				.roles("USER")
				.build();
		UserDetails admin = User.withDefaultPasswordEncoder()
				.username("admin")
				.password("password")
				.roles("USER", "ADMIN")
				.build();
		return new InMemoryUserDetailsManager(user, admin);
	}
}
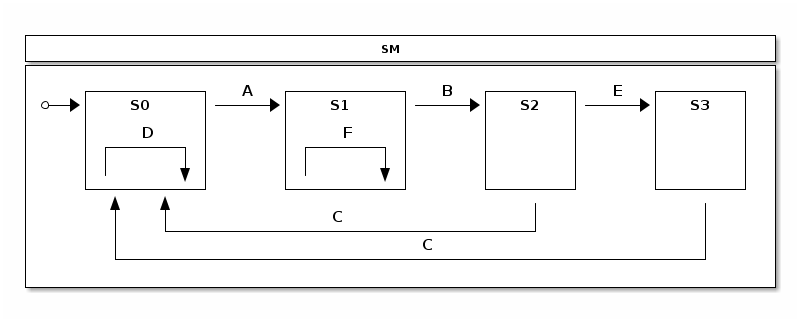
We define various transitions between states according to the state chart
shown at the beginning of the example. Only a user with an active ADMIN role can run
the external transitions between S2 and S3. Similarly only an ADMIN can
run the internal transition the S1 state.
The following listing defines the transitions, including their security:
@Override
public void configure(StateMachineTransitionConfigurer<States, Events> transitions)
		throws Exception {
	transitions
		.withExternal()
			.source(States.S0).target(States.S1).event(Events.A)
			.and()
		.withExternal()
			.source(States.S1).target(States.S2).event(Events.B)
			.and()
		.withExternal()
			.source(States.S2).target(States.S0).event(Events.C)
			.and()
		.withExternal()
			.source(States.S2).target(States.S3).event(Events.E)
			.secured("ROLE_ADMIN", ComparisonType.ANY)
			.and()
		.withExternal()
			.source(States.S3).target(States.S0).event(Events.C)
			.and()
		.withInternal()
			.source(States.S0).event(Events.D)
			.action(adminAction())
			.and()
		.withInternal()
			.source(States.S1).event(Events.F)
			.action(transitionAction())
			.secured("ROLE_ADMIN", ComparisonType.ANY);
}
The following listing uses a method called adminAction whose return type is Action to
specify that the action is secured with a role of ADMIN:
@Scope(proxyMode = ScopedProxyMode.TARGET_CLASS)
@Bean
public Action<States, Events> adminAction() {
	return new Action<States, Events>() {

		@Secured("ROLE_ADMIN")
		@Override
		public void execute(StateContext<States, Events> context) {
			log.info("Executed only for admin role");
		}
	};
}
The following Action runs an internal transition in state S when event F is sent.
@Bean
public Action<States, Events> transitionAction() {
	return new Action<States, Events>() {

		@Override
		public void execute(StateContext<States, Events> context) {
			log.info("Executed only for admin role");
		}
	};
}
The transition itself is secured with a
role of ADMIN, so this transition does not run if the current user
does not hate that role.
49. Event Service
The event service example shows how you can use state machine concepts as a processing engine for events. This sample evolved from a question:
Can I use Spring Statemachine as a microservice to feed events to different state machine instances? In fact, Spring Statemachine can feed events to potentially millions of different state machine instances.
This example uses a Redis instance to persist state machine
instances.
Obviously, a million state machine instances in a JVM would be
a bad idea, due to memory constraints. This leads to
other features of Spring Statemachine that let you persist a
StateMachineContext and re-use existing instances.
For this example, we assume that a shopping application
sends different types of PageView events to a separate
microservice which then tracks user behavior by using a state
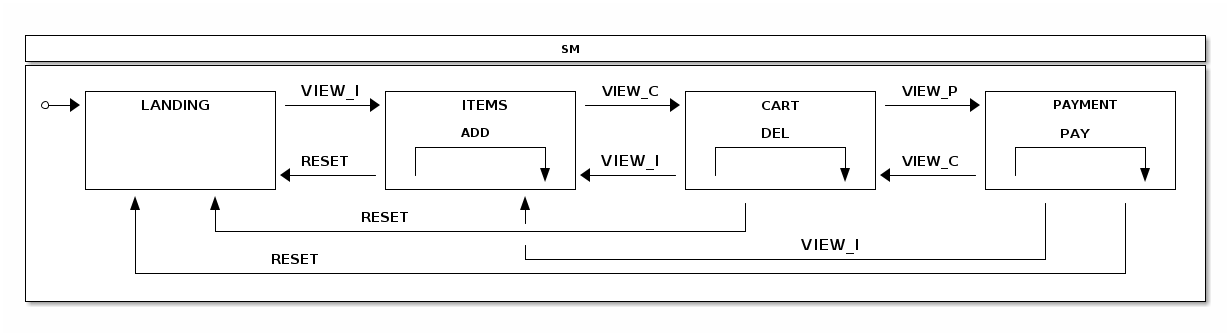
machine. The following image shows the state model, which has a few states
that represent a user navigating a product items list, adding and removing
items from a cart, going to a payment page, and initiating a payment
operation:
An actual shopping application would send these events into this service by (for example) using a rest call. More about this later.
Remember that the focus here is to have an application that exposes a
REST API that the user can use to send events that can be processed by a
state machine for each request.
|
The following state machine configuration models what we have in a
state chart. Various actions update the state machine’s Extended
State to track the number of entries into various states and also how
many times the internal transitions for ADD and DEL are called and whether
PAY has been executed:
@Bean(name = "stateMachineTarget")
@Scope(scopeName="prototype")
public StateMachine<States, Events> stateMachineTarget() throws Exception {
	Builder<States, Events> builder = StateMachineBuilder.<States, Events>builder();

	builder.configureConfiguration()
		.withConfiguration()
			.autoStartup(true);

	builder.configureStates()
		.withStates()
			.initial(States.HOME)
			.states(EnumSet.allOf(States.class));

	builder.configureTransitions()
		.withInternal()
			.source(States.ITEMS).event(Events.ADD)
			.action(addAction())
			.and()
		.withInternal()
			.source(States.CART).event(Events.DEL)
			.action(delAction())
			.and()
		.withInternal()
			.source(States.PAYMENT).event(Events.PAY)
			.action(payAction())
			.and()
		.withExternal()
			.source(States.HOME).target(States.ITEMS)
			.action(pageviewAction())
			.event(Events.VIEW_I)
			.and()
		.withExternal()
			.source(States.CART).target(States.ITEMS)
			.action(pageviewAction())
			.event(Events.VIEW_I)
			.and()
		.withExternal()
			.source(States.ITEMS).target(States.CART)
			.action(pageviewAction())
			.event(Events.VIEW_C)
			.and()
		.withExternal()
			.source(States.PAYMENT).target(States.CART)
			.action(pageviewAction())
			.event(Events.VIEW_C)
			.and()
		.withExternal()
			.source(States.CART).target(States.PAYMENT)
			.action(pageviewAction())
			.event(Events.VIEW_P)
			.and()
		.withExternal()
			.source(States.ITEMS).target(States.HOME)
			.action(resetAction())
			.event(Events.RESET)
			.and()
		.withExternal()
			.source(States.CART).target(States.HOME)
			.action(resetAction())
			.event(Events.RESET)
			.and()
		.withExternal()
			.source(States.PAYMENT).target(States.HOME)
			.action(resetAction())
			.event(Events.RESET);

	return builder.build();
}
Do not focus on stateMachineTarget or
@Scope for now, as we explain those later in this section.
We set up a RedisConnectionFactory that defaults to
localhost and default port. We use StateMachinePersist with a
RepositoryStateMachinePersist implementation. Finally, we create a
RedisStateMachinePersister that uses a previously
created StateMachinePersist bean.
These are then used in a Controller that handles REST calls,
as the following listing shows:
@Bean
public RedisConnectionFactory redisConnectionFactory() {
	return new JedisConnectionFactory();
}

@Bean
public StateMachinePersist<States, Events, String> stateMachinePersist(RedisConnectionFactory connectionFactory) {
	RedisStateMachineContextRepository<States, Events> repository =
			new RedisStateMachineContextRepository<States, Events>(connectionFactory);
	return new RepositoryStateMachinePersist<States, Events>(repository);
}

@Bean
public RedisStateMachinePersister<States, Events> redisStateMachinePersister(
		StateMachinePersist<States, Events, String> stateMachinePersist) {
	return new RedisStateMachinePersister<States, Events>(stateMachinePersist);
}
We create a bean named stateMachineTarget.
State machine instantiation is a relatively
expensive operation, so it is better to try to pool instances instead
of instantiating a new instance for every request. To do so, we first
create a poolTargetSource that wraps stateMachineTarget and pools
it with a max size of three. When then proxy this poolTargetSource with
ProxyFactoryBean by using a request scope. Effectively, this means
that every REST request gets a pooled state machine instance from
a bean factory. Later, we show how these instances are used.
The following listing shows how we create the ProxyFactoryBean
and set the target source:
@Bean
@Scope(value = "request", proxyMode = ScopedProxyMode.TARGET_CLASS)
public ProxyFactoryBean stateMachine() {
	ProxyFactoryBean pfb = new ProxyFactoryBean();
	pfb.setTargetSource(poolTargetSource());
	return pfb;
}
The following listing shows we set the maximum size and set the target bean name:
@Bean
public CommonsPool2TargetSource poolTargetSource() {
	CommonsPool2TargetSource pool = new CommonsPool2TargetSource();
	pool.setMaxSize(3);
	pool.setTargetBeanName("stateMachineTarget");
	return pool;
}
Now we can get into actual demo. You need to have a Redis server running on localhost with default settings. Then you need to run the Boot-based sample application by running the following command:
# java -jar spring-statemachine-samples-eventservice-4.0.1-SNAPSHOT.jarIn a browser, you see something like the following:
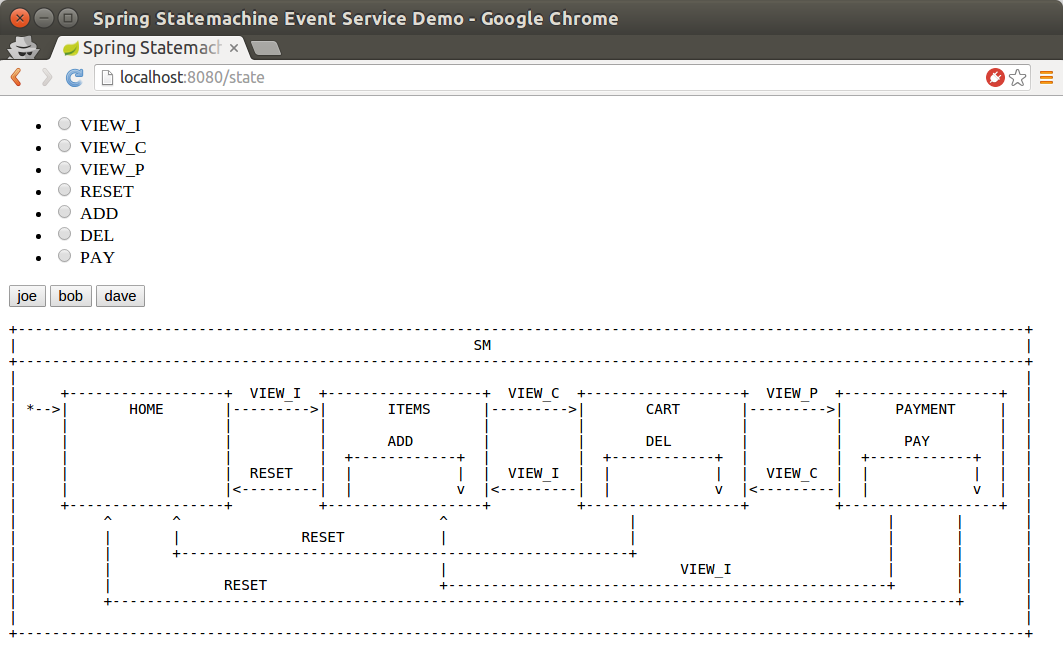
In this UI, you can use three users: joe, bob, and dave.
Clicking a button shows the current state and the extended state. Enabling a
radio button before clicking a button sends a particular event for that
user. This arrangement lets you play with the UI.
In our StateMachineController, we autowire StateMachine and
StateMachinePersister. StateMachine is request scoped, so you
get a new instance for each request, while StateMachinePersist is a normal
singleton bean.
The following listing autowires StateMachine and
StateMachinePersist:
@Autowired
private StateMachine<States, Events> stateMachine;

@Autowired
private StateMachinePersister<States, Events, String> stateMachinePersister;
In the following listing, feedAndGetState is used with a UI to do same things that an
actual REST api might do:
@RequestMapping("/state")
public String feedAndGetState(@RequestParam(value = "user", required = false) String user,
		@RequestParam(value = "id", required = false) Events id, Model model) throws Exception {
	model.addAttribute("user", user);
	model.addAttribute("allTypes", Events.values());
	model.addAttribute("stateChartModel", stateChartModel);
	// we may get into this page without a user so
	// do nothing with a state machine
	if (StringUtils.hasText(user)) {
		resetStateMachineFromStore(user);
		if (id != null) {
			feedMachine(user, id);
		}
		model.addAttribute("states", stateMachine.getState().getIds());
		model.addAttribute("extendedState", stateMachine.getExtendedState().getVariables());
	}
	return "states";
}
In the following listing, feedPageview is a REST method that accepts a post with
JSON content.
@RequestMapping(value = "/feed",method= RequestMethod.POST)
@ResponseStatus(HttpStatus.OK)
public void feedPageview(@RequestBody(required = true) Pageview event) throws Exception {
	Assert.notNull(event.getUser(), "User must be set");
	Assert.notNull(event.getId(), "Id must be set");
	resetStateMachineFromStore(event.getUser());
	feedMachine(event.getUser(), event.getId());
}
In the following listing, feedMachine sends an event into a StateMachine and persists
its state by using a StateMachinePersister:
private void feedMachine(String user, Events id) throws Exception {
	stateMachine
		.sendEvent(Mono.just(MessageBuilder
			.withPayload(id).build()))
		.blockLast();
	stateMachinePersister.persist(stateMachine, "testprefix:" + user);
}
The following listing shows a resetStateMachineFromStore that is used to restore a state machine
for a particular user:
private StateMachine<States, Events> resetStateMachineFromStore(String user) throws Exception {
	return stateMachinePersister.restore(stateMachine, "testprefix:" + user);
}
As you would usually send an event by using a UI, you can do the same by using REST calls,
as the following curl command shows:
# curl http://localhost:8080/feed -H "Content-Type: application/json" --data '{"user":"joe","id":"VIEW_I"}'At this point, you should have content in Redis with a key of
testprefix:joe, as the following example shows:
$ ./redis-cli
127.0.0.1:6379> KEYS *
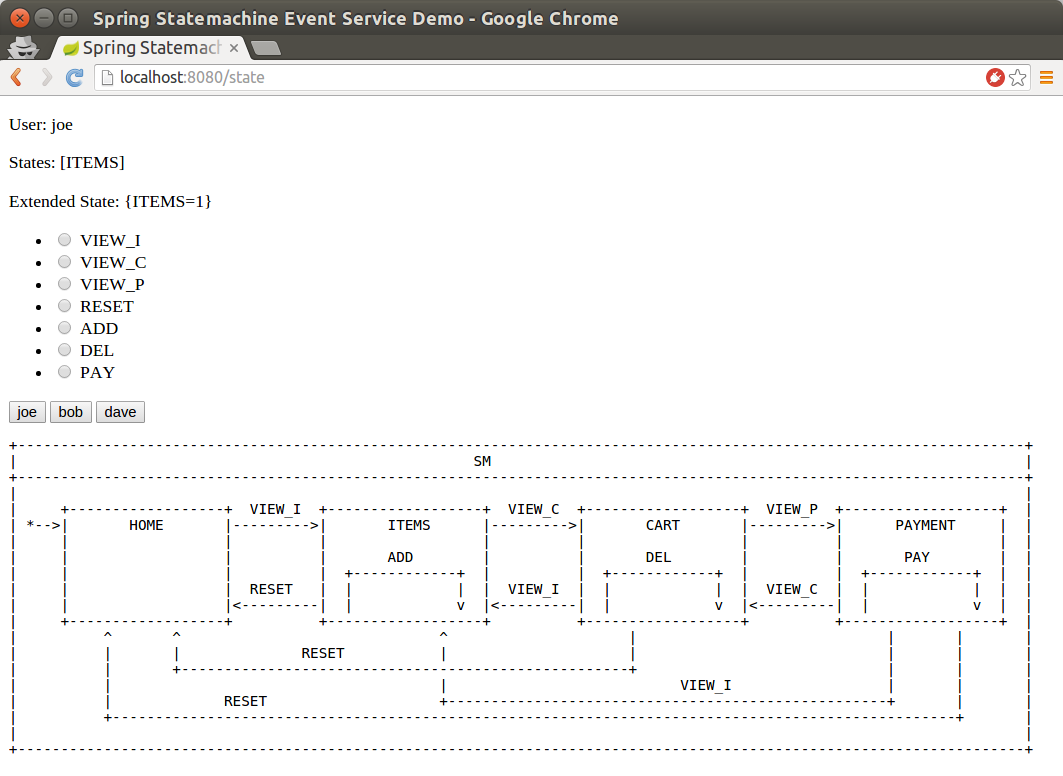
1) "testprefix:joe"The next three images show when state for joe has been changed from
HOME to ITEMS and when the ADD action has been executed.
The following image the ADD event being sent:
Now your are still on the ITEMS state, and the internal transition caused
the COUNT extended state variable to increase to 1, as the following image shows:
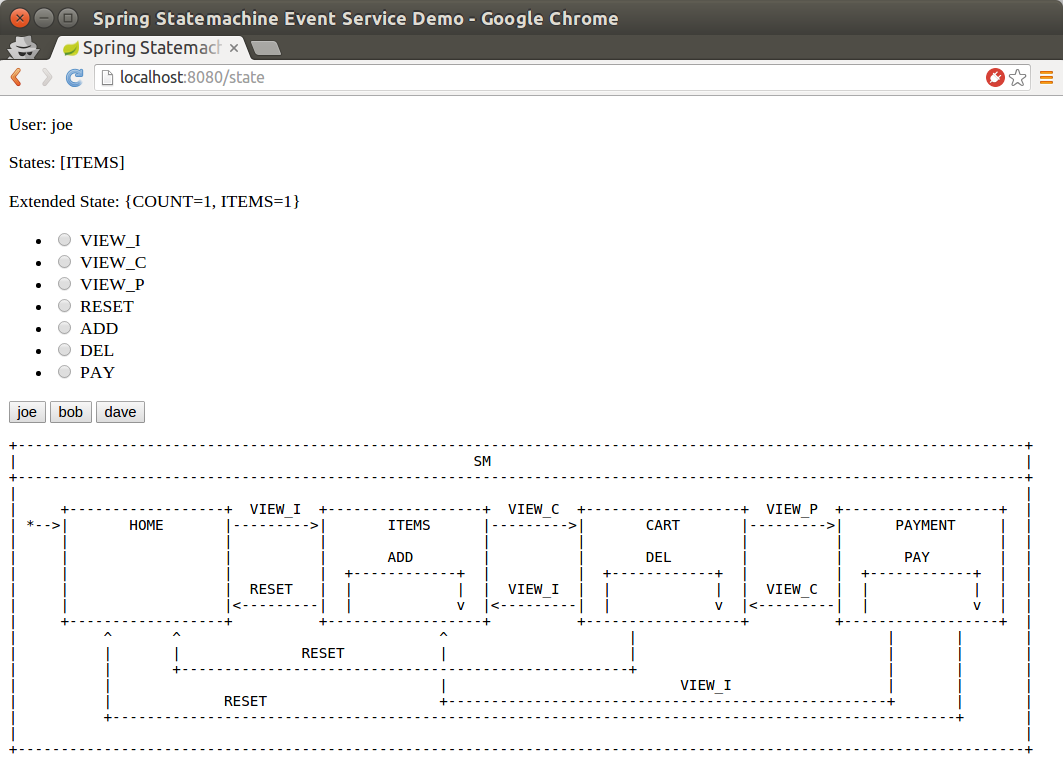
Now you can run the following curl rest call a few times (or do it through the UI) and
see the COUNT variable increase with every call:
# curl http://localhost:8080/feed -H "Content-Type: application/json" # --data '{"user":"joe","id":"ADD"}'The following image shows the result of these operations:

50. Deploy
The deploy example shows how you can use state machine concepts with UML modeling to provide a generic error handling state. This state machine is a relatively complex example of how you can use various features to provide a centralized error handling concept. The following image shows the deploy state machine:
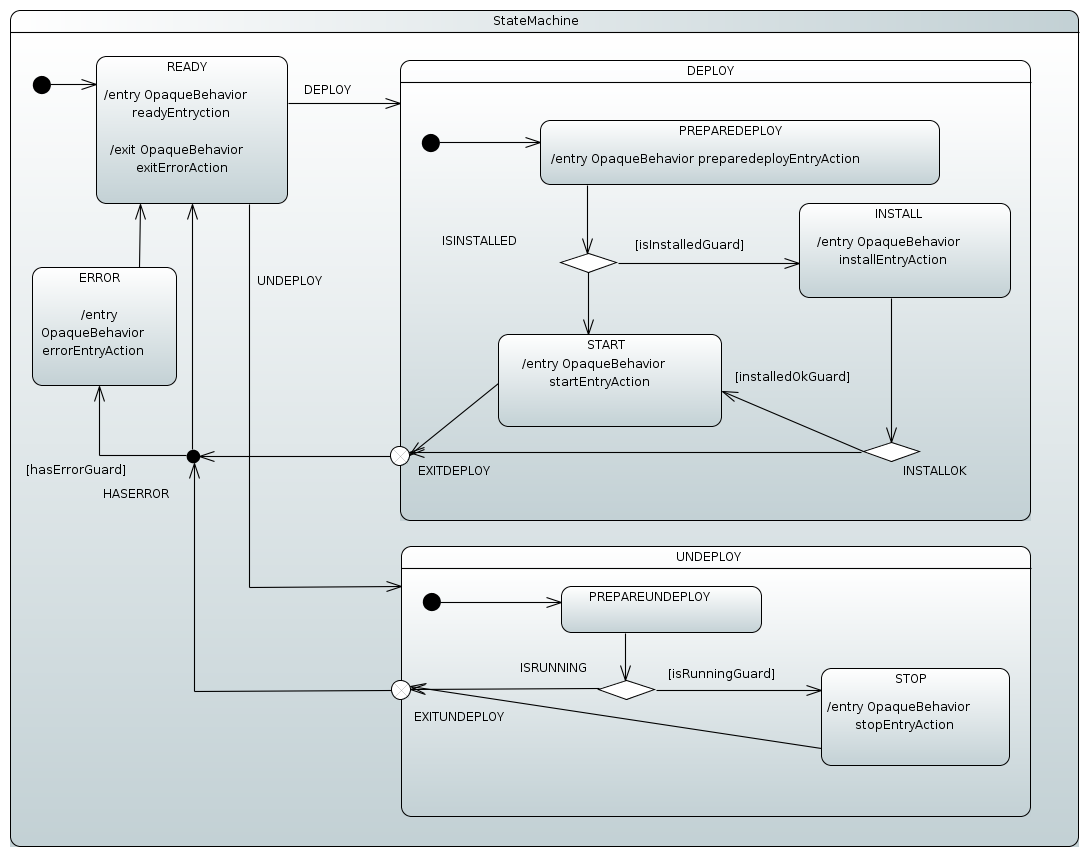
| The preceding state chart was designed by using the Eclipse Papyrus Plugin (seeEclipse Modeling Support) and imported into Spring StateMachine through the resulting UML model file. Actions and guards defined in a model are resolved from a Spring Application Context. |
In this state machine scenario, we have two different behaviors
(DEPLOY and UNDEPLOY) that user tries to execute.
In the preceding state chart:
-
In the
DEPLOYstate, theINSTALLandSTARTstates are entered conditionally. We enterSTARTdirectly if a product is already installed and have no need to try toSTARTif install fails. -
In the
UNDEPLOYstate, we enterSTOPconditionally if the application is already running. -
Conditional choices for
DEPLOYandUNDEPLOYare done through a choice pseudostate within those states, and the choices are selected by guards. -
We use exit point pseudostates to have a more controlled exit from the
DEPLOYandUNDEPLOYstates. -
After exiting from
DEPLOYandUNDEPLOY, we go through a junction pseudostate to choose whether to go through anERRORstate (if an error was added into an extended state). -
Finally, we go back to the
READYstate to process new requests.
Now we can get to the actual demo. Run the boot based sample application by running the following command:
# java -jar spring-statemachine-samples-deploy-4.0.1-SNAPSHOT.jarIn a browser, you can see something like the following image:
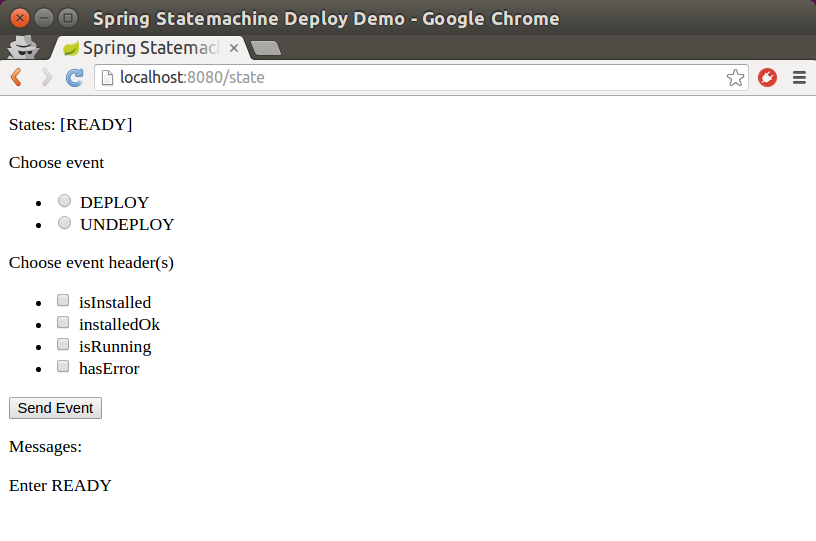
| As we do not have real install, start, or stop functionality, we simulate failures by checking the existence of particular message headers. |
Now you can start to send events to a machine and choose various message headers to drive functionality.
51. Order Shipping
The order shipping example shows how you can use state machine concepts to build a simple order processing system.
The following image shows a state chart that drives this order shipping sample.
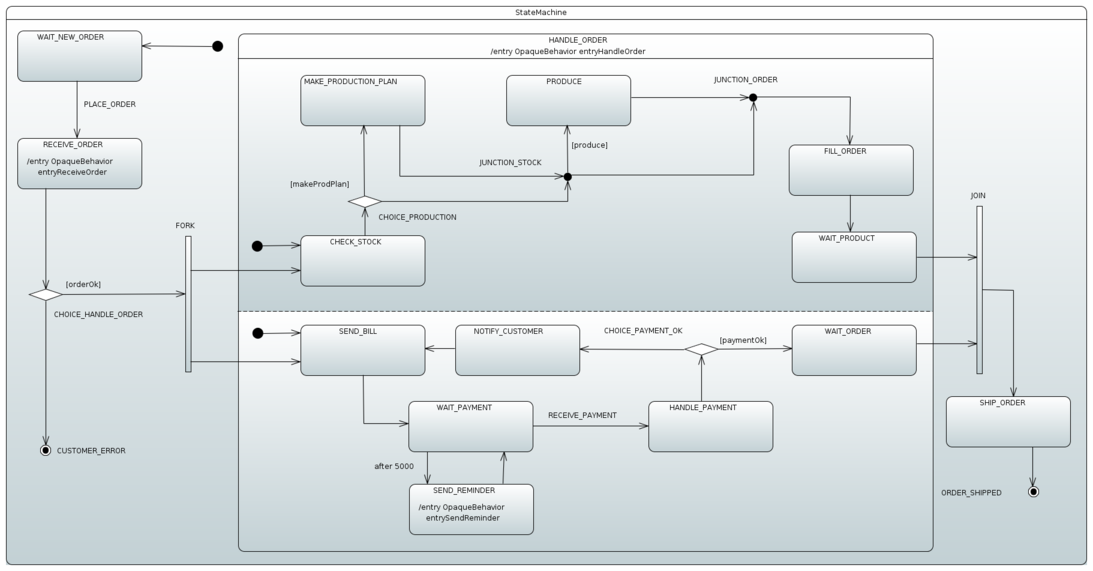
In the preceding state chart:
-
The state machine enters the
WAIT_NEW_ORDER(default) state. -
The event
PLACE_ORDERtransitions into theRECEIVE_ORDERstate and the entry action (entryReceiveOrder) is executed. -
If the order is
OK, the state machine goes into two regions, one handling order production and one handling user-level payment. Otherwise, the state machine goes intoCUSTOMER_ERROR, which is a final state. -
The state machine loops in a lower region to remind the user to pay until
RECEIVE_PAYMENTis sent successfully to indicate correct payment. -
Both regions go into waiting states (
WAIT_PRODUCTandWAIT_ORDER), where they are joined before the parent orthogonal state (HANDLE_ORDER) is exited. -
Finally, the state machine goes through
SHIP_ORDERto its final state (ORDER_SHIPPED).
The following command runs the sample:
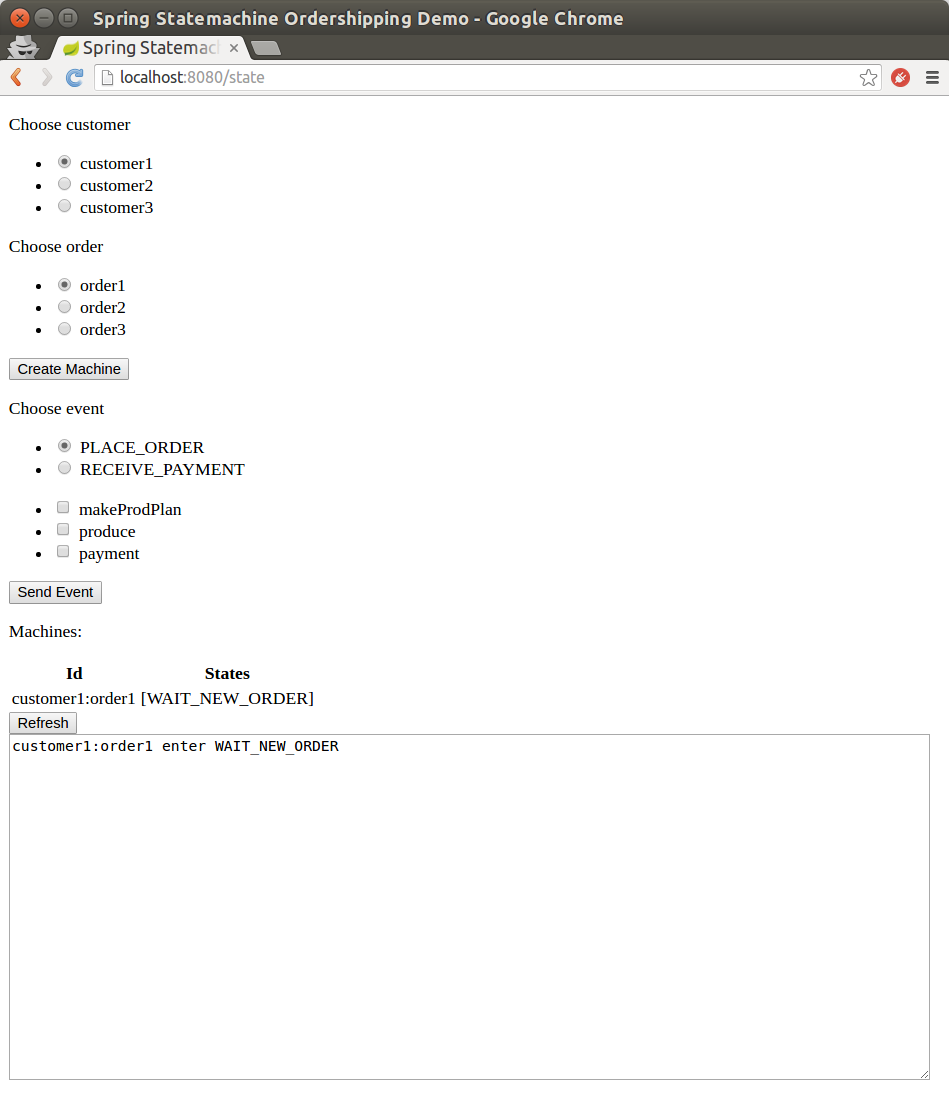
# java -jar spring-statemachine-samples-ordershipping-4.0.1-SNAPSHOT.jarIn a browser, you can see something similar to the following image. You can start by choosing a customer and an order to create a state machine.
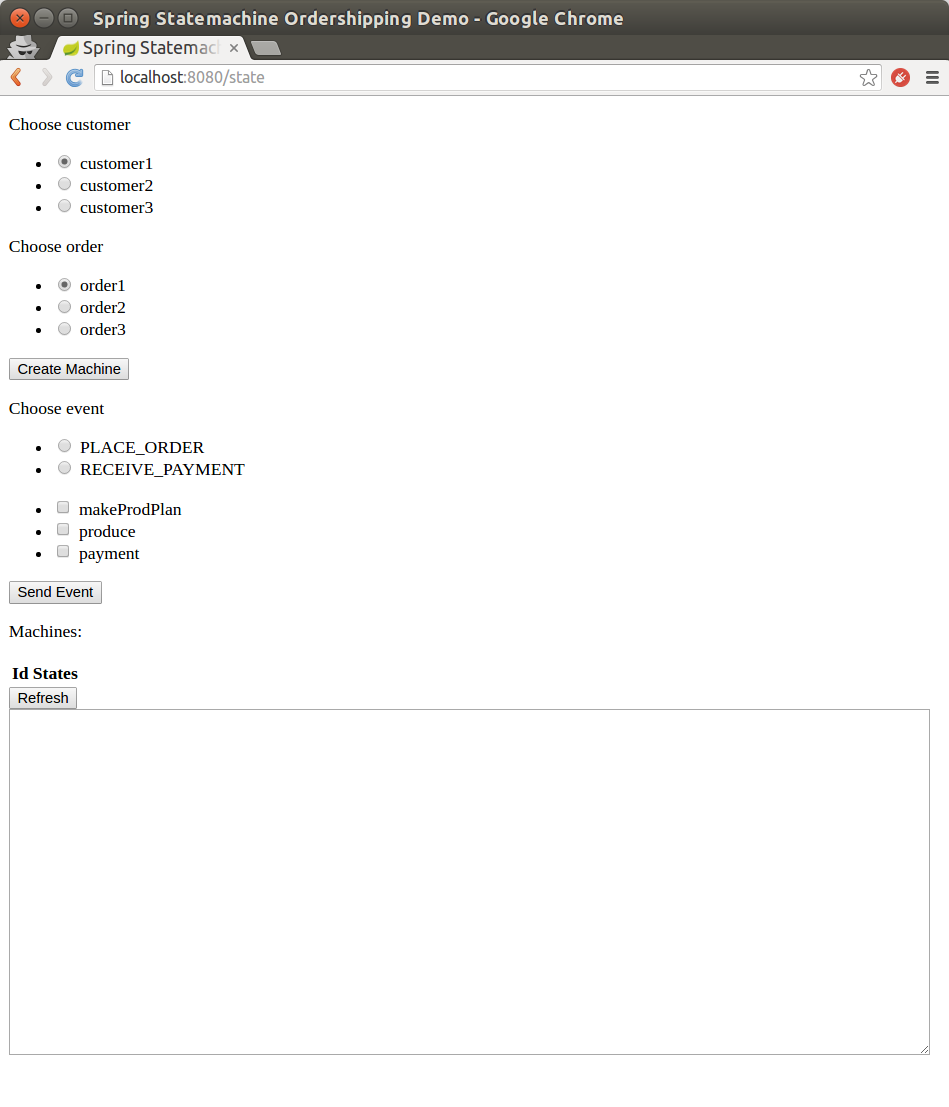
The state machine for a particular order is now created and you can start to play
with placing an order and sending a payment. Other settings (such as
makeProdPlan, produce, and payment) let you control how the state
machine works.
The following image shows the state machine waiting for an order:
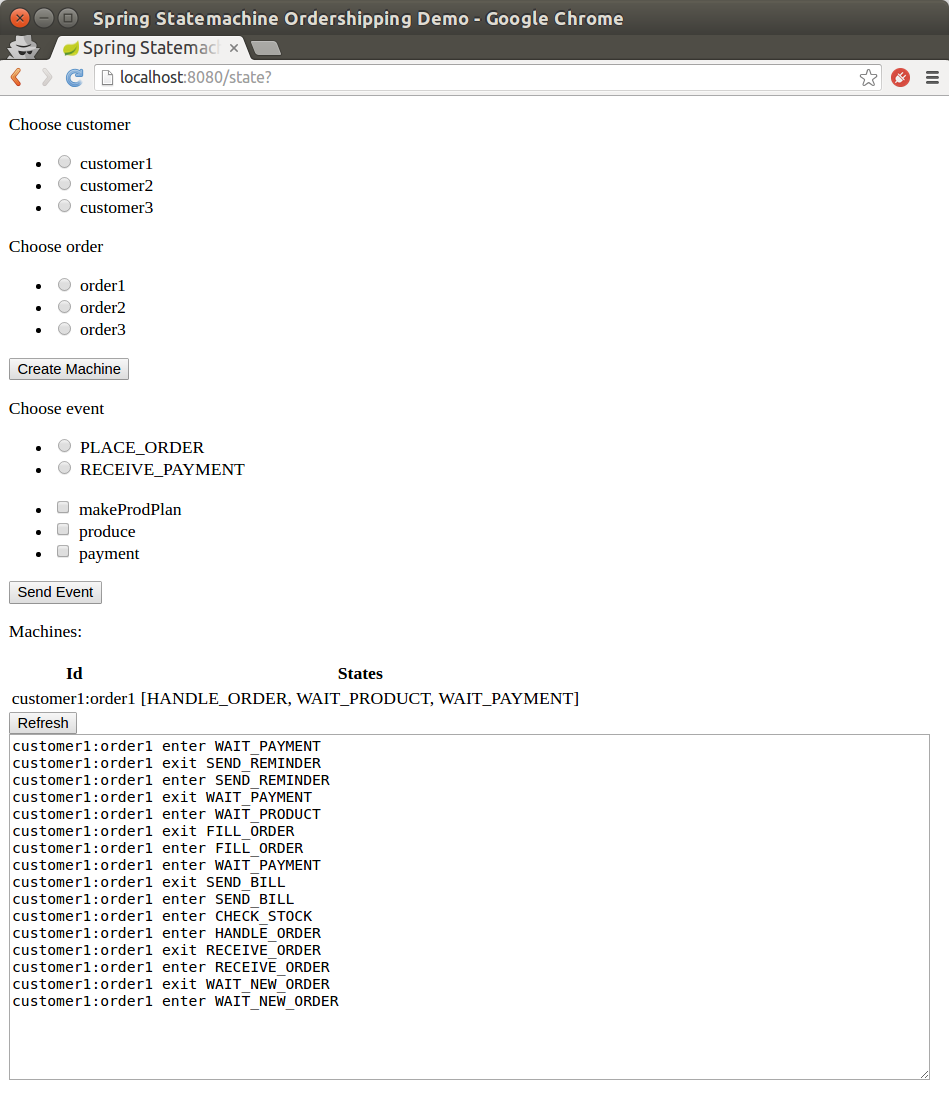
Finally, you can see what machine does by refreshing a page, as the following image shows:
52. JPA Configuration
The JPA configuration example shows how you can use state machine concepts with a machine configuration kept in a database. This sample uses an embedded H2 database with an H2 Console (to ease playing with the database).
This sample uses spring-statemachine-autoconfigure (which, by default,
auto-configures the repositories and entity classes needed for JPA).
Thus, you need only @SpringBootApplication.
The following example shows the Application class with the @SpringBootApplication annotation:
@SpringBootApplication
public class Application {

	public static void main(String[] args) {
		SpringApplication.run(Application.class, args);
	}
}
The following example shows how to create a RepositoryStateMachineModelFactory:
@Configuration
@EnableStateMachineFactory
public static class Config extends StateMachineConfigurerAdapter<String, String> {

	@Autowired
	private StateRepository<? extends RepositoryState> stateRepository;

	@Autowired
	private TransitionRepository<? extends RepositoryTransition> transitionRepository;

	@Override
	public void configure(StateMachineModelConfigurer<String, String> model) throws Exception {
		model
			.withModel()
				.factory(modelFactory());
	}

	@Bean
	public StateMachineModelFactory<String, String> modelFactory() {
		return new RepositoryStateMachineModelFactory(stateRepository, transitionRepository);
	}
}
You can use the following command to run the sample:
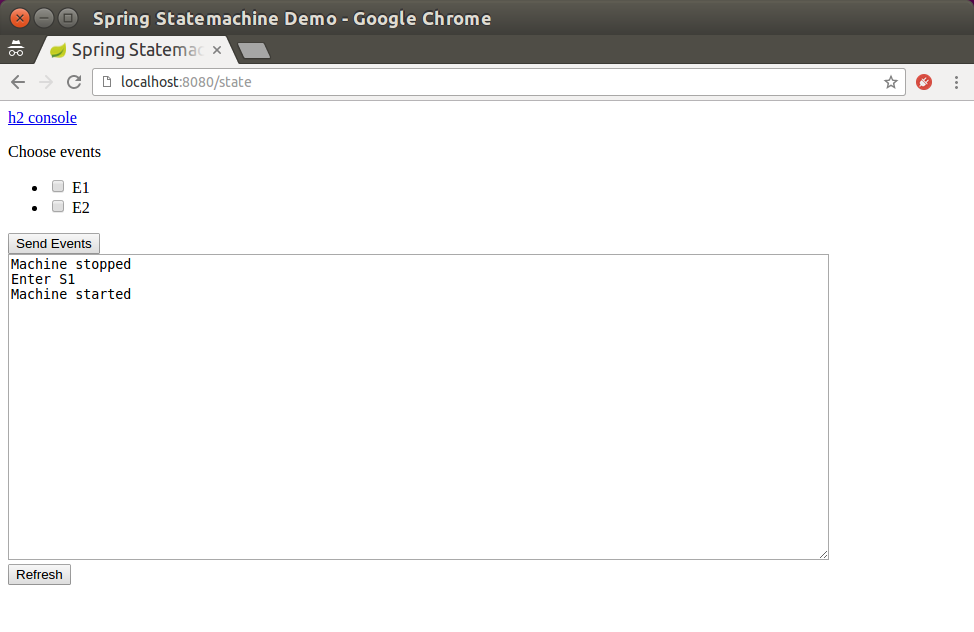
# java -jar spring-statemachine-samples-datajpa-4.0.1-SNAPSHOT.jarAccessing the application at http://localhost:8080 brings up a newly
constructed machine for each request. You can then choose to send
events to a machine. The possible events and machine configuration are
updated from a database with every request.
The following image shows the UI and the initial events that are created when
this state machine starts:
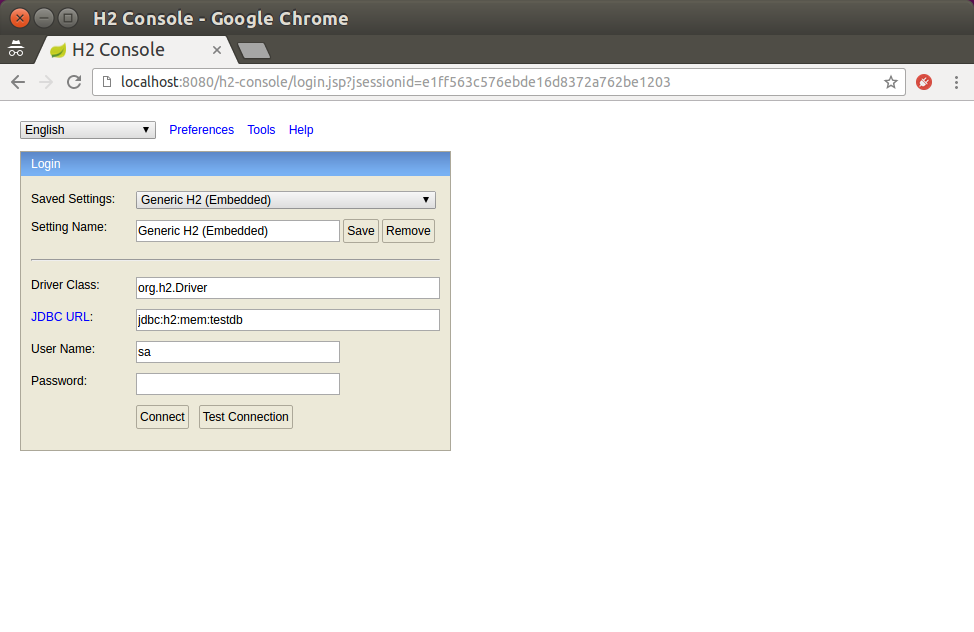
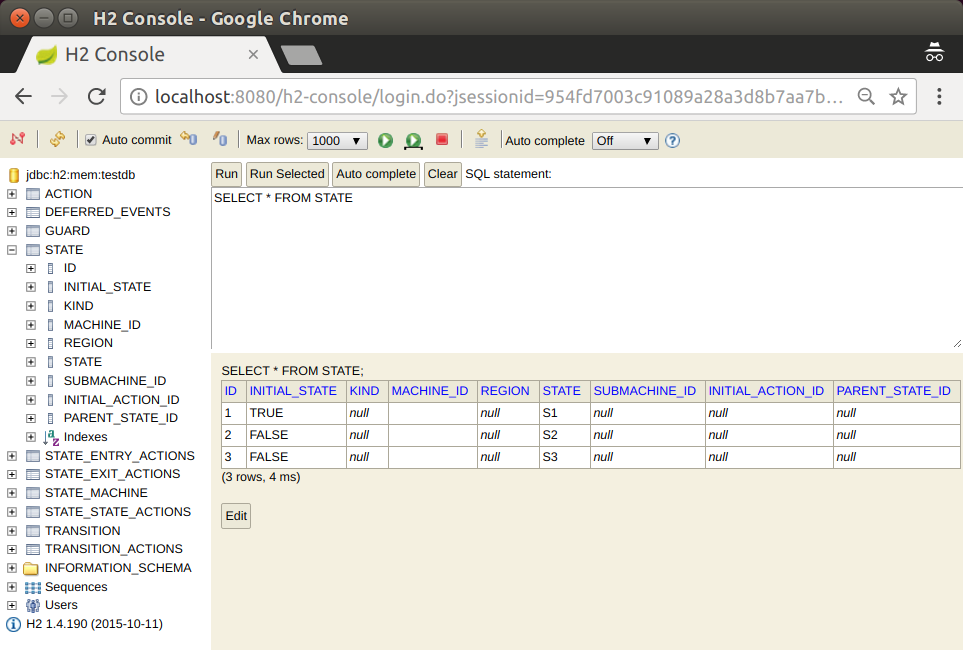
To access the embedded console, you can use the JDBC URL (which is jdbc:h2:mem:testdb, if it is
not already set).
The following image shows the H2 console:
From the console, you can see the database tables and modify them as you wish. The following image shows the result of a simple query in the UI:
Now that you have gotten this far, you have probably wondered how those default
states and transitions got populated into the database. Spring Data
has a nice trick to auto-populate repositories, and we
used this feature through Jackson2RepositoryPopulatorFactoryBean.
The following example shows how we create such a bean:
@Bean
public StateMachineJackson2RepositoryPopulatorFactoryBean jackson2RepositoryPopulatorFactoryBean() {
	StateMachineJackson2RepositoryPopulatorFactoryBean factoryBean = new StateMachineJackson2RepositoryPopulatorFactoryBean();
	factoryBean.setResources(new Resource[]{new ClassPathResource("data.json")});
	return factoryBean;
}
The following listing shows the source of the data with which we populate the database:
[
	{
		"@id": "10",
		"_class": "org.springframework.statemachine.data.jpa.JpaRepositoryAction",
		"spel": "T(System).out.println('hello exit S1')"
	},
	{
		"@id": "11",
		"_class": "org.springframework.statemachine.data.jpa.JpaRepositoryAction",
		"spel": "T(System).out.println('hello entry S2')"
	},
	{
		"@id": "12",
		"_class": "org.springframework.statemachine.data.jpa.JpaRepositoryAction",
		"spel": "T(System).out.println('hello state S3')"
	},
	{
		"@id": "13",
		"_class": "org.springframework.statemachine.data.jpa.JpaRepositoryAction",
		"spel": "T(System).out.println('hello')"
	},
	{
		"@id": "1",
		"_class": "org.springframework.statemachine.data.jpa.JpaRepositoryState",
		"initial": true,
		"state": "S1",
		"exitActions": ["10"]
	},
	{
		"@id": "2",
		"_class": "org.springframework.statemachine.data.jpa.JpaRepositoryState",
		"initial": false,
		"state": "S2",
		"entryActions": ["11"]
	},
	{
		"@id": "3",
		"_class": "org.springframework.statemachine.data.jpa.JpaRepositoryState",
		"initial": false,
		"state": "S3",
		"stateActions": ["12"]
	},
	{
		"_class": "org.springframework.statemachine.data.jpa.JpaRepositoryTransition",
		"source": "1",
		"target": "2",
		"event": "E1",
		"kind": "EXTERNAL"
	},
	{
		"_class": "org.springframework.statemachine.data.jpa.JpaRepositoryTransition",
		"source": "2",
		"target": "3",
		"event": "E2",
		"actions": ["13"]
	}
]
53. Data Persist
The data persist sample shows how you can state machine concepts with a persisting machine in an external repository. This sample uses an embedded H2 database with an H2 Console (to ease playing with the database). Optionally, you can also enable Redis or MongoDB.
This sample uses spring-statemachine-autoconfigure (which, by default,
auto-configures the repositories and entity classes needed for JPA).
Thus, you need only @SpringBootApplication.
The following example shows the Application class with the @SpringBootApplication annotation:
@SpringBootApplication
public class Application {

	public static void main(String[] args) {
		SpringApplication.run(Application.class, args);
	}
}
The StateMachineRuntimePersister interface works on the runtime
level of a StateMachine. Its implementation,
JpaPersistingStateMachineInterceptor, is meant to be used with a
JPA.
The following listing creates a StateMachineRuntimePersister bean:
@Configuration
@Profile("jpa")
public static class JpaPersisterConfig {

	@Bean
	public StateMachineRuntimePersister<States, Events, String> stateMachineRuntimePersister(
			JpaStateMachineRepository jpaStateMachineRepository) {
		return new JpaPersistingStateMachineInterceptor<>(jpaStateMachineRepository);
	}
}
The following example shows how you can use a very similar configuration to create a bean for MongoDB:
@Configuration
@Profile("mongo")
public static class MongoPersisterConfig {

	@Bean
	public StateMachineRuntimePersister<States, Events, String> stateMachineRuntimePersister(
			MongoDbStateMachineRepository jpaStateMachineRepository) {
		return new MongoDbPersistingStateMachineInterceptor<>(jpaStateMachineRepository);
	}
}
The following example shows how you can use a very similar configuration to create a bean for Redis:
@Configuration
@Profile("redis")
public static class RedisPersisterConfig {

	@Bean
	public StateMachineRuntimePersister<States, Events, String> stateMachineRuntimePersister(
			RedisStateMachineRepository jpaStateMachineRepository) {
		return new RedisPersistingStateMachineInterceptor<>(jpaStateMachineRepository);
	}
}
You can configure StateMachine to use runtime persistence by using the
withPersistence configuration method.
The following listing shows how to do so:
@Autowired
private StateMachineRuntimePersister<States, Events, String> stateMachineRuntimePersister;

@Override
public void configure(StateMachineConfigurationConfigurer<States, Events> config)
		throws Exception {
	config
		.withPersistence()
			.runtimePersister(stateMachineRuntimePersister);
}
This sample also uses DefaultStateMachineService, which makes it
easier to work with multiple machines.
The following listing shows how to create an instance of DefaultStateMachineService:
@Bean
public StateMachineService<States, Events> stateMachineService(
		StateMachineFactory<States, Events> stateMachineFactory,
		StateMachineRuntimePersister<States, Events, String> stateMachineRuntimePersister) {
	return new DefaultStateMachineService<States, Events>(stateMachineFactory, stateMachineRuntimePersister);
}
The following listing shows the logic that drives the StateMachineService in this sample:
private synchronized StateMachine<States, Events> getStateMachine(String machineId) throws Exception {
	listener.resetMessages();
	if (currentStateMachine == null) {
		currentStateMachine = stateMachineService.acquireStateMachine(machineId);
		currentStateMachine.addStateListener(listener);
		currentStateMachine.startReactively().block();
	} else if (!ObjectUtils.nullSafeEquals(currentStateMachine.getId(), machineId)) {
		stateMachineService.releaseStateMachine(currentStateMachine.getId());
		currentStateMachine.stopReactively().block();
		currentStateMachine = stateMachineService.acquireStateMachine(machineId);
		currentStateMachine.addStateListener(listener);
		currentStateMachine.startReactively().block();
	}
	return currentStateMachine;
}
You can use the following command to run the sample:
# java -jar spring-statemachine-samples-datapersist-4.0.1-SNAPSHOT.jar|
By default, the |
Accessing the application at http://localhost:8080 brings up a newly constructed state machine for each request, and you can choose to send events to a machine. The possible events and machine configuration are updated from a database with every request.
The state machines in this sample have a simple configuration with states 'S1'
to 'S6' and events 'E1' to 'E6' to transition the state machine between those
states. You can use two state machine identifiers (datajpapersist1 and
datajpapersist2) to request a particular state machine.
The following image shows the UI that lets you pick a machine and an event and that shows
what happens when you do:

The sample defaults to using machine 'datajpapersist1' and goes to its initial state 'S1'. The following image shows the result of using those defaults:
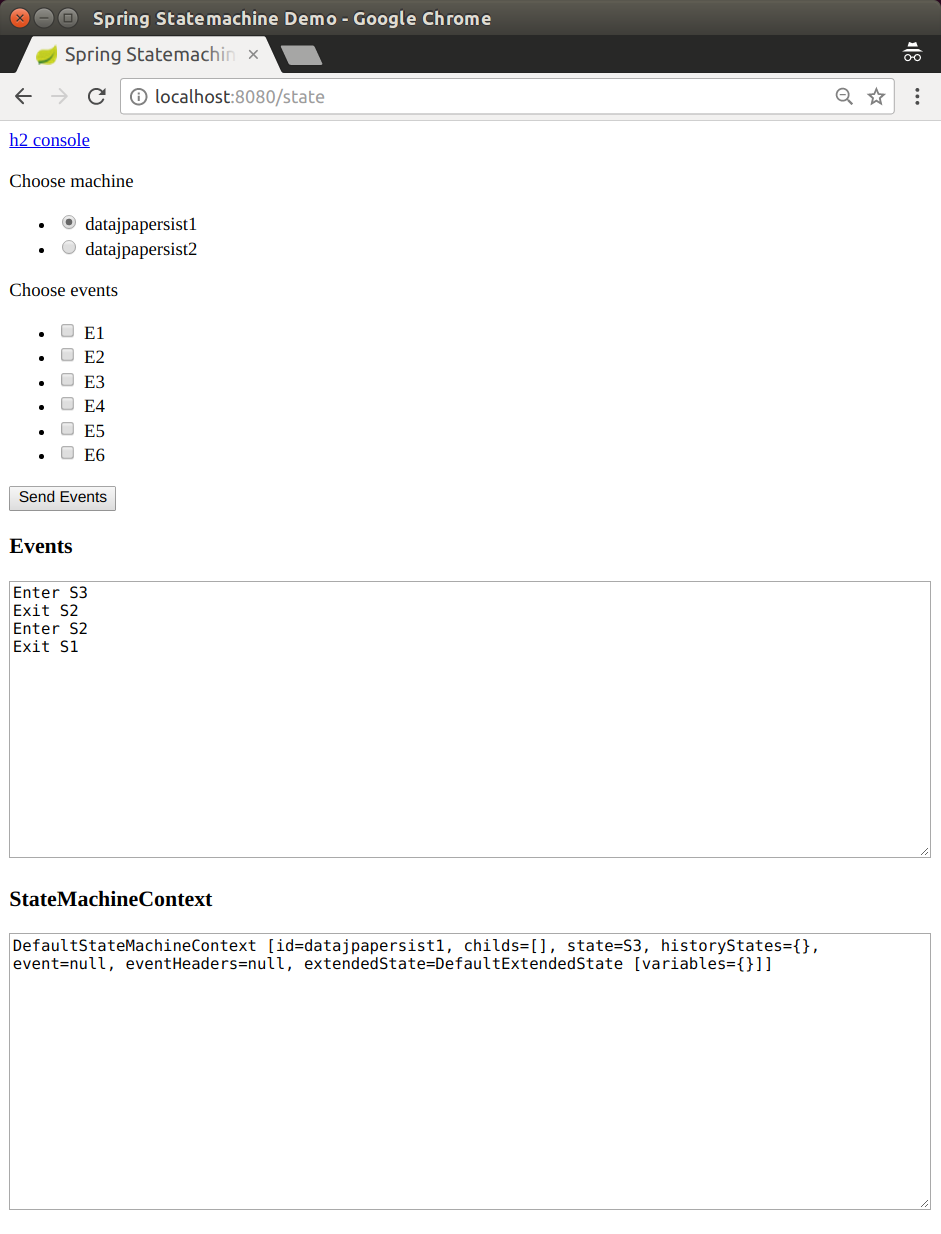
If you send events E1 and E2 to the datajpapersist1 state machine, its
state is persisted as 'S3'.
The following image shows the result of doing so:

If you then request state machine datajpapersist1 but send no events,
the state machine is restored back to its persisted state, S3.
54. Data Multi Persist
The data multi ersist sample is an extension of two other samples: JPA Configuration and Data Persist. We still keep machine configuration in a database and persist into a database. However, this time, we also have a machine that contains two orthogonal regions, to show how those are persisted independently. This sample also uses an embedded H2 database with an H2 Console (to ease playing with the database).
This sample uses spring-statemachine-autoconfigure (which, by default,
auto-configures the repositories and entity classes needed for JPA).
Thus, you need only @SpringBootApplication.
The following example shows the Application class with the @SpringBootApplication annotation:
@SpringBootApplication
public class Application {

	public static void main(String[] args) {
		SpringApplication.run(Application.class, args);
	}
}
As in the other data-driven samples, we again create a StateMachineRuntimePersister,
as the following listing shows:
@Bean
public StateMachineRuntimePersister<String, String, String> stateMachineRuntimePersister(
		JpaStateMachineRepository jpaStateMachineRepository) {
	return new JpaPersistingStateMachineInterceptor<>(jpaStateMachineRepository);
}
A StateMachineService bean makes it easier to work with a machines.
The following listing shows how to create such a bean:
@Bean
public StateMachineService<String, String> stateMachineService(
		StateMachineFactory<String, String> stateMachineFactory,
		StateMachineRuntimePersister<String, String, String> stateMachineRuntimePersister) {
	return new DefaultStateMachineService<String, String>(stateMachineFactory, stateMachineRuntimePersister);
}
We use JSON data to import the configuration. The following example creates a bean to do so:
@Bean
public StateMachineJackson2RepositoryPopulatorFactoryBean jackson2RepositoryPopulatorFactoryBean() {
	StateMachineJackson2RepositoryPopulatorFactoryBean factoryBean = new StateMachineJackson2RepositoryPopulatorFactoryBean();
	factoryBean.setResources(new Resource[] { new ClassPathResource("datajpamultipersist.json") });
	return factoryBean;
}
The following listing shows how we get a RepositoryStateMachineModelFactory:
@Configuration
@EnableStateMachineFactory
public static class Config extends StateMachineConfigurerAdapter<String, String> {

	@Autowired
	private StateRepository<? extends RepositoryState> stateRepository;

	@Autowired
	private TransitionRepository<? extends RepositoryTransition> transitionRepository;

	@Autowired
	private StateMachineRuntimePersister<String, String, String> stateMachineRuntimePersister;

	@Override
	public void configure(StateMachineConfigurationConfigurer<String, String> config)
			throws Exception {
		config
			.withPersistence()
				.runtimePersister(stateMachineRuntimePersister);
	}

	@Override
	public void configure(StateMachineModelConfigurer<String, String> model)
			throws Exception {
		model
			.withModel()
				.factory(modelFactory());
	}

	@Bean
	public StateMachineModelFactory<String, String> modelFactory() {
		return new RepositoryStateMachineModelFactory(stateRepository, transitionRepository);
	}
}
You can run the sample by using the following command:
# java -jar spring-statemachine-samples-datajpamultipersist-4.0.1-SNAPSHOT.jarAccessing the application at http://localhost:8080 brings up a newly
constructed machine for each request and lets you send
events to a machine. The possible events and the state machine configuration are
updated from a database for each request. We also print out
all state machine contexts and the current root machine,
as the following image shows:
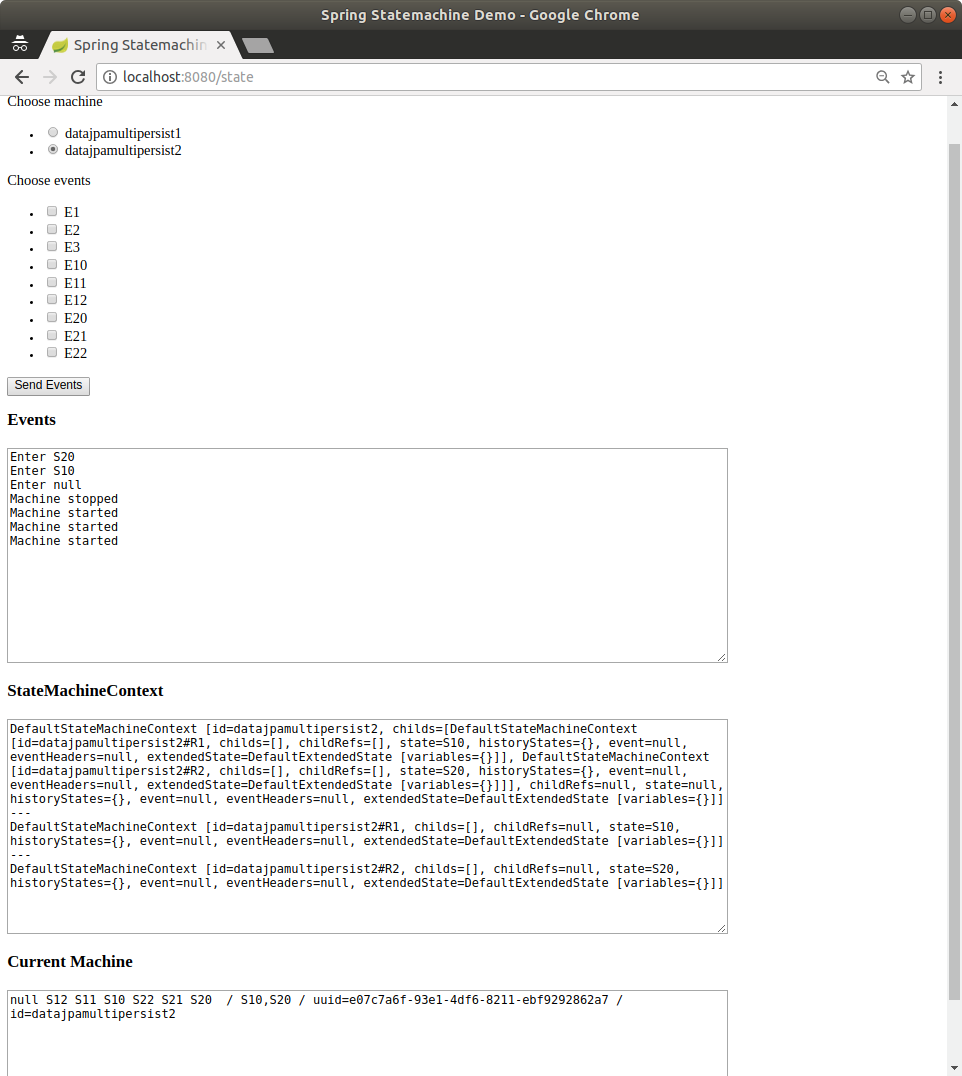
The state machine named datajpamultipersist1 is a simple “flat” machine where states S1,
S2 and S3 are transitioned by events E1, E2, and E3 (respectively).
However, the state machine named datajpamultipersist2 contains two
regions (R1 and R2) directly under the root level. That is why this
root level machine really does not have a state. We need
that root level machine to host those regions.
Regions R1 and R2 in the datajpamultipersist2 state machine contains states
S10, S11, and S12 and S20, S21, and S22 (respectively). Events
E10, E11, and E12 are used for region R1 and events E20, E21,
and event E22 is used for region R2. The following images shows what happens when we
send events E10 and E20 to the
datajpamultipersist2 state machine:
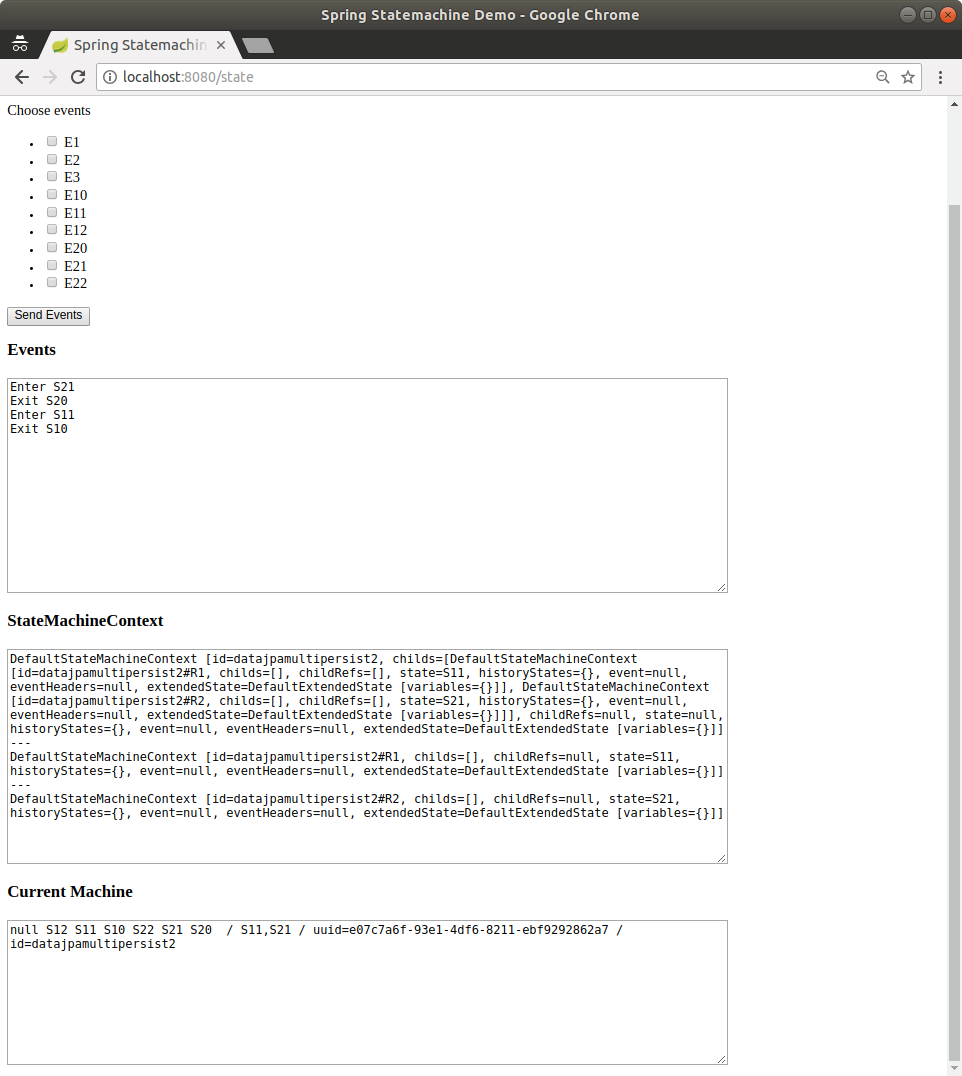
Regions have their own contexts with their own IDs, and the actual
ID is postfixed with # and the region ID. As the following image shows,
different regions in a database have different contexts:
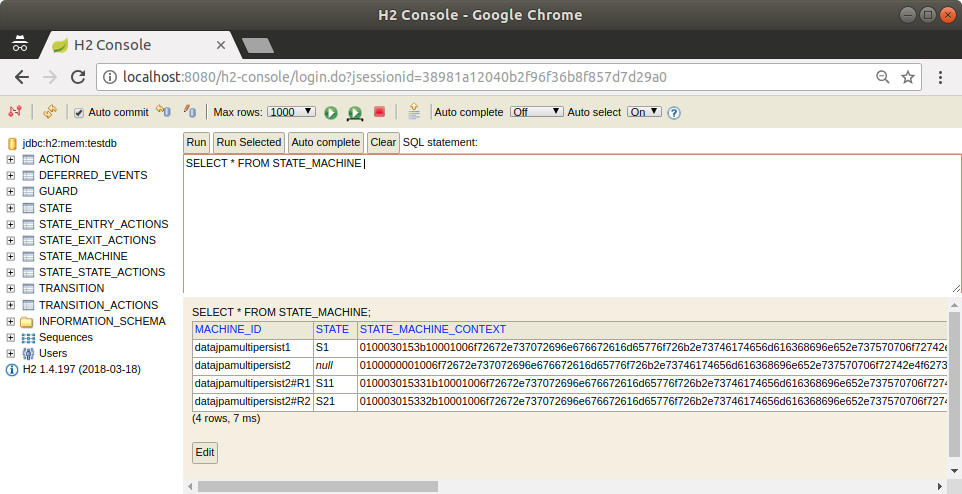
55. Data JPA Persist
The data persist sample shows how you can state machine concepts with a persisting machine in an external repository. This sample uses an embedded H2 database with an H2 Console (to ease playing with the database). Optionally, you can also enable Redis or MongoDB.
This sample uses spring-statemachine-autoconfigure (which, by default,
auto-configures the repositories and entity classes needed for JPA).
Thus, you need only @SpringBootApplication.
The following example shows the Application class with the @SpringBootApplication annotation:
@SpringBootApplication
public class Application {

	public static void main(String[] args) {
		SpringApplication.run(Application.class, args);
	}
}
The StateMachineRuntimePersister interface works on the runtime
level of a StateMachine. Its implementation,
JpaPersistingStateMachineInterceptor, is meant to be used with a
JPA.
The following listing creates a StateMachineRuntimePersister bean:
@Configuration
@Profile("jpa")
public static class JpaPersisterConfig {

	@Bean
	public StateMachineRuntimePersister<States, Events, String> stateMachineRuntimePersister(
			JpaStateMachineRepository jpaStateMachineRepository) {
		return new JpaPersistingStateMachineInterceptor<>(jpaStateMachineRepository);
	}
}
The following example shows how you can use a very similar configuration to create a bean for MongoDB:
@Configuration
@Profile("mongo")
public static class MongoPersisterConfig {

	@Bean
	public StateMachineRuntimePersister<States, Events, String> stateMachineRuntimePersister(
			MongoDbStateMachineRepository jpaStateMachineRepository) {
		return new MongoDbPersistingStateMachineInterceptor<>(jpaStateMachineRepository);
	}
}
The following example shows how you can use a very similar configuration to create a bean for Redis:
@Configuration
@Profile("redis")
public static class RedisPersisterConfig {

	@Bean
	public StateMachineRuntimePersister<States, Events, String> stateMachineRuntimePersister(
			RedisStateMachineRepository jpaStateMachineRepository) {
		return new RedisPersistingStateMachineInterceptor<>(jpaStateMachineRepository);
	}
}
You can configure StateMachine to use runtime persistence by using the
withPersistence configuration method.
The following listing shows how to do so:
@Autowired
private StateMachineRuntimePersister<States, Events, String> stateMachineRuntimePersister;

@Override
public void configure(StateMachineConfigurationConfigurer<States, Events> config)
		throws Exception {
	config
		.withPersistence()
			.runtimePersister(stateMachineRuntimePersister);
}
This sample also uses DefaultStateMachineService, which makes it
easier to work with multiple machines.
The following listing shows how to create an instance of DefaultStateMachineService:
@Bean
public StateMachineService<States, Events> stateMachineService(
		StateMachineFactory<States, Events> stateMachineFactory,
		StateMachineRuntimePersister<States, Events, String> stateMachineRuntimePersister) {
	return new DefaultStateMachineService<States, Events>(stateMachineFactory, stateMachineRuntimePersister);
}
The following listing shows the logic that drives the StateMachineService in this sample:
private synchronized StateMachine<States, Events> getStateMachine(String machineId) throws Exception {
	listener.resetMessages();
	if (currentStateMachine == null) {
		currentStateMachine = stateMachineService.acquireStateMachine(machineId);
		currentStateMachine.addStateListener(listener);
		currentStateMachine.startReactively().block();
	} else if (!ObjectUtils.nullSafeEquals(currentStateMachine.getId(), machineId)) {
		stateMachineService.releaseStateMachine(currentStateMachine.getId());
		currentStateMachine.stopReactively().block();
		currentStateMachine = stateMachineService.acquireStateMachine(machineId);
		currentStateMachine.addStateListener(listener);
		currentStateMachine.startReactively().block();
	}
	return currentStateMachine;
}
You can use the following command to run the sample:
# java -jar spring-statemachine-samples-datapersist-4.0.1-SNAPSHOT.jar|
By default, the |
Accessing the application at http://localhost:8080 brings up a newly constructed state machine for each request, and you can choose to send events to a machine. The possible events and machine configuration are updated from a database with every request.
The state machines in this sample have a simple configuration with states 'S1'
to 'S6' and events 'E1' to 'E6' to transition the state machine between those
states. You can use two state machine identifiers (datajpapersist1 and
datajpapersist2) to request a particular state machine.
The following image shows the UI that lets you pick a machine and an event and that shows
what happens when you do:
The sample defaults to using machine 'datajpapersist1' and goes to its initial state 'S1'. The following image shows the result of using those defaults:
If you send events E1 and E2 to the datajpapersist1 state machine, its
state is persisted as 'S3'.
The following image shows the result of doing so:
If you then request state machine datajpapersist1 but send no events,
the state machine is restored back to its persisted state, S3.
56. Monitoring
The monitoring sample shows how you can use state machine concepts to monitor state machine transitions and actions. The following listing configures the state machine that we use for this sample:
@Configuration
@EnableStateMachine
public static class Config extends StateMachineConfigurerAdapter<String, String> {

	@Override
	public void configure(StateMachineStateConfigurer<String, String> states)
			throws Exception {
		states
			.withStates()
				.initial("S1")
				.state("S2", null, (c) -> {System.out.println("hello");})
				.state("S3", (c) -> {System.out.println("hello");}, null);
	}

	@Override
	public void configure(StateMachineTransitionConfigurer<String, String> transitions)
			throws Exception {
		transitions
			.withExternal()
				.source("S1").target("S2").event("E1")
				.action((c) -> {System.out.println("hello");})
				.and()
			.withExternal()
				.source("S2").target("S3").event("E2");
	}
}
You can use the following command to run the sample:
# java -jar spring-statemachine-samples-monitoring-4.0.1-SNAPSHOT.jarThe following image shows the state machine’s initial state:
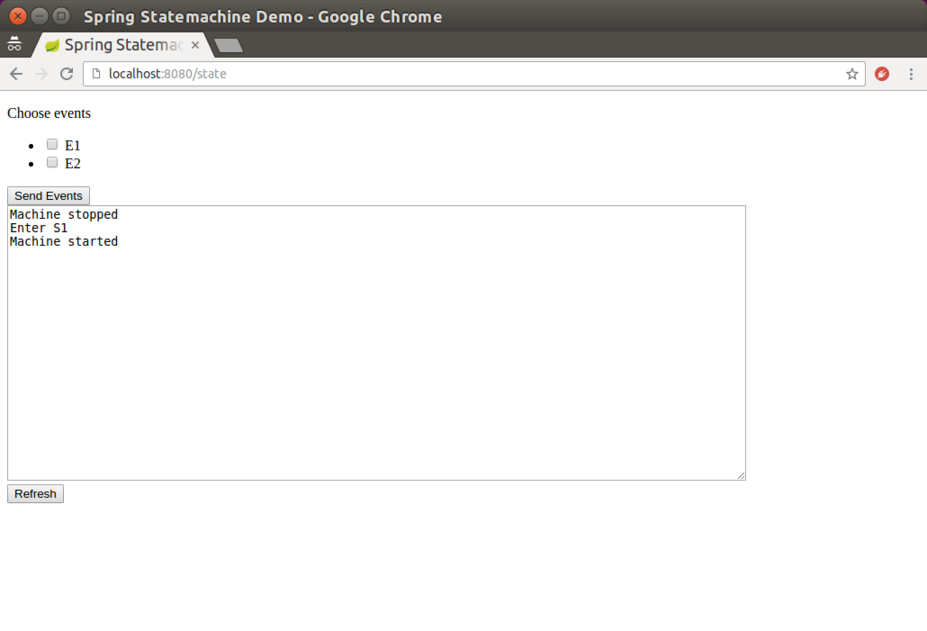
The following image shows the state of the state machine after we have performed some actions:
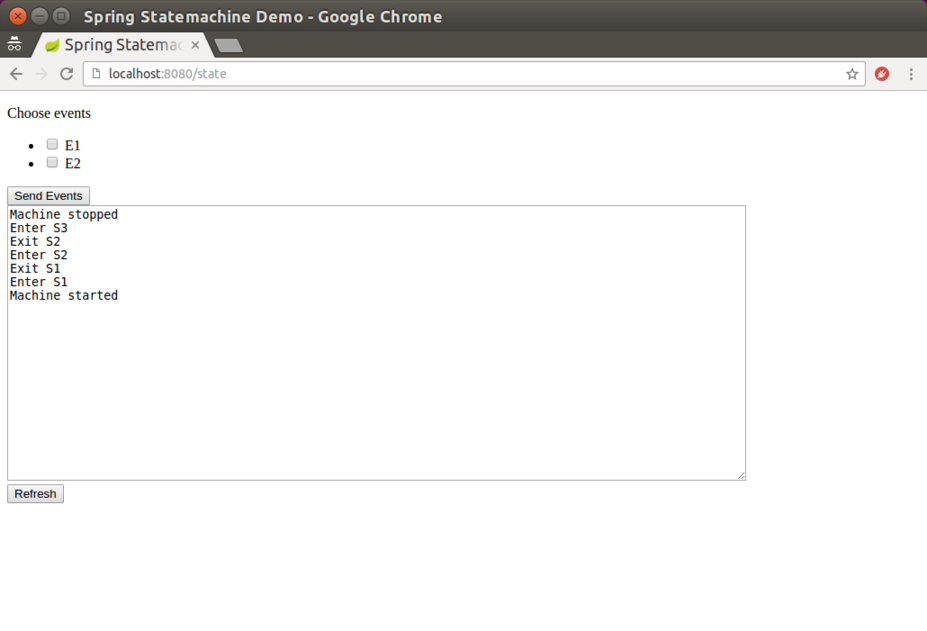
You can view metrics from Spring Boot by running the following two curl
commands (shown with their output):
# curl http://localhost:8080/actuator/metrics/ssm.transition.duration

{
  "name":"ssm.transition.duration",
  "measurements":[
    {
      "statistic":"COUNT",
      "value":3.0
    },
    {
      "statistic":"TOTAL_TIME",
      "value":0.007
    },
    {
      "statistic":"MAX",
      "value":0.004
    }
  ],
  "availableTags":[
    {
      "tag":"transitionName",
      "values":[
        "INITIAL_S1",
        "EXTERNAL_S1_S2"
      ]
    }
  ]
}
# curl http://localhost:8080/actuator/metrics/ssm.transition.transit
{
"name":"ssm.transition.transit",
"measurements":[
{
"statistic":"COUNT",
"value":3.0
}
],
"availableTags":[
{
"tag":"transitionName",
"values":[
"EXTERNAL_S1_S2",
"INITIAL_S1"
]
}
]
}You can also view tracing from Spring Boot by running the following curl
command (shown with its output):
# curl http://localhost:8080/actuator/statemachinetrace

[
  {
    "timestamp":"2018-02-11T06:44:12.723+0000",
    "info":{
      "duration":2,
      "machine":null,
      "transition":"EXTERNAL_S1_S2"
    }
  },
  {
    "timestamp":"2018-02-11T06:44:12.720+0000",
    "info":{
      "duration":0,
      "machine":null,
      "action":"demo.monitoring.StateMachineConfig$Config$$Lambda$576/1499688007@22b47b2f"
    }
  },
  {
    "timestamp":"2018-02-11T06:44:12.714+0000",
    "info":{
      "duration":1,
      "machine":null,
      "transition":"INITIAL_S1"
    }
  },
  {
    "timestamp":"2018-02-11T06:44:09.689+0000",
    "info":{
      "duration":4,
      "machine":null,
      "transition":"INITIAL_S1"
    }
  }
]