使用 Spring Statemachine
参考文档的这一部分介绍了核心功能 Spring Statemachine 提供给任何基于 Spring 的应用程序。
它包括以下主题:
-
Statemachine Configuration 描述了通用配置支持。
-
状态机 ID 描述了机器 ID 的使用。
-
状态机工厂 描述了通用的状态机工厂支持。
-
使用 Scopes 介绍了范围支持。
-
Using Actions 介绍了支持的作。
-
使用 Guards 描述了 Guard 支持。
-
使用扩展状态 介绍了扩展状态支持。
-
用
StateContext描述 State 上下文支持。 -
触发过渡 描述了触发器的使用。
-
侦听状态机事件 介绍了状态机侦听器的使用。
-
上下文集成描述了通用的 Spring 应用程序上下文支持。
-
用
StateMachineAccessor介绍状态机内部访问器支持。 -
用
StateMachineInterceptor介绍状态机错误处理支持。 -
State Machine Security 描述了 state machine security 支持。
-
状态机错误处理描述了状态机拦截器支持。
-
状态机服务描述了状态机服务支持。
-
持久化状态机 描述了状态机持久化支持。
-
Spring Boot Support 描述了 Spring Boot 支持。
-
监视状态机 描述了监视和转换支持。
-
使用分布式状态 介绍了分布式状态机支持。
-
Testing Support 描述了状态机测试支持。
-
Eclipse 建模支持描述了状态机 UML 建模支持。
-
存储库支持 描述了状态机存储库配置支持。
Statemachine 配置
使用状态机时的常见任务之一是设计其 运行时配置。本章重点介绍 Spring Statemachine 的配置以及它如何利用 Spring 的轻量级 IoC 容器简化应用程序内部结构,使其更加 管理。
| 本节中的配置示例功能不完整。那是 您始终需要同时定义 State 和 transition。 否则,状态机配置将格式错误。我们有 通过保留其他需要的部分,简单地使代码片段不那么冗长 外。 |
用enable附注
我们使用两个熟悉的 Spring enabler 注释来简化配置:@EnableStateMachine和@EnableStateMachineFactory.
这些注释在放置在@Configuration类、启用
状态机所需的一些基本功能。
您可以使用@EnableStateMachine当您需要配置来创建
实例StateMachine.通常,@Configuration类扩展适配器
(EnumStateMachineConfigurerAdapter或StateMachineConfigurerAdapter),其中
允许您覆盖配置回调方法。我们自动
检测是否使用这些适配器类并修改运行时配置
逻辑。
您可以使用@EnableStateMachineFactory当您需要配置来创建
实例的StateMachineFactory.
| 以下部分显示了这些用法示例。 |
配置状态
在本指南的后面部分,我们将介绍更复杂的配置示例,但是
我们首先从简单的事情开始。对于大多数简单的状态
machine 中,您可以使用EnumStateMachineConfigurerAdapter并定义
可能的状态,然后选择 Initial (初始) 和 Optional End (可选结束状态)。
@Configuration
@EnableStateMachine
public class Config1Enums
		extends EnumStateMachineConfigurerAdapter<States, Events> {

	@Override
	public void configure(StateMachineStateConfigurer<States, Events> states)
			throws Exception {
		states
			.withStates()
				.initial(States.S1)
				.end(States.SF)
				.states(EnumSet.allOf(States.class));
	}

}
您还可以使用字符串而不是枚举作为状态和
事件StateMachineConfigurerAdapter,如下例所示。最
的配置示例 ues 枚举,但是,一般来说,
您可以交换字符串和枚举。
@Configuration
@EnableStateMachine
public class Config1Strings
		extends StateMachineConfigurerAdapter<String, String> {

	@Override
	public void configure(StateMachineStateConfigurer<String, String> states)
			throws Exception {
		states
			.withStates()
				.initial("S1")
				.end("SF")
				.states(new HashSet<String>(Arrays.asList("S1","S2","S3","S4")));
	}

}
| 使用枚举会带来一组更安全的状态和事件类型,但 将可能的组合限制为编译时。字符串没有 this 限制,并允许使用更动态的方式来构建状态 机器配置,但不允许相同级别的安全。 |
配置分层状态
您可以使用多个withStates()调用,您可以在其中使用parent()以指示这些
特定状态是其他状态的子状态。
以下示例显示了如何执行此作:
@Configuration
@EnableStateMachine
public class Config2
		extends EnumStateMachineConfigurerAdapter<States, Events> {

	@Override
	public void configure(StateMachineStateConfigurer<States, Events> states)
			throws Exception {
		states
			.withStates()
				.initial(States.S1)
				.state(States.S1)
				.and()
				.withStates()
					.parent(States.S1)
					.initial(States.S2)
					.state(States.S2);
	}

}
配置区域
没有特殊的配置方法可以标记 states 作为正交 state 的一部分。简单来说,正交 当同一分层状态机具有多个 set 时创建 state 的状态,每个状态都有一个初始状态。因为单个状态 machine 只能有一个初始状态,多个初始状态必须 表示一个特定的 state 必须有多个独立的 Region。 以下示例显示如何定义区域:
@Configuration
@EnableStateMachine
public class Config10
		extends EnumStateMachineConfigurerAdapter<States2, Events> {

	@Override
	public void configure(StateMachineStateConfigurer<States2, Events> states)
			throws Exception {
		states
			.withStates()
				.initial(States2.S1)
				.state(States2.S2)
				.and()
				.withStates()
					.parent(States2.S2)
					.initial(States2.S2I)
					.state(States2.S21)
					.end(States2.S2F)
					.and()
				.withStates()
					.parent(States2.S2)
					.initial(States2.S3I)
					.state(States2.S31)
					.end(States2.S3F);
	}

}
当保留具有区域或通常
依靠任何功能来重置计算机,您可能需要
拥有区域的专用 ID。默认情况下,此 ID
是生成的 UUID。如下例所示,StateConfigurer具有
一个名为region(String id),用于设置区域的 ID:
@Configuration
@EnableStateMachine
public class Config10RegionId
		extends EnumStateMachineConfigurerAdapter<States2, Events> {

	@Override
	public void configure(StateMachineStateConfigurer<States2, Events> states)
			throws Exception {
		states
			.withStates()
				.initial(States2.S1)
				.state(States2.S2)
				.and()
				.withStates()
					.parent(States2.S2)
					.region("R1")
					.initial(States2.S2I)
					.state(States2.S21)
					.end(States2.S2F)
					.and()
				.withStates()
					.parent(States2.S2)
					.region("R2")
					.initial(States2.S3I)
					.state(States2.S31)
					.end(States2.S3F);
	}

}
配置过渡
我们支持三种不同类型的过渡:external,internal和local.转换由 signal 触发
(这是发送到状态机的事件)或定时器。
以下示例显示如何定义所有三种类型的过渡:
@Configuration
@EnableStateMachine
public class Config3
		extends EnumStateMachineConfigurerAdapter<States, Events> {

	@Override
	public void configure(StateMachineStateConfigurer<States, Events> states)
			throws Exception {
		states
			.withStates()
				.initial(States.S1)
				.states(EnumSet.allOf(States.class));
	}

	@Override
	public void configure(StateMachineTransitionConfigurer<States, Events> transitions)
			throws Exception {
		transitions
			.withExternal()
				.source(States.S1).target(States.S2)
				.event(Events.E1)
				.and()
			.withInternal()
				.source(States.S2)
				.event(Events.E2)
				.and()
			.withLocal()
				.source(States.S2).target(States.S3)
				.event(Events.E3);
	}

}
配置 Guard
你可以使用 guard 来保护 state transitions。您可以使用Guard接口
执行方法可以访问StateContext.
以下示例显示了如何执行此作:
@Configuration
@EnableStateMachine
public class Config4
		extends EnumStateMachineConfigurerAdapter<States, Events> {

	@Override
	public void configure(StateMachineTransitionConfigurer<States, Events> transitions)
			throws Exception {
		transitions
			.withExternal()
				.source(States.S1).target(States.S2)
				.event(Events.E1)
				.guard(guard())
				.and()
			.withExternal()
				.source(States.S2).target(States.S3)
				.event(Events.E2)
				.guardExpression("true");

	}

	@Bean
	public Guard<States, Events> guard() {
		return new Guard<States, Events>() {

			@Override
			public boolean evaluate(StateContext<States, Events> context) {
				return true;
			}
		};
	}

}
在前面的示例中,我们使用了两种不同类型的 guard 配置。首先,我们
创建了一个简单的Guard作为 Bean 并将其附加到
国家S1和S2.
其次,我们使用 SPeL 表达式作为守卫来表示
expression 必须返回一个BOOLEAN价值。在幕后,这个
基于表达式的守卫是一个SpelExpressionGuard.我们将其附加到
状态之间的转换S2和S3.两个守卫
始终评估为true.
配置作
您可以定义要使用过渡和状态执行的作。 作始终作为 源自触发器。以下示例说明如何定义作:
@Configuration
@EnableStateMachine
public class Config51
		extends EnumStateMachineConfigurerAdapter<States, Events> {

	@Override
	public void configure(StateMachineTransitionConfigurer<States, Events> transitions)
			throws Exception {
		transitions
			.withExternal()
				.source(States.S1)
				.target(States.S2)
				.event(Events.E1)
				.action(action());
	}

	@Bean
	public Action<States, Events> action() {
		return new Action<States, Events>() {

			@Override
			public void execute(StateContext<States, Events> context) {
				// do something
			}
		};
	}

}
在前面的示例中,单个Action被定义为名为action和关联
从S1自S2.
以下示例演示如何多次使用作:
@Configuration
@EnableStateMachine
public class Config52
		extends EnumStateMachineConfigurerAdapter<States, Events> {

	@Override
	public void configure(StateMachineStateConfigurer<States, Events> states)
			throws Exception {
		states
			.withStates()
				.initial(States.S1, action())
				.state(States.S1, action(), null)
				.state(States.S2, null, action())
				.state(States.S2, action())
				.state(States.S3, action(), action());
	}

	@Bean
	public Action<States, Events> action() {
		return new Action<States, Events>() {

			@Override
			public void execute(StateContext<States, Events> context) {
				// do something
			}
		};
	}

}
通常,您不会定义相同的Actioninstance for different
阶段,但我们在这里这样做是为了避免在代码中产生太多干扰
片段。 |
在前面的示例中,单个Action由名为action和关联
与状态S1,S2和S3.我们需要澄清一下这里发生了什么:
-
我们为初始状态 (initial state) 定义了一个 action
S1. -
我们为 state 定义了一个 entry action
S1并将 Exit作留空。 -
我们为 state 定义了一个 exit action
S2并将 entry作留空。 -
我们为 state 定义了一个 state action
S2. -
我们为 state 定义了 entry 和 exit 动作
S3. -
请注意,状态
S1与initial()和state()功能。仅当您想要定义 entry 或 exit 时,才需要执行此作 具有初始状态的 action。
定义作initial()函数仅运行一个特定的
action 来触发。此作
是仅运行一次的初始化作。定义的作
跟state()如果状态机转换回来,则运行
以及 forward 在初始状态和非初始状态之间。 |
状态作
与 entry 和 exit 相比,状态作的运行方式不同 作,因为执行发生在进入状态之后 如果 state exit 发生在特定作之前,则可以取消 已完成。
State action 使用正常的响应式 flow 执行,方法是订阅
reactor 的默认并行调度器。这意味着,无论您在
action 中,您需要能够捕获InterruptedException或者,更广泛地说,
定期检查是否Thread被打断。
以下示例显示了使用 defaultIMMEDIATE_CANCEL哪
当 state 为 complete 时,将立即取消正在运行的任务:
@Configuration
@EnableStateMachine
static class Config1 extends StateMachineConfigurerAdapter<String, String> {

	@Override
	public void configure(StateMachineConfigurationConfigurer<String, String> config) throws Exception {
		config
			.withConfiguration()
				.stateDoActionPolicy(StateDoActionPolicy.IMMEDIATE_CANCEL);
	}

	@Override
	public void configure(StateMachineStateConfigurer<String, String> states) throws Exception {
		states
			.withStates()
				.initial("S1")
				.state("S2", context -> {})
				.state("S3");
	}

	@Override
	public void configure(StateMachineTransitionConfigurer<String, String> transitions) throws Exception {
		transitions
			.withExternal()
				.source("S1")
				.target("S2")
				.event("E1")
				.and()
			.withExternal()
				.source("S2")
				.target("S3")
				.event("E2");
	}
}
您可以将策略设置为TIMEOUT_CANCEL与全局超时一起
对于每台计算机。这会将状态行为更改为 await action completion
在请求取消之前。以下示例显示了如何执行此作:
@Override
public void configure(StateMachineConfigurationConfigurer<String, String> config) throws Exception {
	config
		.withConfiguration()
			.stateDoActionPolicy(StateDoActionPolicy.TIMEOUT_CANCEL)
			.stateDoActionPolicyTimeout(10, TimeUnit.SECONDS);
}
如果Event直接将机器带入一个状态,以便事件标头
可用于特定作,您还可以使用专用的
event 标头来设置特定的超时时间(在millis).
您可以使用保留的标头值StateMachineMessageHeaders.HEADER_DO_ACTION_TIMEOUT为此目的。以下示例显示了如何执行此作:
@Autowired
StateMachine<String, String> stateMachine;

void sendEventUsingTimeout() {
	stateMachine
		.sendEvent(Mono.just(MessageBuilder
			.withPayload("E1")
			.setHeader(StateMachineMessageHeaders.HEADER_DO_ACTION_TIMEOUT, 5000)
			.build()))
		.subscribe();

}
转换作错误处理
您始终可以手动捕获异常。但是,使用
transitions,您可以定义一个 error作,该作在
异常。然后,可以从StateContext传递给该作。以下示例演示如何创建 state
处理异常:
@Configuration
@EnableStateMachine
public class Config53
		extends EnumStateMachineConfigurerAdapter<States, Events> {

	@Override
	public void configure(StateMachineTransitionConfigurer<States, Events> transitions)
			throws Exception {
		transitions
			.withExternal()
				.source(States.S1)
				.target(States.S2)
				.event(Events.E1)
				.action(action(), errorAction());
	}

	@Bean
	public Action<States, Events> action() {
		return new Action<States, Events>() {

			@Override
			public void execute(StateContext<States, Events> context) {
				throw new RuntimeException("MyError");
			}
		};
	}

	@Bean
	public Action<States, Events> errorAction() {
		return new Action<States, Events>() {

			@Override
			public void execute(StateContext<States, Events> context) {
				// RuntimeException("MyError") added to context
				Exception exception = context.getException();
				exception.getMessage();
			}
		};
	}

}
如果需要,您可以为每个作手动创建类似的 logic。 以下示例显示了如何执行此作:
@Override
public void configure(StateMachineTransitionConfigurer<States, Events> transitions)
		throws Exception {
	transitions
		.withExternal()
			.source(States.S1)
			.target(States.S2)
			.event(Events.E1)
			.action(Actions.errorCallingAction(action(), errorAction()));
}
状态作错误处理
还提供类似于处理 state 转换中错误的 logic 的 logic 用于进入状态和退出状态。
对于这些情况,StateConfigurer具有调用stateEntry,stateDo和stateExit.这些方法定义了一个erroraction 与 normal (non-error) 一起作action.
以下示例演示如何使用所有三种方法:
@Configuration
@EnableStateMachine
public class Config55
		extends EnumStateMachineConfigurerAdapter<States, Events> {

	@Override
	public void configure(StateMachineStateConfigurer<States, Events> states)
			throws Exception {
		states
			.withStates()
				.initial(States.S1)
				.stateEntry(States.S2, action(), errorAction())
				.stateDo(States.S2, action(), errorAction())
				.stateExit(States.S2, action(), errorAction())
				.state(States.S3);
	}

	@Bean
	public Action<States, Events> action() {
		return new Action<States, Events>() {

			@Override
			public void execute(StateContext<States, Events> context) {
				throw new RuntimeException("MyError");
			}
		};
	}

	@Bean
	public Action<States, Events> errorAction() {
		return new Action<States, Events>() {

			@Override
			public void execute(StateContext<States, Events> context) {
				// RuntimeException("MyError") added to context
				Exception exception = context.getException();
				exception.getMessage();
			}
		};
	}
}
配置伪状态
伪 state 配置通常是通过配置 state 和 转换。伪状态会自动作为 国家。
初始状态
您可以使用initial()方法。例如,此初始作适用于初始化
扩展状态变量。以下示例演示如何使用initial()方法:
@Configuration
@EnableStateMachine
public class Config11
		extends EnumStateMachineConfigurerAdapter<States, Events> {

	@Override
	public void configure(StateMachineStateConfigurer<States, Events> states)
			throws Exception {
		states
			.withStates()
				.initial(States.S1, initialAction())
				.end(States.SF)
				.states(EnumSet.allOf(States.class));
	}

	@Bean
	public Action<States, Events> initialAction() {
		return new Action<States, Events>() {

			@Override
			public void execute(StateContext<States, Events> context) {
				// do something initially
			}
		};
	}

}
终止状态
您可以使用end()方法。
您最多可以为每个子计算机或区域执行此作一次。
以下示例演示如何使用end()方法:
@Configuration
@EnableStateMachine
public class Config1Enums
		extends EnumStateMachineConfigurerAdapter<States, Events> {

	@Override
	public void configure(StateMachineStateConfigurer<States, Events> states)
			throws Exception {
		states
			.withStates()
				.initial(States.S1)
				.end(States.SF)
				.states(EnumSet.allOf(States.class));
	}

}
状态历史
您可以为每个单独的状态机定义一次状态历史记录。
您需要选择其状态标识符并设置History.SHALLOW或History.DEEP.以下示例使用History.SHALLOW:
@Configuration
@EnableStateMachine
public class Config12
		extends EnumStateMachineConfigurerAdapter<States3, Events> {

	@Override
	public void configure(StateMachineStateConfigurer<States3, Events> states)
			throws Exception {
		states
			.withStates()
				.initial(States3.S1)
				.state(States3.S2)
				.and()
				.withStates()
					.parent(States3.S2)
					.initial(States3.S2I)
					.state(States3.S21)
					.state(States3.S22)
					.history(States3.SH, History.SHALLOW);
	}

	@Override
	public void configure(StateMachineTransitionConfigurer<States3, Events> transitions)
			throws Exception {
		transitions
			.withHistory()
				.source(States3.SH)
				.target(States3.S22);
	}

}
此外,如前面的示例所示,您可以选择定义默认的 在同一台机器中从历史状态过渡到状态顶点。 此过渡是默认进行的,例如,如果计算机具有 从未被输入,因此,将没有历史记录可用。如果默认的 state transition 未定义,则正常进入 Region 为 做。如果计算机的历史记录为 最终状态。
选择状态
需要在 state 和 transition to work 中定义 choice
适当地。您可以使用choice()方法。当转换
配置。
您可以使用withChoice(),您可以在其中定义源
state 和first/then/last结构,它相当于 Normalif/elseif/else.跟first和then,你可以指定一个守卫
就像您将if/elseif第。
过渡需要能够存在,因此您必须确保使用last.
否则,配置格式不正确。以下示例显示了如何定义
a choice 状态:
@Configuration
@EnableStateMachine
public class Config13
		extends EnumStateMachineConfigurerAdapter<States, Events> {

	@Override
	public void configure(StateMachineStateConfigurer<States, Events> states)
			throws Exception {
		states
			.withStates()
				.initial(States.SI)
				.choice(States.S1)
				.end(States.SF)
				.states(EnumSet.allOf(States.class));
	}

	@Override
	public void configure(StateMachineTransitionConfigurer<States, Events> transitions)
			throws Exception {
		transitions
			.withChoice()
				.source(States.S1)
				.first(States.S2, s2Guard())
				.then(States.S3, s3Guard())
				.last(States.S4);
	}

	@Bean
	public Guard<States, Events> s2Guard() {
		return new Guard<States, Events>() {

			@Override
			public boolean evaluate(StateContext<States, Events> context) {
				return false;
			}
		};
	}

	@Bean
	public Guard<States, Events> s3Guard() {
		return new Guard<States, Events>() {

			@Override
			public boolean evaluate(StateContext<States, Events> context) {
				return true;
			}
		};
	}

}
作可以在 Nm 的传入和传出过渡 choice 伪状态。如以下示例所示,一个虚拟 lambda action 的 API API 的 API 的 Lambda作(其中它还 定义一个 error作):
@Configuration
@EnableStateMachine
public class Config23
		extends EnumStateMachineConfigurerAdapter<States, Events> {

	@Override
	public void configure(StateMachineStateConfigurer<States, Events> states)
			throws Exception {
		states
			.withStates()
				.initial(States.SI)
				.choice(States.S1)
				.end(States.SF)
				.states(EnumSet.allOf(States.class));
	}

	@Override
	public void configure(StateMachineTransitionConfigurer<States, Events> transitions)
			throws Exception {
		transitions
			.withExternal()
				.source(States.SI)
				.action(c -> {
						// action with SI-S1
					})
				.target(States.S1)
				.and()
			.withChoice()
				.source(States.S1)
				.first(States.S2, c -> {
						return true;
					})
				.last(States.S3, c -> {
						// action with S1-S3
					}, c -> {
						// error callback for action S1-S3
					});
	}
}
| Junction 具有相同的 api 格式,这意味着可以定义作 同样地。 |
交汇点状态
您需要在状态和转换中定义一个 junction 才能使其正常工作
适当地。您可以使用junction()方法。当转换
配置。
您可以使用withJunction()定义源的位置
state 和first/then/last结构体(相当于普通的if/elseif/else).跟first和then,您可以将守卫指定为
您将使用 Condition 和if/elseif第。
过渡需要能够存在,因此您必须确保使用last.
否则,配置格式不正确。
以下示例使用联结:
@Configuration
@EnableStateMachine
public class Config20
		extends EnumStateMachineConfigurerAdapter<States, Events> {

	@Override
	public void configure(StateMachineStateConfigurer<States, Events> states)
			throws Exception {
		states
			.withStates()
				.initial(States.SI)
				.junction(States.S1)
				.end(States.SF)
				.states(EnumSet.allOf(States.class));
	}

	@Override
	public void configure(StateMachineTransitionConfigurer<States, Events> transitions)
			throws Exception {
		transitions
			.withJunction()
				.source(States.S1)
				.first(States.S2, s2Guard())
				.then(States.S3, s3Guard())
				.last(States.S4);
	}

	@Bean
	public Guard<States, Events> s2Guard() {
		return new Guard<States, Events>() {

			@Override
			public boolean evaluate(StateContext<States, Events> context) {
				return false;
			}
		};
	}

	@Bean
	public Guard<States, Events> s3Guard() {
		return new Guard<States, Events>() {

			@Override
			public boolean evaluate(StateContext<States, Events> context) {
				return true;
			}
		};
	}

}
选择和交汇点之间的区别纯粹是学术性的,因为两者都是
实现方式first/then/last结构。然而,从理论上讲,基于
在 UML 建模上,choice只允许一个传入过渡,而junction允许多个传入过渡。在代码级别,
功能几乎相同。 |
分叉状态
您必须在 state 和 transitions 中定义 fork 才能正常工作
适当地。您可以使用fork()方法。当转换
配置。
目标状态需要是 super 状态或 immediate 状态中的 地区。使用超级状态作为目标会将所有区域置于 初始状态。以单个状态为目标,入口控制更严格 到区域。以下示例使用 fork:
@Configuration
@EnableStateMachine
public class Config14
		extends EnumStateMachineConfigurerAdapter<States2, Events> {

	@Override
	public void configure(StateMachineStateConfigurer<States2, Events> states)
			throws Exception {
		states
			.withStates()
				.initial(States2.S1)
				.fork(States2.S2)
				.state(States2.S3)
				.and()
				.withStates()
					.parent(States2.S3)
					.initial(States2.S2I)
					.state(States2.S21)
					.state(States2.S22)
					.end(States2.S2F)
					.and()
				.withStates()
					.parent(States2.S3)
					.initial(States2.S3I)
					.state(States2.S31)
					.state(States2.S32)
					.end(States2.S3F);
	}

	@Override
	public void configure(StateMachineTransitionConfigurer<States2, Events> transitions)
			throws Exception {
		transitions
			.withFork()
				.source(States2.S2)
				.target(States2.S22)
				.target(States2.S32);
	}

}
加入状态
您必须在 state 和 transition 中定义一个 join 才能正常工作
适当地。您可以使用join()方法。此状态不需要匹配源状态或
target 状态。
您可以选择当所有源状态时转换转到的目标状态 已加入。如果您使用 State Hosting Regions 作为源,则 区域的状态用作联接。否则,您可以选择任何 州。以下示例使用 join:
@Configuration
@EnableStateMachine
public class Config15
		extends EnumStateMachineConfigurerAdapter<States2, Events> {

	@Override
	public void configure(StateMachineStateConfigurer<States2, Events> states)
			throws Exception {
		states
			.withStates()
				.initial(States2.S1)
				.state(States2.S3)
				.join(States2.S4)
				.state(States2.S5)
				.and()
				.withStates()
					.parent(States2.S3)
					.initial(States2.S2I)
					.state(States2.S21)
					.state(States2.S22)
					.end(States2.S2F)
					.and()
				.withStates()
					.parent(States2.S3)
					.initial(States2.S3I)
					.state(States2.S31)
					.state(States2.S32)
					.end(States2.S3F);
	}

	@Override
	public void configure(StateMachineTransitionConfigurer<States2, Events> transitions)
			throws Exception {
		transitions
			.withJoin()
				.source(States2.S2F)
				.source(States2.S3F)
				.target(States2.S4)
				.and()
			.withExternal()
				.source(States2.S4)
				.target(States2.S5);
	}
}
您还可以让多个过渡源自
join 状态。在这种情况下,我们建议你使用 guard 并定义你的 guard
使得只有一个守卫计算为TRUE在任何给定时间。否则
过渡行为是不可预测的。这在以下示例中显示,其中 guard
检查 extended state 是否有变量:
@Configuration
@EnableStateMachine
public class Config22
		extends EnumStateMachineConfigurerAdapter<States2, Events> {

	@Override
	public void configure(StateMachineStateConfigurer<States2, Events> states)
			throws Exception {
		states
			.withStates()
				.initial(States2.S1)
				.state(States2.S3)
				.join(States2.S4)
				.state(States2.S5)
				.end(States2.SF)
				.and()
				.withStates()
					.parent(States2.S3)
					.initial(States2.S2I)
					.state(States2.S21)
					.state(States2.S22)
					.end(States2.S2F)
					.and()
				.withStates()
					.parent(States2.S3)
					.initial(States2.S3I)
					.state(States2.S31)
					.state(States2.S32)
					.end(States2.S3F);
	}

	@Override
	public void configure(StateMachineTransitionConfigurer<States2, Events> transitions)
			throws Exception {
		transitions
			.withJoin()
				.source(States2.S2F)
				.source(States2.S3F)
				.target(States2.S4)
				.and()
			.withExternal()
				.source(States2.S4)
				.target(States2.S5)
				.guardExpression("!extendedState.variables.isEmpty()")
				.and()
			.withExternal()
				.source(States2.S4)
				.target(States2.SF)
				.guardExpression("extendedState.variables.isEmpty()");
	}
}
退出和入口点状态
您可以使用退出点和入场点来执行更受控的退出和进入作
从 和 进入 Submachine。
以下示例使用withEntry和withExit定义入口点的方法:
@Configuration
@EnableStateMachine
static class Config21 extends StateMachineConfigurerAdapter<String, String> {

	@Override
	public void configure(StateMachineStateConfigurer<String, String> states)
			throws Exception {
		states
		.withStates()
			.initial("S1")
			.state("S2")
			.state("S3")
			.and()
			.withStates()
				.parent("S2")
				.initial("S21")
				.entry("S2ENTRY")
				.exit("S2EXIT")
				.state("S22");
	}

	@Override
	public void configure(StateMachineTransitionConfigurer<String, String> transitions)
			throws Exception {
		transitions
		.withExternal()
			.source("S1").target("S2")
			.event("E1")
			.and()
		.withExternal()
			.source("S1").target("S2ENTRY")
			.event("ENTRY")
			.and()
		.withExternal()
			.source("S22").target("S2EXIT")
			.event("EXIT")
			.and()
		.withEntry()
			.source("S2ENTRY").target("S22")
			.and()
		.withExit()
			.source("S2EXIT").target("S3");
	}
}
如上所示,您需要将特定状态标记为exit和entry国家。然后,创建到这些状态的正常过渡
并指定withExit()和withEntry(),其中这些状态
分别退出和进入。
配置通用设置
您可以使用ConfigurationConfigurer.有了它,您可以设置BeanFactory和一个 autostart 标志
对于状态机。它还允许您注册StateMachineListener实例
配置转换冲突策略和区域执行策略。
以下示例演示如何使用ConfigurationConfigurer:
@Configuration
@EnableStateMachine
public class Config17
		extends EnumStateMachineConfigurerAdapter<States, Events> {

	@Override
	public void configure(StateMachineConfigurationConfigurer<States, Events> config)
			throws Exception {
		config
			.withConfiguration()
				.autoStartup(true)
				.machineId("myMachineId")
				.beanFactory(new StaticListableBeanFactory())
				.listener(new StateMachineListenerAdapter<States, Events>())
				.transitionConflictPolicy(TransitionConflictPolicy.CHILD)
				.regionExecutionPolicy(RegionExecutionPolicy.PARALLEL);
	}
}
默认情况下,状态机autoStartup标志被禁用,因为所有
处理子状态的实例由状态机本身控制
并且无法自动启动。此外,离开要安全得多
是否应启动计算机
自动或不向用户。此标志仅控制
顶级状态机。
设置machineId在配置类中,只是为了方便
你想或需要在那里做。
注册StateMachineListenerinstances 也部分用于
方便,但如果您想在
状态机生命周期,例如获取状态机的
start 和 stop 事件。请注意,您不能监听 state
machine 的 start 事件 ifautoStartup处于启用状态,除非您注册侦听器
在配置阶段。
您可以使用transitionConflictPolicy当多个
可以选择过渡路径。一个常见的用例是
machine 包含从子状态引出的匿名转换
和一个父状态,并且您希望定义一个策略,其中
选择。这是计算机实例中的全局设置,
默认为CHILD.
您可以使用withDistributed()配置DistributedStateMachine.它
允许您设置StateMachineEnsemble,它(如果存在)会自动
包装任何创建的StateMachine跟DistributedStateMachine和
启用分布式模式。以下示例演示如何使用它:
@Configuration
@EnableStateMachine
public class Config18
		extends EnumStateMachineConfigurerAdapter<States, Events> {

	@Override
	public void configure(StateMachineConfigurationConfigurer<States, Events> config)
			throws Exception {
		config
			.withDistributed()
				.ensemble(stateMachineEnsemble());
	}

	@Bean
	public StateMachineEnsemble<States, Events> stateMachineEnsemble()
			throws Exception {
		// naturally not null but should return ensemble instance
		return null;
	}
}
有关分布式状态的更多信息,请参阅使用分布式状态。
这StateMachineModelVerifierinterface 在内部用于
对状态机的结构进行一些健全性检查。其目的是
fail fast,而不是让常见的配置错误进入
状态机。默认情况下,验证程序会自动启用,并且DefaultStateMachineModelVerifierimplementation 的 implementation 的 API 中。
跟withVerifier(),如果
需要。以下示例显示了如何执行此作:
@Configuration
@EnableStateMachine
public class Config19
		extends EnumStateMachineConfigurerAdapter<States, Events> {

	@Override
	public void configure(StateMachineConfigurationConfigurer<States, Events> config)
			throws Exception {
		config
			.withVerifier()
				.enabled(true)
				.verifier(verifier());
	}

	@Bean
	public StateMachineModelVerifier<States, Events> verifier() {
		return new StateMachineModelVerifier<States, Events>() {

			@Override
			public void verify(StateMachineModel<States, Events> model) {
				// throw exception indicating malformed model
			}
		};
	}
}
有关配置模型的更多信息,请参见 StateMachine 配置模型。
这withSecurity,withMonitoring和withPersistence配置方法
记录在状态机安全性、监控状态机和用StateMachineRuntimePersister分别。 |
配置模型
StateMachineModelFactory是一个钩子,允许您配置 StateMachine 模型
无需使用手动配置。本质上,它是一个第三方
integration 集成到配置模型中。
您可以钩住StateMachineModelFactory导入到配置模型中
使用StateMachineModelConfigurer.以下示例显示了如何执行此作:
@Configuration
@EnableStateMachine
public static class Config1 extends StateMachineConfigurerAdapter<String, String> {

	@Override
	public void configure(StateMachineModelConfigurer<String, String> model) throws Exception {
		model
			.withModel()
				.factory(modelFactory());
	}

	@Bean
	public StateMachineModelFactory<String, String> modelFactory() {
		return new CustomStateMachineModelFactory();
	}
}
以下示例使用CustomStateMachineModelFactory自
定义两个状态 (S1和S2) 和事件 (E1)
国家:
public static class CustomStateMachineModelFactory implements StateMachineModelFactory<String, String> {

	@Override
	public StateMachineModel<String, String> build() {
		ConfigurationData<String, String> configurationData = new ConfigurationData<>();
		Collection<StateData<String, String>> stateData = new ArrayList<>();
		stateData.add(new StateData<String, String>("S1", true));
		stateData.add(new StateData<String, String>("S2"));
		StatesData<String, String> statesData = new StatesData<>(stateData);
		Collection<TransitionData<String, String>> transitionData = new ArrayList<>();
		transitionData.add(new TransitionData<String, String>("S1", "S2", "E1"));
		TransitionsData<String, String> transitionsData = new TransitionsData<>(transitionData);
		StateMachineModel<String, String> stateMachineModel = new DefaultStateMachineModel<String, String>(configurationData,
				statesData, transitionsData);
		return stateMachineModel;
	}

	@Override
	public StateMachineModel<String, String> build(String machineId) {
		return build();
	}
}
| 定义自定义模型通常不是人们正在寻找的, 虽然这是可能的。然而,这是一个允许 对此配置模型的外部访问。 |
您可以在 Eclipse Modeling Support 中找到使用此 Model Factory 集成的示例。您可以找到有关自定义模型集成的更多通用信息 在 Developer Documentation(开发人员文档)中。
要记住的事情
当从
配置,记住 Spring Framework 的工作原理是值得的
和豆子。在下一个示例中,我们定义了一个普通配置,其中
国家S1和S2以及它们之间的四个过渡。所有过渡
由guard1或guard2.您必须确保guard1创建为真正的 Bean,因为它带有@Bean而guard2莫。
这意味着该事件E3将获得guard2condition 设置为TRUE和E4将获得guard2condition 设置为FALSE,因为这些是
来自对这些函数的普通方法调用。
但是,由于guard1定义为@Bean,它由
Spring 框架。因此,对其方法的额外调用会导致
只有该实例的一个实例。事件E1将首先获取
条件TRUE、while 事件E2会得到相同的
实例替换为TRUEcondition 定义方法调用时使用FALSE.这不是 Spring State Machine 特有的行为。相反,它是
Spring Framework 如何与 bean 一起工作。
以下示例显示了这种安排的工作原理:
@Configuration
@EnableStateMachine
public class Config1
		extends StateMachineConfigurerAdapter<String, String> {

	@Override
	public void configure(StateMachineStateConfigurer<String, String> states)
			throws Exception {
		states
			.withStates()
				.initial("S1")
				.state("S2");
	}

	@Override
	public void configure(StateMachineTransitionConfigurer<String, String> transitions)
			throws Exception {
		transitions
			.withExternal()
				.source("S1").target("S2").event("E1").guard(guard1(true))
				.and()
			.withExternal()
				.source("S1").target("S2").event("E2").guard(guard1(false))
				.and()
			.withExternal()
				.source("S1").target("S2").event("E3").guard(guard2(true))
				.and()
			.withExternal()
				.source("S1").target("S2").event("E4").guard(guard2(false));
	}

	@Bean
	public Guard<String, String> guard1(final boolean value) {
		return new Guard<String, String>() {
			@Override
			public boolean evaluate(StateContext<String, String> context) {
				return value;
			}
		};
	}

	public Guard<String, String> guard2(final boolean value) {
		return new Guard<String, String>() {
			@Override
			public boolean evaluate(StateContext<String, String> context) {
				return value;
			}
		};
	}
}
状态机 ID
各种类和接口使用machineId作为变量或
parameter 的 Method。本节将详细介绍如何machineId与正常的机器作和实例化有关。
在运行时,machineId真的没什么大的运营
role 除外,以区分机器 — 例如,当
跟踪日志或进行更深入的调试。有很多不同的
如果有 Machine Instances 的话,开发人员很快就会迷失在翻译中
没有简单的方法来识别这些实例。因此,我们添加了将machineId.
用@EnableStateMachine
设置machineId在 Java 配置中为mymachine然后公开该值
用于日志。这同样machineId也可从StateMachine.getId()方法。以下示例使用machineId方法:
@Override
public void configure(StateMachineConfigurationConfigurer<String, String> config)
		throws Exception {
	config
		.withConfiguration()
			.machineId("mymachine");
}
以下日志输出示例显示了mymachine编号:
11:23:54,509  INFO main support.LifecycleObjectSupport [main] -
started S2 S1 / S1 / uuid=8fe53d34-8c85-49fd-a6ba-773da15fcaf1 / id=mymachine| 手动构建器(参见 通过 Builder 进行状态机)使用相同的配置 接口,这意味着行为是等效的。 |
用@EnableStateMachineFactory
你可以看到同样的machineIdGetting Configuration(如果您使用StateMachineFactory并使用该 ID 请求新计算机,
如下例所示:
StateMachineFactory<String, String> factory = context.getBean(StateMachineFactory.class);
StateMachine<String, String> machine = factory.getStateMachine("mymachine");
用StateMachineModelFactory
在后台,所有机器配置首先转换为StateMachineModel因此StateMachineFactory无需知道
从配置的来源,因为机器可以构建
Java 配置、UML 或存储库。如果你想疯狂,你也可以使用自定义的StateMachineModel,这是可能的最低值
定义配置的级别。
所有这些都与 a 有什么关系machineId?StateMachineModelFactory还有一个具有以下签名的方法:StateMachineModel<S, E> build(String machineId)其中 aStateMachineModelFactoryimplementation 可以选择 use。
RepositoryStateMachineModelFactory(请参阅存储库支持)使用machineId在持久
store 通过 Spring Data Repository 接口。例如,两者StateRepository和TransitionRepository有一个方法 (List<T>
findByMachineId(String machineId))、构建不同的状态和
transitions 的machineId.跟RepositoryStateMachineModelFactory如果machineId用作 empty
或 NULL,则默认为 repository configuration(在后备持久模型中)
没有已知的计算机 ID。
现在UmlStateMachineModelFactory不区分
不同的计算机 ID,因为 UML 源总是来自同一
文件。在未来的版本中,这可能会发生变化。 |
状态机工厂
有些用例需要动态创建状态机 而不是通过在编译时定义静态配置。例如 如果存在使用自己的状态机的自定义组件 而这些组件是动态创建的,不可能有 在应用程序启动期间构建的静态状态机。内部 状态机始终通过工厂接口构建。这 为您提供以编程方式使用此功能的选项。 状态机工厂的配置与所示完全相同 在本文档中的各种示例中,其中状态机配置 是硬编码的。
通过适配器出厂
实际使用@EnableStateMachine通过工厂工作,因此@EnableStateMachineFactory仅暴露
该工厂通过其接口。以下示例使用@EnableStateMachineFactory:
@Configuration
@EnableStateMachineFactory
public class Config6
		extends EnumStateMachineConfigurerAdapter<States, Events> {

	@Override
	public void configure(StateMachineStateConfigurer<States, Events> states)
			throws Exception {
		states
			.withStates()
				.initial(States.S1)
				.end(States.SF)
				.states(EnumSet.allOf(States.class));
	}

}
现在您已经使用了@EnableStateMachineFactory创建 Factory 的步骤
你可以注入它并(按原样)使用它来
请求新的状态机。以下示例显示了如何执行此作:
public class Bean3 {

	@Autowired
	StateMachineFactory<States, Events> factory;

	void method() {
		StateMachine<States,Events> stateMachine = factory.getStateMachine();
		stateMachine.startReactively().subscribe();
	}
}
通过 Builder 进行状态机
使用适配器(如上所示)有一个限制,其
通过 Spring 工作的要求@Configuration类和
应用程序上下文。虽然这是一个非常清晰的模型,用于配置
state machine 时,它会在编译时限制配置,
这并不总是用户想要做的。如果有要求
要构建更多动态状态机,您可以使用简单的构建器模式
以构造类似的实例。通过使用字符串作为状态和
事件,您可以使用此构建器模式来构建完全动态的 state
machines 在 Spring 应用程序上下文之外。以下示例
演示如何执行此作:
StateMachine<String, String> buildMachine1() throws Exception {
	Builder<String, String> builder = StateMachineBuilder.builder();
	builder.configureStates()
		.withStates()
			.initial("S1")
			.end("SF")
			.states(new HashSet<String>(Arrays.asList("S1","S2","S3","S4")));
	return builder.build();
}
构建器在后台使用相同的配置接口,这些接口
这@ConfigurationAdapter 类的 model 用途。相同的模型用于
通过构建器的
方法。这意味着,无论您可以将EnumStateMachineConfigurerAdapter或StateMachineConfigurerAdapter您可以通过生成器动态使用。
目前,builder.configureStates(),builder.configureTransitions(),
和builder.configureConfiguration()接口方法不能是
链接在一起,这意味着需要单独调用 Builder 方法。 |
以下示例使用 builder 设置许多选项:
StateMachine<String, String> buildMachine2() throws Exception {
	Builder<String, String> builder = StateMachineBuilder.builder();
	builder.configureConfiguration()
		.withConfiguration()
			.autoStartup(false)
			.beanFactory(null)
			.listener(null);
	return builder.build();
}
您需要了解常见配置何时需要
用于从 Builder 实例化的计算机。您可以使用 configurer
从withConfiguration()设置autoStart和BeanFactory.
您也可以使用一个 API 来注册StateMachineListener.如果StateMachine从构建器返回的实例通过使用@Bean,BeanFactory将自动附加。如果您在 Spring 应用程序上下文之外使用实例,则
您必须使用这些方法来设置所需的设施。
使用延迟事件
发送事件时,它可能会触发EventTrigger,这可能会导致
如果状态机处于触发器为
评估成功。通常,这可能会导致
事件未被接受并被丢弃。但是,您可能希望
将此事件推迟到状态机进入另一个状态。在这种情况下,
您可以接受该事件。换句话说,一个事件
来得不是时候。
Spring Statemachine 提供了一种将事件推迟到以后的机制 加工。每个状态都可以有一个延迟事件列表。如果事件 在当前状态的 Deferred Event List occurs 中,保存该事件 (deferred) 以供将来处理,直到输入未列出的状态 其 Deferred Event 列表中的事件。当进入此类状态时, 状态机会自动调用任何已保存的不再 deferred,然后使用或丢弃这些事件。这是可能的 使 Superstate 在延迟的事件上定义转换 按子状态。遵循相同的分层状态机概念,子状态 优先于超状态,则事件被延迟,并且 transi 的 TRANSITION 未运行。对于正交区域, 当一个正交区域推迟事件而另一个正交区域接受事件时, accept 优先,事件被使用而不是延迟。
事件延迟最明显的用例是事件导致 转换到特定状态,然后返回状态机 恢复到其原始状态,其中第二个事件应导致相同的 过渡。以下示例显示了这种情况:
@Configuration
@EnableStateMachine
static class Config5 extends StateMachineConfigurerAdapter<String, String> {

	@Override
	public void configure(StateMachineStateConfigurer<String, String> states)
			throws Exception {
		states
			.withStates()
				.initial("READY")
				.state("DEPLOYPREPARE", "DEPLOY")
				.state("DEPLOYEXECUTE", "DEPLOY");
	}

	@Override
	public void configure(StateMachineTransitionConfigurer<String, String> transitions)
			throws Exception {
		transitions
			.withExternal()
				.source("READY").target("DEPLOYPREPARE")
				.event("DEPLOY")
				.and()
			.withExternal()
				.source("DEPLOYPREPARE").target("DEPLOYEXECUTE")
				.and()
			.withExternal()
				.source("DEPLOYEXECUTE").target("READY");
	}
}
在前面的示例中,状态机的状态为READY,这表示机器是
ready 处理事件,这些事件会将其转换为DEPLOYstate 中,其中
实际部署将发生。运行部署作后,计算机
将返回到READY州。在READYstate 不会造成任何麻烦,如果机器正在使用同步执行程序,则
因为事件发送会在事件调用之间阻塞。但是,如果 executor 使用
threads 中,其他事件可能会丢失,因为机器不再处于
可以处理事件。因此,延迟其中一些事件可以让机器
保留它们。以下示例说明如何配置此类安排:
@Configuration
@EnableStateMachine
static class Config6 extends StateMachineConfigurerAdapter<String, String> {

	@Override
	public void configure(StateMachineStateConfigurer<String, String> states)
			throws Exception {
		states
			.withStates()
				.initial("READY")
				.state("DEPLOY", "DEPLOY")
				.state("DONE")
				.and()
				.withStates()
					.parent("DEPLOY")
					.initial("DEPLOYPREPARE")
					.state("DEPLOYPREPARE", "DONE")
					.state("DEPLOYEXECUTE");
	}

	@Override
	public void configure(StateMachineTransitionConfigurer<String, String> transitions)
			throws Exception {
		transitions
			.withExternal()
				.source("READY").target("DEPLOY")
				.event("DEPLOY")
				.and()
			.withExternal()
				.source("DEPLOYPREPARE").target("DEPLOYEXECUTE")
				.and()
			.withExternal()
				.source("DEPLOYEXECUTE").target("READY")
				.and()
			.withExternal()
				.source("READY").target("DONE")
				.event("DONE")
				.and()
			.withExternal()
				.source("DEPLOY").target("DONE")
				.event("DONE");
	}
}
在前面的示例中,状态机使用嵌套状态而不是 flat
state 模型,因此DEPLOY事件可以直接在子状态中延迟。
它还演示了延迟DONEevent 中
子状态,然后覆盖
这DEPLOY和DONE状态机是否恰好位于DEPLOYPREPAREstate 时,DONE事件。在DEPLOYEXECUTEstate 时,DONE事件未延迟,则此事件将
在超级状态下处理。
使用范围
对状态机中范围的支持非常有限,但您可以
使session范围使用普通的 Spring@Scopeannotation 中:
-
如果状态机是使用构建器手动构建的,并返回到 context 作为
@Bean. -
通过配置适配器。
两者
这些需要@Scope要存在,请使用scopeName设置为session和proxyMode设置为ScopedProxyMode.TARGET_CLASS.以下示例
显示两个用例:
@Configuration
public class Config3 {

	@Bean
	@Scope(scopeName="session", proxyMode=ScopedProxyMode.TARGET_CLASS)
	StateMachine<String, String> stateMachine() throws Exception {
		Builder<String, String> builder = StateMachineBuilder.builder();
		builder.configureConfiguration()
			.withConfiguration()
				.autoStartup(true);
		builder.configureStates()
			.withStates()
				.initial("S1")
				.state("S2");
		builder.configureTransitions()
			.withExternal()
				.source("S1")
				.target("S2")
				.event("E1");
		StateMachine<String, String> stateMachine = builder.build();
		return stateMachine;
	}

}
@Configuration
@EnableStateMachine
@Scope(scopeName="session", proxyMode=ScopedProxyMode.TARGET_CLASS)
public static class Config4 extends StateMachineConfigurerAdapter<String, String> {

	@Override
	public void configure(StateMachineConfigurationConfigurer<String, String> config) throws Exception {
		config
			.withConfiguration()
				.autoStartup(true);
	}

	@Override
	public void configure(StateMachineStateConfigurer<String, String> states) throws Exception {
		states
			.withStates()
				.initial("S1")
				.state("S2");
	}

	@Override
	public void configure(StateMachineTransitionConfigurer<String, String> transitions) throws Exception {
		transitions
			.withExternal()
				.source("S1")
				.target("S2")
				.event("E1");
	}

}
提示:有关如何使用会话范围的信息,请参阅 Scope。
将状态机的范围限定为session,将其自动连接到
一个@Controller为每个会话提供一个新的状态机实例。
然后,当HttpSession无效。
以下示例展示了如何在控制器中使用状态机:
@Controller
public class StateMachineController {

	@Autowired
	StateMachine<String, String> stateMachine;

	@RequestMapping(path="/state", method=RequestMethod.POST)
	public HttpEntity<Void> setState(@RequestParam("event") String event) {
		stateMachine
			.sendEvent(Mono.just(MessageBuilder
				.withPayload(event).build()))
			.subscribe();
		return new ResponseEntity<Void>(HttpStatus.ACCEPTED);
	}

	@RequestMapping(path="/state", method=RequestMethod.GET)
	@ResponseBody
	public String getState() {
		return stateMachine.getState().getId();
	}
}
在session范围需要仔细规划,
主要是因为它是一个相对较重的组件。 |
| Spring Statemachine poms 不依赖于 Spring MVC 类,您需要使用 session 范围。但是,如果你是 使用 Web 应用程序时,您已经拉取了这些依赖项 直接从 Spring MVC 或 Spring Boot 获取。 |
使用作
作是可用于的最有用的组件之一 与状态机交互和协作。您可以运行作 在状态机及其状态生命周期的不同位置——例如, 进入或退出状态或在过渡期间。 以下示例显示了如何在状态机中使用作:
@Override
public void configure(StateMachineStateConfigurer<States, Events> states)
		throws Exception {
	states
		.withStates()
			.initial(States.SI)
			.state(States.S1, action1(), action2())
			.state(States.S2, action1(), action2())
			.state(States.S3, action1(), action3());
}
在前面的示例中,action1和action2bean 附加到entry和exit状态。以下示例定义这些作 (以及action3):
@Bean
public Action<States, Events> action1() {
	return new Action<States, Events>() {

		@Override
		public void execute(StateContext<States, Events> context) {
		}
	};
}

@Bean
public BaseAction action2() {
	return new BaseAction();
}

@Bean
public SpelAction action3() {
	ExpressionParser parser = new SpelExpressionParser();
	return new SpelAction(
			parser.parseExpression(
					"stateMachine.sendEvent(T(org.springframework.statemachine.docs.Events).E1)"));
}

public class BaseAction implements Action<States, Events> {

	@Override
	public void execute(StateContext<States, Events> context) {
	}
}

public class SpelAction extends SpelExpressionAction<States, Events> {

	public SpelAction(Expression expression) {
		super(expression);
	}
}
您可以直接实现Action作为匿名函数或创建
您自己的实现,并将相应的实现定义为
豆。
在前面的示例中,action3使用 SpEL 表达式发送Events.E1event 转换为
状态机。
StateContext在用StateContext. |
响应式作
正常Actioninterface 是一个简单的功能方法,采用StateContext并返回 void。在你阻止之前,这里没有任何阻碍
在方法本身中,这是一个有点问题,因为框架不能
了解它内部到底发生了什么。
public interface Action<S, E> {
	void execute(StateContext<S, E> context);
}
为了解决这个问题,我们在内部进行了更改Actionhandling 设置为
处理普通 Java 的Function取StateContext并返回Mono.这样我们就可以调用 action 并完全以响应式方式
execute作,仅当它被订阅且以非阻塞方式执行
等待完成。
public interface ReactiveAction<S, E> extends Function<StateContext<S, E>, Mono<Void>> {
}
|
内部陈旧 |
使用守卫
如 Things to Remember 中所示,guard1和guard2bean 附加到 entry 和
退出状态。
以下示例还对事件使用 guards:
@Override
public void configure(StateMachineTransitionConfigurer<States, Events> transitions)
		throws Exception {
	transitions
		.withExternal()
			.source(States.SI).target(States.S1)
			.event(Events.E1)
			.guard(guard1())
			.and()
		.withExternal()
			.source(States.S1).target(States.S2)
			.event(Events.E1)
			.guard(guard2())
			.and()
		.withExternal()
			.source(States.S2).target(States.S3)
			.event(Events.E2)
			.guardExpression("extendedState.variables.get('myvar')");
}
您可以直接实现Guard作为匿名函数或创建
您自己的实现,并将相应的实现定义为
豆。在前面的示例中,guardExpressioncheckS 是否扩展了
state 变量myvar计算结果为TRUE.
下面的示例实现一些示例 guards:
@Bean
public Guard<States, Events> guard1() {
	return new Guard<States, Events>() {

		@Override
		public boolean evaluate(StateContext<States, Events> context) {
			return true;
		}
	};
}

@Bean
public BaseGuard guard2() {
	return new BaseGuard();
}

public class BaseGuard implements Guard<States, Events> {

	@Override
	public boolean evaluate(StateContext<States, Events> context) {
		return false;
	}
}
StateContext在用StateContext. |
带守卫的 SPEL 表达式
您还可以使用 SPEL 表达式来替代
完整的 Guard 实现。唯一的要求是表达式需要
要返回Boolean值来满足Guard实现。这可以是
演示使用guardExpression()函数,该函数采用
expression 作为参数。
响应式守卫
正常Guardinterface 是一个简单的功能方法,采用StateContext并返回 boolean。在你阻止之前,这里没有任何阻碍
在方法本身中,这是一个有点问题,因为框架不能
了解它内部到底发生了什么。
public interface Guard<S, E> {
	boolean evaluate(StateContext<S, E> context);
}
为了解决这个问题,我们在内部进行了更改Guardhandling 设置为
处理普通 Java 的Function取StateContext并返回Mono<Boolean>.这样我们就可以调用 guard 并且完全以响应方式
仅在订阅时以非阻塞方式对其进行评估
等待 return 值完成。
public interface ReactiveGuard<S, E> extends Function<StateContext<S, E>, Mono<Boolean>> {
}
|
内部陈旧 |
使用扩展状态
假设您需要创建一个状态机来跟踪 很多时候,用户按下键盘上的某个键,然后终止 当按键被按下 1000 次时。一个可能但非常幼稚的解决方案 将是每按 1000 次按键创建一个新状态。 您可能会突然出现一个天文数字 状态,这自然不是很实用。
这就是扩展状态变量通过不需要 以添加更多状态来驱动状态机更改。相反 您可以在过渡期间执行简单的变量更改。
StateMachine有一个名为getExtendedState().它返回一个
接口调用ExtendedState,它提供对扩展状态的访问
变量。您可以通过状态机或通过StateContext在 actions 或 transitions 回调期间。
以下示例显示了如何执行此作:
public Action<String, String> myVariableAction() {
	return new Action<String, String>() {

		@Override
		public void execute(StateContext<String, String> context) {
			context.getExtendedState()
				.getVariables().put("mykey", "myvalue");
		}
	};
}
如果您需要获得扩展状态变量的通知
changes,您有两个选项:要么使用StateMachineListener或
监听extendedStateChanged(key, value)回调。以下示例
使用extendedStateChanged方法:
public class ExtendedStateVariableListener
		extends StateMachineListenerAdapter<String, String> {

	@Override
	public void extendedStateChanged(Object key, Object value) {
		// do something with changed variable
	}
}
或者,你可以为OnExtendedStateChanged.如 侦听状态机事件 中所述,
您也可以全部收听StateMachineEvent事件。
以下示例使用onApplicationEvent要监听状态变化:
public class ExtendedStateVariableEventListener
		implements ApplicationListener<OnExtendedStateChanged> {

	@Override
	public void onApplicationEvent(OnExtendedStateChanged event) {
		// do something with changed variable
	}
}
用StateContext
StateContext是最重要的对象之一
当使用状态机时,因为它被传递到各种方法中
和回调来给出状态机的当前状态,以及
它可能去哪里。您可以将其视为
当前状态机阶段的快照
是StateContext被检索。
在 Spring Statemachine 1.0.x 中,StateContext使用相对天真
就它如何被用来作为简单的 “POJO” 传递东西而言。
从 Spring Statemachine 1.1.x 开始,它的作用已经大大
通过使其成为状态机中的一等公民而得到改进。 |
您可以使用StateContext以访问以下内容:
-
当前的
Message或Event(或其MessageHeaders(如果已知))。 -
状态机的
Extended State. -
这
StateMachine本身。 -
到可能的状态机错误。
-
到当前
Transition(如果适用)。 -
状态机的源状态。
-
状态机的目标状态。
-
当前的
Stage,如 Stages 中所述。
StateContext传递到各种组件中,例如Action和Guard.
触发过渡
驱动状态机是通过使用触发的转换来完成的
by 触发器。当前支持的触发器包括EventTrigger和TimerTrigger.
用EventTrigger
EventTrigger是最有用的触发器,因为它允许您
通过向状态机发送事件来直接与状态机交互。这些
事件也称为信号。您可以向过渡添加触发器
通过在配置期间将状态与其关联。
以下示例显示了如何执行此作:
@Autowired
StateMachine<String, String> stateMachine;

void signalMachine() {
	stateMachine
		.sendEvent(Mono.just(MessageBuilder
			.withPayload("E1").build()))
		.subscribe();

	Message<String> message = MessageBuilder
			.withPayload("E2")
			.setHeader("foo", "bar")
			.build();
	stateMachine.sendEvent(Mono.just(message)).subscribe();
}
无论您是发送一个事件还是多个事件,结果始终是一个序列
的结果。之所以如此,是因为在存在多个 reqions 的情况下,结果将
从这些区域中的多台计算机返回。这是
with 方法sendEventCollect,它给出了一个结果列表。方法
本身只是一个语法糖收集Fluxas 列表。如果有
只有一个地区,此列表包含一个结果。
Message<String> message1 = MessageBuilder
	.withPayload("E1")
	.build();

Mono<List<StateMachineEventResult<String, String>>> results =
	stateMachine.sendEventCollect(Mono.just(message1));

results.subscribe();
| 在订阅返回的 flux 之前,什么都不会发生。从 StateMachineEventResult 中了解更多信息。 |
前面的示例通过构造Mono包皮
一个Message并订阅 returnedFlux的结果。Message让
我们向事件添加任意的额外信息,然后该信息可见
自StateContext当 (例如) 实施作时。
消息标头通常会一直传递,直到机器运行
完成特定事件。例如,如果事件导致
过渡到 StateA它们具有匿名转换为
州B,原始事件可用于状态B. |
也可以发送Flux的消息,而不仅仅是发送
一个具有Mono.
Message<String> message1 = MessageBuilder
	.withPayload("E1")
	.build();
Message<String> message2 = MessageBuilder
	.withPayload("E2")
	.build();

Flux<StateMachineEventResult<String, String>> results =
	stateMachine.sendEvents(Flux.just(message1, message2));

results.subscribe();
用TimerTrigger
TimerTrigger在需要触发某些作时很有用
自动的。Trigger已添加到
transition 的 TRANSITION。
目前,有两种类型的受支持的计时器,一种是触发 持续触发,并在进入源状态后触发。 以下示例演示如何使用触发器:
@Configuration
@EnableStateMachine
public class Config2 extends StateMachineConfigurerAdapter<String, String> {

	@Override
	public void configure(StateMachineStateConfigurer<String, String> states)
			throws Exception {
		states
			.withStates()
				.initial("S1")
				.state("S2")
				.state("S3");
	}

	@Override
	public void configure(StateMachineTransitionConfigurer<String, String> transitions)
			throws Exception {
		transitions
			.withExternal()
				.source("S1").target("S2").event("E1")
				.and()
			.withExternal()
				.source("S1").target("S3").event("E2")
				.and()
			.withInternal()
				.source("S2")
				.action(timerAction())
				.timer(1000)
				.and()
			.withInternal()
				.source("S3")
				.action(timerAction())
				.timerOnce(1000);
	}

	@Bean
	public TimerAction timerAction() {
		return new TimerAction();
	}
}

public class TimerAction implements Action<String, String> {

	@Override
	public void execute(StateContext<String, String> context) {
		// do something in every 1 sec
	}
}
前面的示例有三种状态:S1,S2和S3.我们有一个正常的
外部过渡S1自S2和 从S1自S3跟
事件E1和E2分别。有趣的部分
用于TimerTrigger是当我们定义
源状态的内部过渡S2和S3.
对于这两个转换,我们调用ActionBean (timerAction),其中
源状态S2使用timer和S3使用timerOnce.
给出的值以毫秒为单位 (1000毫秒,或者在两种情况下都是 1 秒)。
一旦状态机收到事件E1,它会执行过渡
从S1自S2计时器开始计时。当状态为S2,TimerTrigger运行并导致与该
state — 在本例中,具有timerAction定义。
一旦状态机收到E2,事件会执行
从S1自S3计时器开始计时。此计时器仅执行一次
在 state 被输入之后 (在 timer 中定义的 delay 之后)。
在幕后,计时器是简单的触发器,可能会导致
transition 到 Happen 的 Transition。使用timer()保持
仅当 source state 为 active 时,触发才会触发并导致 transition。
过渡timerOnce()有点不同,因为它
仅在实际进入源状态时延迟后触发。 |
用timerOnce()如果您希望在延迟后发生某些事情
在 State 进入时恰好一次。 |
侦听状态机事件
在一些用例中,您想知道发生了什么 状态机、对某事做出反应或获取 调试目的。Spring Statemachine 提供了用于添加侦听器的接口。这些侦听器 然后给出一个选项,以便在各种 state 发生变化时获取回调, 作,等等。
您基本上有两个选择:监听 Spring 应用程序 context 事件或直接将侦听器附加到状态机。两者 这些基本上提供相同的信息。一个产生 events 作为事件类,另一个通过侦听器生成回调 接口。这两者都有优点和缺点,我们将在后面讨论。
应用程序上下文事件
应用程序上下文事件类是OnTransitionStartEvent,OnTransitionEvent,OnTransitionEndEvent,OnStateExitEvent,OnStateEntryEvent,OnStateChangedEvent,OnStateMachineStart,OnStateMachineStop以及其他扩展基事件类StateMachineEvent.这些可以按原样与 Spring 一起使用ApplicationListener.
StateMachine通过以下方式发送上下文事件StateMachineEventPublisher.
如果@Configurationclass 的@EnableStateMachine.
以下示例获取StateMachineApplicationEventListener从@Configuration类:
public class StateMachineApplicationEventListener
		implements ApplicationListener<StateMachineEvent> {

	@Override
	public void onApplicationEvent(StateMachineEvent event) {
	}
}

@Configuration
public class ListenerConfig {

	@Bean
	public StateMachineApplicationEventListener contextListener() {
		return new StateMachineApplicationEventListener();
	}
}
上下文事件也会通过使用@EnableStateMachine,
跟StateMachine用于构建机器并注册为 bean,
如下例所示:
@Configuration
@EnableStateMachine
public class ManualBuilderConfig {

	@Bean
	public StateMachine<String, String> stateMachine() throws Exception {

		Builder<String, String> builder = StateMachineBuilder.builder();
		builder.configureStates()
			.withStates()
				.initial("S1")
				.state("S2");
		builder.configureTransitions()
			.withExternal()
				.source("S1")
				.target("S2")
				.event("E1");
		return builder.build();
	}
}
用StateMachineListener
通过使用StateMachineListener,您可以扩展它,然后
实现所有回调方法或使用StateMachineListenerAdapter类,其中包含存根方法实现,并选择哪些实现
以覆盖。
以下示例使用后一种方法:
public class StateMachineEventListener
		extends StateMachineListenerAdapter<States, Events> {

	@Override
	public void stateChanged(State<States, Events> from, State<States, Events> to) {
	}

	@Override
	public void stateEntered(State<States, Events> state) {
	}

	@Override
	public void stateExited(State<States, Events> state) {
	}

	@Override
	public void transition(Transition<States, Events> transition) {
	}

	@Override
	public void transitionStarted(Transition<States, Events> transition) {
	}

	@Override
	public void transitionEnded(Transition<States, Events> transition) {
	}

	@Override
	public void stateMachineStarted(StateMachine<States, Events> stateMachine) {
	}

	@Override
	public void stateMachineStopped(StateMachine<States, Events> stateMachine) {
	}

	@Override
	public void eventNotAccepted(Message<Events> event) {
	}

	@Override
	public void extendedStateChanged(Object key, Object value) {
	}

	@Override
	public void stateMachineError(StateMachine<States, Events> stateMachine, Exception exception) {
	}

	@Override
	public void stateContext(StateContext<States, Events> stateContext) {
	}
}
在前面的示例中,我们创建了自己的 listener 类
(StateMachineEventListener),该StateMachineListenerAdapter.
这stateContextlistener 方法允许访问各种StateContext不同阶段的变化。您可以在用StateContext.
定义自己的侦听器后,您可以在
状态机使用addStateListener方法。这是一个
flavor 是将其挂接在 Spring 配置中还是执行
在应用程序生命周期内的任何时间手动作。
以下示例显示如何附加侦听器:
public class Config7 {

	@Autowired
	StateMachine<States, Events> stateMachine;

	@Bean
	public StateMachineEventListener stateMachineEventListener() {
		StateMachineEventListener listener = new StateMachineEventListener();
		stateMachine.addStateListener(listener);
		return listener;
	}

}
限制和问题
Spring 应用程序上下文并不是最快的事件总线,因此我们
建议考虑一下状态机的事件发生率
发送。为了获得更好的性能,最好使用StateMachineListener接口。出于这个特定的原因,
您可以使用contextEventsflag 替换为@EnableStateMachine和@EnableStateMachineFactory禁用 Spring 应用程序上下文
事件,如上一节所示。
以下示例显示如何禁用 Spring 应用程序上下文事件:
@Configuration
@EnableStateMachine(contextEvents = false)
public class Config8
		extends EnumStateMachineConfigurerAdapter<States, Events> {
}

@Configuration
@EnableStateMachineFactory(contextEvents = false)
public class Config9
		extends EnumStateMachineConfigurerAdapter<States, Events> {
}
上下文集成
通过以下方式与状态机进行交互有点受限 监听其事件或使用带有 state 和 转换。有时,这种方法会过于有限,并且 verbose 创建与状态机的应用程序的交互 工程。对于这个特定的用例,我们制作了一个 Spring 风格的 轻松插入状态机功能的上下文集成 放入你的豆子里。
可用的注释已协调,以便能够访问相同的 可从 Listening to State Machine Events 获得的状态机执行点。
您可以使用@WithStateMachine用于关联状态的注释
machine 中。然后你就可以开始添加
该 bean 的方法的 supported 注释。
以下示例显示了如何执行此作:
@WithStateMachine
public class Bean1 {

	@OnTransition
	public void anyTransition() {
	}
}
您还可以从
使用 Annotation 的应用程序上下文name田。
以下示例显示了如何执行此作:
@WithStateMachine(name = "myMachineBeanName")
public class Bean2 {

	@OnTransition
	public void anyTransition() {
	}
}
有时,使用起来更方便machine id,这是
您可以设置以更好地识别多个实例。此 ID 映射到
这getId()方法中的StateMachine接口。
以下示例演示如何使用它:
@WithStateMachine(id = "myMachineId")
public class Bean16 {

	@OnTransition
	public void anyTransition() {
	}
}
当使用 StateMachineFactory 生成状态机时,状态机使用 dynamic 提供的id,bean name 将默认为stateMachine不能使用@WithStateMachine (id = "some-id")因为id仅在运行时已知。
在这种情况下,请使用@WithStateMachine或@WithStateMachine(name = "stateMachine")并且工厂生成的所有状态机都将附加到你的一个或多个 bean。
您还可以使用@WithStateMachine作为元注释,如图所示
在前面的示例中。在这种情况下,您可以使用WithMyBean.
以下示例显示了如何执行此作:
@Target(ElementType.TYPE)
@Retention(RetentionPolicy.RUNTIME)
@WithStateMachine(name = "myMachineBeanName")
public @interface WithMyBean {
}
| 这些方法的返回类型无关紧要,并且实际上是 丢弃。 |
启用集成
您可以启用@WithStateMachine通过使用
这@EnableWithStateMachineannotation 中,它会导入所需的
配置导入到 Spring Application Context 中。双@EnableStateMachine和@EnableStateMachineFactory已经
使用此注释进行注释,因此无需再次添加它。
但是,如果机器在构建和配置时没有
配置适配器,您必须使用@EnableWithStateMachine要将这些功能与@WithStateMachine.
以下示例显示了如何执行此作:
public static StateMachine<String, String> buildMachine(BeanFactory beanFactory) throws Exception {
	Builder<String, String> builder = StateMachineBuilder.builder();

	builder.configureConfiguration()
		.withConfiguration()
			.machineId("myMachineId")
			.beanFactory(beanFactory);

	builder.configureStates()
		.withStates()
			.initial("S1")
			.state("S2");

	builder.configureTransitions()
		.withExternal()
			.source("S1")
			.target("S2")
			.event("E1");

	return builder.build();
}

@WithStateMachine(id = "myMachineId")
static class Bean17 {

	@OnStateChanged
	public void onStateChanged() {
	}
}
如果机器不是作为 Bean 创建的,则需要将BeanFactory对于计算机,如前面的示例所示。否则,tge 机器为
不知道调用@WithStateMachine方法。 |
方法参数
每个 Comments 都支持完全相同的可能方法
参数,但运行时行为会有所不同,具体取决于
annotation 本身以及调用 annotated 方法的阶段。自
更好地了解上下文的工作原理,请参阅用StateContext.
| 有关方法参数之间的差异,请参阅定义 单独的注释。 |
实际上,所有带 Comments 的方法都是通过使用 Spring SPel 来调用的
表达式,这些表达式在此过程中动态构建。要使
this work,这些表达式需要有一个 root 对象(它们根据该对象进行求值)。
此根对象是一个StateContext.我们还制作了一些
在内部进行调整,以便可以访问StateContext方法
直接访问,而无需通过上下文句柄。
最简单的方法参数是StateContext本身。
以下示例演示如何使用它:
@WithStateMachine
public class Bean3 {

	@OnTransition
	public void anyTransition(StateContext<String, String> stateContext) {
	}
}
您可以访问StateContext内容。
参数的数量和顺序无关紧要。
以下示例显示了如何访问StateContext内容:
@WithStateMachine
public class Bean4 {

	@OnTransition
	public void anyTransition(
			@EventHeaders Map<String, Object> headers,
			@EventHeader("myheader1") Object myheader1,
			@EventHeader(name = "myheader2", required = false) String myheader2,
			ExtendedState extendedState,
			StateMachine<String, String> stateMachine,
			Message<String> message,
			Exception e) {
	}
}
而不是使用@EventHeaders,您可以使用@EventHeader,它可以绑定到单个标头。 |
过渡批注
过渡的注释是@OnTransition,@OnTransitionStart,
和@OnTransitionEnd.
这些注释的行为完全相同。为了展示它们的工作原理,我们展示了
如何@OnTransition被使用。在此注解中,属性的
您可以使用source和target以限定过渡。如果source和target留空,则匹配任何过渡。
以下示例演示如何使用@OnTransition注解
(请记住@OnTransitionStart和@OnTransitionEnd以相同的方式工作):
@WithStateMachine
public class Bean5 {

	@OnTransition(source = "S1", target = "S2")
	public void fromS1ToS2() {
	}

	@OnTransition
	public void anyTransition() {
	}
}
默认情况下,您不能使用@OnTransition注解中带有 state 和
由于 Java 语言限制,您创建的 event 枚举。
因此,您需要使用字符串表示形式。
此外,您还可以访问Event Headers和ExtendedState通过向方法添加所需的参数。方法
然后,使用这些参数自动调用。
以下示例显示了如何执行此作:
@WithStateMachine
public class Bean6 {

	@StatesOnTransition(source = States.S1, target = States.S2)
	public void fromS1ToS2(@EventHeaders Map<String, Object> headers, ExtendedState extendedState) {
	}
}
但是,如果您想拥有类型安全的注解,则可以
创建新注释并使用@OnTransition作为元注释。
此用户级注释可以引用实际状态和
events 枚举,框架会尝试以相同的方式匹配这些枚举。
以下示例显示了如何执行此作:
@Target(ElementType.METHOD)
@Retention(RetentionPolicy.RUNTIME)
@OnTransition
public @interface StatesOnTransition {

	States[] source() default {};

	States[] target() default {};
}
在前面的示例中,我们创建了一个@StatesOnTransition注解定义source和target以类型安全的方式。
下面的示例在 bean 中使用该 Comments:
@WithStateMachine
public class Bean7 {

	@StatesOnTransition(source = States.S1, target = States.S2)
	public void fromS1ToS2() {
	}
}
状态注释
可以使用以下状态注释:@OnStateChanged,@OnStateEntry和@OnStateExit.以下示例演示如何使用OnStateChanged注解(
其他两个的工作方式相同):
@WithStateMachine
public class Bean8 {

	@OnStateChanged
	public void anyStateChange() {
	}
}
就像使用 Transition Annotations 一样,您可以定义 target 和 source 状态。以下示例显示了如何执行此作:
@WithStateMachine
public class Bean9 {

	@OnStateChanged(source = "S1", target = "S2")
	public void stateChangeFromS1toS2() {
	}
}
为了类型安全,需要使用@OnStateChanged作为元注释。以下示例说明如何执行此作:
@Target(ElementType.METHOD)
@Retention(RetentionPolicy.RUNTIME)
@OnStateChanged
public @interface StatesOnStates {

	States[] source() default {};

	States[] target() default {};
}
@WithStateMachine
public class Bean10 {

	@StatesOnStates(source = States.S1, target = States.S2)
	public void fromS1ToS2() {
	}
}
state entry 和 exit 的方法的行为方式相同,如下例所示:
@WithStateMachine
public class Bean11 {

	@OnStateEntry
	public void anyStateEntry() {
	}

	@OnStateExit
	public void anyStateExit() {
	}
}
事件注释
有一个与事件相关的注释。它被命名为@OnEventNotAccepted.
如果指定event属性,您可以监听特定事件而不是
接受。如果未指定事件,则可以列出任何非
接受。以下示例显示了使用@OnEventNotAccepted注解:
@WithStateMachine
public class Bean12 {

	@OnEventNotAccepted
	public void anyEventNotAccepted() {
	}

	@OnEventNotAccepted(event = "E1")
	public void e1EventNotAccepted() {
	}
}
状态机注释
以下注释可用于状态机:@OnStateMachineStart,@OnStateMachineStop和@OnStateMachineError.
在状态机启动和停止期间,将调用生命周期方法。
以下示例演示如何使用@OnStateMachineStart和@OnStateMachineStop要监听这些事件:
@WithStateMachine
public class Bean13 {

	@OnStateMachineStart
	public void onStateMachineStart() {
	}

	@OnStateMachineStop
	public void onStateMachineStop() {
	}
}
如果状态机出现异常错误,@OnStateMachineStopannotation 调用。以下示例演示如何使用它:
@WithStateMachine
public class Bean14 {

	@OnStateMachineError
	public void onStateMachineError() {
	}
}
用StateMachineAccessor
StateMachine是与状态机通信的主接口。
有时,您可能需要变得更加动态和
以编程方式访问状态机的内部结构及其
嵌套计算机和区域。对于这些使用案例,StateMachine公开一个名为StateMachineAccessor,它提供
用于访问个人的接口StateMachine和Region实例。
StateMachineFunction是一个简单的功能接口,它允许
您将StateMachineAccess接口。跟
JDK 7 创建的代码有点冗长。但是,使用 JDK 8 lambda 时,
DOCE 相对不冗长。
这doWithAllRegionsmethod 允许访问所有Region中的 实例
状态机。以下示例演示如何使用它:
stateMachine.getStateMachineAccessor().doWithAllRegions(function -> function.setRelay(stateMachine));

stateMachine.getStateMachineAccessor()
	.doWithAllRegions(access -> access.setRelay(stateMachine));
这doWithRegionmethod 允许访问单个Region实例中
状态机。以下示例演示如何使用它:
stateMachine.getStateMachineAccessor().doWithRegion(function -> function.setRelay(stateMachine));

stateMachine.getStateMachineAccessor()
	.doWithRegion(access -> access.setRelay(stateMachine));
这withAllRegionsmethod 可以访问所有Region中的 实例
状态机。以下示例演示如何使用它:
for (StateMachineAccess<String, String> access : stateMachine.getStateMachineAccessor().withAllRegions()) {
	access.setRelay(stateMachine);
}

stateMachine.getStateMachineAccessor().withAllRegions()
	.stream().forEach(access -> access.setRelay(stateMachine));
这withRegionmethod 允许访问单个Region实例中
状态机。以下示例演示如何使用它:
stateMachine.getStateMachineAccessor()
	.withRegion().setRelay(stateMachine);
用StateMachineInterceptor
而不是使用StateMachineListener界面中,您可以
使用StateMachineInterceptor.一个概念上的区别是,您可以使用
interceptor 拦截和停止当前状态
更改或更改其过渡逻辑。而不是实现完整的接口,
您可以使用名为StateMachineInterceptorAdapter覆盖
默认的 no-op 方法。
| 一个配方 (Persist) 和一个示例 ([statemachine-examples-persist]) 与使用 拦截 器。 |
您可以通过StateMachineAccessor.的概念
拦截器是一个相对较深的内部特征,因此不是
直接通过StateMachine接口。
以下示例演示如何添加StateMachineInterceptor并覆盖选定项
方法:
stateMachine.getStateMachineAccessor()
	.withRegion().addStateMachineInterceptor(new StateMachineInterceptor<String, String>() {

		@Override
		public Message<String> preEvent(Message<String> message, StateMachine<String, String> stateMachine) {
			return message;
		}

		@Override
		public StateContext<String, String> preTransition(StateContext<String, String> stateContext) {
			return stateContext;
		}

		@Override
		public void preStateChange(State<String, String> state, Message<String> message,
				Transition<String, String> transition, StateMachine<String, String> stateMachine,
				StateMachine<String, String> rootStateMachine) {
		}

		@Override
		public StateContext<String, String> postTransition(StateContext<String, String> stateContext) {
			return stateContext;
		}

		@Override
		public void postStateChange(State<String, String> state, Message<String> message,
				Transition<String, String> transition, StateMachine<String, String> stateMachine,
				StateMachine<String, String> rootStateMachine) {
		}

		@Override
		public Exception stateMachineError(StateMachine<String, String> stateMachine,
				Exception exception) {
			return exception;
		}
	});
| 有关前面示例中显示的错误处理的更多信息,请参阅状态机错误处理。 |
状态机安全
安全功能建立在 Spring Security 的功能之上。安全功能包括 当需要保护状态机的一部分时非常方便 执行和与之交互。
| 我们希望您对 Spring Security 相当熟悉,这意味着 我们不会详细介绍整体安全框架的工作原理。为 此信息,您应该阅读 Spring Security 参考文档 (可在此处获得)。 |
安全的第一级防御自然是保护事件, 这真的驱动着什么 发生在状态机中。然后,您可以定义更精细的安全设置 用于过渡和作。这与允许员工进入架构物类似 然后授予对架构物内特定房间的访问权限,甚至 以打开和关闭特定房间中的灯。如果您信任 您的用户,事件安全性可能就是您所需要的。如果没有, 您需要应用更详细的安全性。
您可以在了解安全性中找到更多详细信息。
| 有关完整示例,请参阅 Security 示例。 |
配置安全性
所有安全性的通用配置都在SecurityConfigurer,该 API 可从StateMachineConfigurationConfigurer.默认情况下,安全性处于禁用状态,
即使 Spring Security 类是
目前。以下示例说明如何启用安全性:
@Configuration
@EnableStateMachine
static class Config4 extends StateMachineConfigurerAdapter<String, String> {

	@Override
	public void configure(StateMachineConfigurationConfigurer<String, String> config)
			throws Exception {
		config
			.withSecurity()
				.enabled(true)
				.transitionAccessDecisionManager(null)
				.eventAccessDecisionManager(null);
	}
}
如果您绝对需要,您可以自定义AccessDecisionManager对于 event 和
转换。如果您未定义决策管理器或
将它们设置为null,则默认管理器是在内部创建的。
保护事件
事件安全性在全局级别由SecurityConfigurer.
以下示例显示如何启用事件安全性:
@Configuration
@EnableStateMachine
static class Config1 extends StateMachineConfigurerAdapter<String, String> {

	@Override
	public void configure(StateMachineConfigurationConfigurer<String, String> config)
			throws Exception {
		config
			.withSecurity()
				.enabled(true)
				.event("true")
				.event("ROLE_ANONYMOUS", ComparisonType.ANY);
	}
}
在前面的配置示例中,我们使用true,它始终会评估
自TRUE.使用始终计算结果为TRUE在实际应用程序中没有意义,但表明了这一点
expression 需要返回TRUE或FALSE.我们还定义了一个
属性ROLE_ANONYMOUS以及ComparisonType之ANY.有关使用属性的更多信息
和表达式,请参阅使用安全属性和表达式。
保护过渡
您可以全局定义过渡安全性,如下例所示。
@Configuration
@EnableStateMachine
static class Config6 extends StateMachineConfigurerAdapter<String, String> {

	@Override
	public void configure(StateMachineConfigurationConfigurer<String, String> config)
			throws Exception {
		config
			.withSecurity()
				.enabled(true)
				.transition("true")
				.transition("ROLE_ANONYMOUS", ComparisonType.ANY);
	}
}
如果在转换本身中定义了安全性,则它会覆盖任何 全局设置安全性。以下示例显示了如何执行此作:
@Configuration
@EnableStateMachine
static class Config2 extends StateMachineConfigurerAdapter<String, String> {

	@Override
	public void configure(StateMachineTransitionConfigurer<String, String> transitions)
			throws Exception {
		transitions
			.withExternal()
				.source("S0")
				.target("S1")
				.event("A")
				.secured("ROLE_ANONYMOUS", ComparisonType.ANY)
				.secured("hasTarget('S1')");
	}
}
有关使用属性和表达式的更多信息,请参阅使用安全属性和表达式。
保护作
状态中的作没有专用的安全定义
machine 中,但您可以使用全局方法 security 来保护作
来自 Spring Security。这要求Action是
定义为代理@Bean及其executemethod 进行注释@Secured.以下示例显示了如何执行此作:
@Configuration
@EnableStateMachine
static class Config3 extends StateMachineConfigurerAdapter<String, String> {

	@Override
	public void configure(StateMachineConfigurationConfigurer<String, String> config)
			throws Exception {
		config
			.withSecurity()
				.enabled(true);
	}

	@Override
	public void configure(StateMachineStateConfigurer<String, String> states)
			throws Exception {
		states
			.withStates()
				.initial("S0")
				.state("S1");
	}

	@Override
	public void configure(StateMachineTransitionConfigurer<String, String> transitions)
			throws Exception {
		transitions
			.withExternal()
				.source("S0")
				.target("S1")
				.action(securedAction())
				.event("A");
	}

	@Scope(proxyMode = ScopedProxyMode.TARGET_CLASS)
	@Bean
	public Action<String, String> securedAction() {
		return new Action<String, String>() {

			@Secured("ROLE_ANONYMOUS")
			@Override
			public void execute(StateContext<String, String> context) {
			}
		};
	}

}
需要使用 Spring Security 启用全局方法安全性。 以下示例显示了如何执行此作:
@Configuration
public static class Config5 {

	@Bean
	public InMemoryUserDetailsManager userDetailsService() {
		UserDetails user = User.withDefaultPasswordEncoder()
				.username("user")
				.password("password")
				.roles("USER")
				.build();
		return new InMemoryUserDetailsManager(user);
	}
}
有关更多详细信息,请参阅 Spring Security 参考指南(在此处提供)。
使用安全属性和表达式
通常,您可以通过以下两种方式之一定义安全属性:通过 使用安全属性和通过使用安全表达式。 属性更易于使用,但在 功能性。表达式提供了更多功能,但有点 更难使用。
泛型属性用法
默认情况下,AccessDecisionManagerevents 的实例和
过渡都使用RoleVoter,这意味着您可以使用角色属性
来自 Spring Security。
对于属性,我们有三种不同的比较类型:ANY,ALL和MAJORITY.这些比较类型映射到默认访问决策管理器
(AffirmativeBased,UnanimousBased和ConsensusBased)。
如果您定义了自定义AccessDecisionManager,则比较类型为
有效地丢弃,因为它仅用于创建默认管理器。
泛型表达式用法
安全表达式必须返回TRUE或FALSE.
表达式根对象的基类是SecurityExpressionRoot.它提供了一些常见的表达式,这些表达式
在 Transition 和 Event Security 中均可用。下表
描述最常用的内置表达式:
| 表达 | 描述 |
|---|---|
|
返回 |
|
返回 |
|
返回 |
|
返回 |
|
允许直接访问表示 当前用户。 |
|
允许直接访问当前的 |
|
Always 的计算结果为 |
|
Always 的计算结果为 |
|
返回 |
|
返回 |
|
返回 |
|
返回 |
|
返回 |
|
返回 |
了解安全性
本节提供了有关安全性在 状态机。你可能真的不需要知道,但确实需要 保持透明总是更好,而不是隐藏所有的魔法 发生在幕后。
只有当 Spring Statemachine 在封闭的
garden 中,用户无法直接访问应用程序,因此可能会
修改 Spring Security 的SecurityContexthold 在本地线程中。
如果用户控制 JVM,那么实际上就没有安全性
完全。 |
安全性集成点是使用StateMachineInterceptor,然后会自动添加到
状态机(如果启用了安全性)。具体类为StateMachineSecurityInterceptor,它拦截事件和
转换。然后,此拦截器会查询 Spring Security 的AccessDecisionManager确定是否可以发送事件或是否可以发送过渡
执行。实际上,如果一个决定或投票中带有AccessDecisionManager导致异常,则 event 或 transition 被拒绝。
由于如何AccessDecisionManager从 Spring Security Works 开始,我们
每个 Secure Object 需要一个 IT 实例。这就是为什么有
是事件和过渡的不同管理器。在这种情况下,事件
和 transitions 是我们保护的不同类对象。
默认情况下,对于事件,投票者 (EventExpressionVoter,EventVoter和RoleVoter) 添加到AccessDecisionManager.
默认情况下,对于过渡,投票者 (TransitionExpressionVoter,TransitionVoter和RoleVoter) 添加到AccessDecisionManager.
状态机错误处理
如果状态机在状态转换期间检测到内部错误 logic,它可能会引发异常。处理此异常之前 在内部,您有机会进行拦截。
通常,您可以使用StateMachineInterceptor来拦截错误,并使用
下面的清单显示了一个示例:
StateMachine<String, String> stateMachine;

void addInterceptor() {
	stateMachine.getStateMachineAccessor()
			.doWithRegion(function ->
				function.addStateMachineInterceptor(new StateMachineInterceptorAdapter<String, String>() {
					@Override
					public Exception stateMachineError(StateMachine<String, String> stateMachine,
													   Exception exception) {
						return exception;
					}
				})
			);

}
当检测到错误时,将执行正常事件通知机制。
这允许您使用StateMachineListener或 Spring 应用程序
context 事件侦听器。有关这些内容的更多信息,请参阅侦听状态机事件。
话虽如此,下面的示例显示了一个简单的侦听器:
public class ErrorStateMachineListener
		extends StateMachineListenerAdapter<String, String> {

	@Override
	public void stateMachineError(StateMachine<String, String> stateMachine, Exception exception) {
		// do something with error
	}
}
以下示例显示了一个泛型ApplicationListener检查StateMachineEvent:
public class GenericApplicationEventListener
		implements ApplicationListener<StateMachineEvent> {

	@Override
	public void onApplicationEvent(StateMachineEvent event) {
		if (event instanceof OnStateMachineError) {
			// do something with error
		}
	}
}
您也可以直接定义ApplicationListener自
仅识别StateMachineEvent实例,如下例所示:
public class ErrorApplicationEventListener
		implements ApplicationListener<OnStateMachineError> {

	@Override
	public void onApplicationEvent(OnStateMachineError event) {
		// do something with error
	}
}
| 为 transition 定义的 Action 也有自己的错误处理 逻辑。请参阅 Transition Action 错误处理。 |
使用响应式 API 时,可能会出现 Action execution 错误
从 StateMachineEventResult 返回。拥有简单的机器
作中的错误转换为 stateS1.
@Configuration
@EnableStateMachine
static class Config1 extends StateMachineConfigurerAdapter<String, String> {

	@Override
	public void configure(StateMachineStateConfigurer<String, String> states) throws Exception {
		states
			.withStates()
				.initial("SI")
				.stateEntry("S1", (context) -> {
					throw new RuntimeException("example error");
				});
	}

	@Override
	public void configure(StateMachineTransitionConfigurer<String, String> transitions) throws Exception {
		transitions
			.withExternal()
				.source("SI")
				.target("S1")
				.event("E1");
	}
}
下面的测试概念显示了如何消耗可能的误差 从 StateMachineEventResult 获取。
@Autowired
private StateMachine<String, String> machine;

@Test
public void testActionEntryErrorWithEvent() throws Exception {
	StepVerifier.create(machine.startReactively()).verifyComplete();
	assertThat(machine.getState().getIds()).containsExactlyInAnyOrder("SI");

	StepVerifier.create(machine.sendEvent(Mono.just(MessageBuilder.withPayload("E1").build())))
		.consumeNextWith(result -> {
			StepVerifier.create(result.complete()).consumeErrorWith(e -> {
				assertThat(e).isInstanceOf(StateMachineException.class).cause().hasMessageContaining("example error");
			}).verify();
		})
		.verifyComplete();

	assertThat(machine.getState().getIds()).containsExactlyInAnyOrder("S1");
}
| 进入/退出作中的错误不会阻止转换的发生。 |
持久化状态机
传统上,状态机的实例在 running 程序。您可以通过使用 动态构建器和工厂,允许 State Machine 实例化。构建状态机的实例是一个 作相对较重。因此,如果您需要(例如)处理 使用状态机在数据库中进行任意状态更改,您需要 找到一种更好、更快的方法来做到这一点。
persist 功能允许您保存状态机的状态 添加到外部存储库中,然后根据 serialized 状态。例如,如果您有一个数据库表保存 orders,则使用 state 更新 Order state 的成本太高了 machine 的实例。 persist 功能允许您在没有 实例化新的状态机实例。
| 有一个配方(请参阅 Persist)和一个示例 (参见 [statemachine-examples-persist]),它提供了有关 持久状态。 |
虽然您可以使用StateMachineListener,它有一个概念问题。当侦听器
通知状态更改,则状态更改已发生。如果
自定义持久化方法无法更新序列化的
state 中,状态机中的状态和
外部存储库将处于不一致状态。
您可以改用状态机拦截器来尝试保存
序列化状态到外部存储中
state machine 内的 change 进行如果该拦截器回调失败,
您可以停止状态更改尝试,而不是以
inconsistent 状态,然后您可以手动处理此错误。看用StateMachineInterceptor了解如何使用拦截器。
用StateMachineContext
您不能持久化StateMachine使用普通 Java
序列化,因为对象图太丰富并且包含太多
对其他 Spring 上下文类的依赖。StateMachineContext是状态机的运行时表示形式,您可以使用它来
将现有计算机还原到由特定StateMachineContext对象。
StateMachineContext包含两种不同的信息包含
对于子上下文。这些通常在机器包含
正交区域。首先,上下文可以具有子上下文的列表
可以按原样使用,就好像它们存在一样。其次,您可以
包括原始上下文子级
未到位。这些子引用实际上是
保留运行多个并行区域的计算机
独立地。
| Data Multi Persist 示例显示 如何持久保存并行区域。 |
用StateMachinePersister
构建StateMachineContext然后恢复状态机
如果完成的话,它总是有一点点 “黑魔法”
手动下载。这StateMachinePersisterINTERFACE 旨在缓解这些
作persist和restore方法。默认的
此接口的实现为DefaultStateMachinePersister.
我们可以展示如何使用StateMachinePersister通过以下
A 测试中的片段。我们首先创建两个类似的配置
(machine1和machine2) 用于状态机。请注意,我们可以构建不同的
机器以其他方式进行演示,但 this way
适用于这种情况。以下示例配置两个状态机:
@Configuration
@EnableStateMachine(name = "machine1")
static class Config1 extends Config {
}

@Configuration
@EnableStateMachine(name = "machine2")
static class Config2 extends Config {
}

static class Config extends StateMachineConfigurerAdapter<String, String> {

	@Override
	public void configure(StateMachineStateConfigurer<String, String> states) throws Exception {
		states
			.withStates()
				.initial("S1")
				.state("S1")
				.state("S2");
	}

	@Override
	public void configure(StateMachineTransitionConfigurer<String, String> transitions) throws Exception {
		transitions
			.withExternal()
				.source("S1")
				.target("S2")
				.event("E1");
	}
}
由于我们使用StateMachinePersist对象,我们可以在内存中创建一个
实现。
| 此内存中示例仅用于演示目的。真实 applications 中,您应该使用真正的持久存储实现。 |
下面的清单显示了如何使用内存中示例:
static class InMemoryStateMachinePersist implements StateMachinePersist<String, String, String> {

	private final HashMap<String, StateMachineContext<String, String>> contexts = new HashMap<>();

	@Override
	public void write(StateMachineContext<String, String> context, String contextObj) throws Exception {
		contexts.put(contextObj, context);
	}

	@Override
	public StateMachineContext<String, String> read(String contextObj) throws Exception {
		return contexts.get(contextObj);
	}
}
在我们实例化了两台不同的机器之后,我们可以将machine1进入状态S2THROUGH 事件E1.然后我们可以持久化它并恢复machine2.以下示例显示了如何执行此作:
InMemoryStateMachinePersist stateMachinePersist = new InMemoryStateMachinePersist();
StateMachinePersister<String, String, String> persister = new DefaultStateMachinePersister<>(stateMachinePersist);

StateMachine<String, String> stateMachine1 = context.getBean("machine1", StateMachine.class);
StateMachine<String, String> stateMachine2 = context.getBean("machine2", StateMachine.class);
stateMachine1.startReactively().block();

stateMachine1
	.sendEvent(Mono.just(MessageBuilder
		.withPayload("E1").build()))
	.blockLast();
assertThat(stateMachine1.getState().getIds()).containsExactly("S2");

persister.persist(stateMachine1, "myid");
persister.restore(stateMachine2, "myid");
assertThat(stateMachine2.getState().getIds()).containsExactly("S2");
使用 Redis
RepositoryStateMachinePersist(它实现StateMachinePersist) 支持将状态机持久化到 Redis 中。
具体实现是RedisStateMachineContextRepository,它使用kryoserialization 设置为
持久化一个StateMachineContext到Redis.
为StateMachinePersister,我们有一个 Redis 相关的RedisStateMachinePersisterimplementation 的 API 实例,它采用
一个StateMachinePersist和用途String作为其 context 对象。
| 有关详细用法,请参阅 事件服务 示例。 |
RedisStateMachineContextRepository需要一个RedisConnectionFactory让它工作。我们建议使用JedisConnectionFactory,如前面的示例所示。
用StateMachineRuntimePersister
StateMachineRuntimePersister是StateMachinePersist这添加了一个接口级方法以获取StateMachineInterceptor与之相关联。然后,这个拦截器是
需要在 state 更改期间持久化机器,而无需
停止和启动计算机。
目前,此接口有
支持的 Spring Data Repositories。这些实现是JpaPersistingStateMachineInterceptor,MongoDbPersistingStateMachineInterceptor,
和RedisPersistingStateMachineInterceptor.
| 有关详细用法,请参阅 Data Persist 示例。 |
Spring Boot 支持
自动配置模块 (spring-statemachine-autoconfigure) 包含所有
与 Spring Boot 集成的逻辑,它为
自动配置和执行器。您所需要的只是拥有这个 Spring Statemachine
库作为启动应用程序的一部分。
监控和跟踪
BootStateMachineMonitor是自动创建的,并与
状态机。BootStateMachineMonitor是自定义的StateMachineMonitor与 Spring Boot 的MeterRegistry和终端节点
通过自定义StateMachineTraceRepository.或者,您可以禁用此自动配置
通过设置spring.statemachine.monitor.enabled键设置为false.Monitoring 示例显示了如何使用此自动配置。
存储库配置
如果从 Classpath 中找到所需的类,则 Spring Data Repositories 实体类扫描会自动配置 以获取存储库支持。
当前支持的配置包括JPA,Redis和MongoDB.您可以使用spring.statemachine.data.jpa.repositories.enabled,spring.statemachine.data.redis.repositories.enabled和spring.statemachine.data.mongo.repositories.enabled属性。
监视状态机
您可以使用StateMachineMonitor要获取有关
执行过渡和作所花费的时间的持续时间。以下清单
演示如何实现此接口。
public class TestStateMachineMonitor extends AbstractStateMachineMonitor<String, String> {

	@Override
	public void transition(StateMachine<String, String> stateMachine, Transition<String, String> transition,
			long duration) {
	}

	@Override
	public void action(StateMachine<String, String> stateMachine,
			Function<StateContext<String, String>, Mono<Void>> action, long duration) {
	}
}
一旦你有了StateMachineMonitorimplementation 中,您可以将其添加到
通过配置的状态机,如下例所示:
@Configuration
@EnableStateMachine
public class Config1 extends StateMachineConfigurerAdapter<String, String> {

	@Override
	public void configure(StateMachineConfigurationConfigurer<String, String> config)
			throws Exception {
		config
			.withMonitoring()
				.monitor(stateMachineMonitor());
	}

	@Override
	public void configure(StateMachineStateConfigurer<String, String> states) throws Exception {
		states
			.withStates()
				.initial("S1")
				.state("S2");
	}

	@Override
	public void configure(StateMachineTransitionConfigurer<String, String> transitions) throws Exception {
		transitions
			.withExternal()
				.source("S1")
				.target("S2")
				.event("E1");
	}

	@Bean
	public StateMachineMonitor<String, String> stateMachineMonitor() {
		return new TestStateMachineMonitor();
	}
}
| 有关详细用法,请参阅 Monitoring 示例。 |
使用分布式状态
分布式状态可能是 Spring 状态机。究竟什么是分布式状态?状态 在单个状态机中自然很容易理解, 但是,当需要引入共享分布式状态时 通过状态机,事情会变得有点复杂。
| 分布式状态功能仍是一项预览功能,并非 但被认为在此特定版本中是稳定的。我们期待这一点 功能使其成熟到第一个正式版本。 |
分布式状态机是通过DistributedStateMachine包装实际实例的类
的StateMachine.DistributedStateMachine拦截
与StateMachine实例,并与
分布式状态抽象通过StateMachineEnsemble接口。根据实际实现,
您还可以使用StateMachinePersist接口来序列化StateMachineContext,其中包含足够的信息来重置StateMachine.
虽然分布式状态机是通过抽象实现的, 当前仅存在一个实现。它基于 Zookeeper。
以下示例显示如何配置基于 Zookeeper 的分布式状态 machine' 的
@Configuration
@EnableStateMachine
public class Config
		extends StateMachineConfigurerAdapter<String, String> {

	@Override
	public void configure(StateMachineConfigurationConfigurer<String, String> config)
			throws Exception {
		config
			.withDistributed()
				.ensemble(stateMachineEnsemble())
				.and()
			.withConfiguration()
				.autoStartup(true);
	}

	@Override
	public void configure(StateMachineStateConfigurer<String, String> states)
			throws Exception {
		// config states
	}

	@Override
	public void configure(StateMachineTransitionConfigurer<String, String> transitions)
			throws Exception {
		// config transitions
	}

	@Bean
	public StateMachineEnsemble<String, String> stateMachineEnsemble()
			throws Exception {
		return new ZookeeperStateMachineEnsemble<String, String>(curatorClient(), "/zkpath");
	}

	@Bean
	public CuratorFramework curatorClient()
			throws Exception {
		CuratorFramework client = CuratorFrameworkFactory
				.builder()
				.defaultData(new byte[0])
				.connectString("localhost:2181").build();
		client.start();
		return client;
	}

}
您可以找到基于 Zookeeker 的分布式 附录中的状态机。
用ZookeeperStateMachineEnsemble
ZookeeperStateMachineEnsemble本身需要两个强制设置,
一个curatorClient以及basePath.客户端是一个CuratorFramework,路径是Zookeeper实例。
或者,您可以将cleanState,默认为TRUE如果 ensemble 中不存在成员,则清除现有数据。您可以设置
它来FALSE如果要在
应用程序重新启动。
(可选)您可以设置logSize(默认值
自32) 更改为 Keep history of state changes。这个
set 必须是 2 的幂。32通常是一个不错的默认值
价值。如果特定状态机被
大小,则会进入 Error 状态并与
ensemble 的 Ensemble 表示它已经失去了它的历史和完全重建
synchronized 状态。
测试支持
我们还添加了一组实用程序类来简化状态测试 machine 实例。这些在框架本身中使用,但也 对最终用户非常有用。
StateMachineTestPlanBuilder构建一个StateMachineTestPlan,
它有一个方法(称为test()).该方法运行一个计划。StateMachineTestPlanBuilder包含一个 Fluent Builder API,允许您添加
步骤。在这些步骤中,您可以发送事件并检查
各种条件,例如状态更改、转换和扩展状态
变量。
以下示例使用StateMachineBuilder要构建状态机:
private StateMachine<String, String> buildMachine() throws Exception {
	StateMachineBuilder.Builder<String, String> builder = StateMachineBuilder.builder();

	builder.configureConfiguration()
		.withConfiguration()
			.autoStartup(true);

	builder.configureStates()
			.withStates()
				.initial("SI")
				.state("S1");

	builder.configureTransitions()
			.withExternal()
				.source("SI").target("S1")
				.event("E1")
				.action(c -> {
					c.getExtendedState().getVariables().put("key1", "value1");
				});

	return builder.build();
}
在下面的测试计划中,我们有两个步骤。首先,我们检查初始
状态 (SI) 确实已设置。其次,我们发送一个事件 (E1) 并期望
发生一个状态更改,并预期机器最终处于S1.
下面的清单显示了测试计划:
StateMachine<String, String> machine = buildMachine();
StateMachineTestPlan<String, String> plan =
		StateMachineTestPlanBuilder.<String, String>builder()
			.defaultAwaitTime(2)
			.stateMachine(machine)
			.step()
				.expectStates("SI")
				.and()
			.step()
				.sendEvent("E1")
				.expectStateChanged(1)
				.expectStates("S1")
				.expectVariable("key1")
				.expectVariable("key1", "value1")
				.expectVariableWith(hasKey("key1"))
				.expectVariableWith(hasValue("value1"))
				.expectVariableWith(hasEntry("key1", "value1"))
				.expectVariableWith(not(hasKey("key2")))
				.and()
			.build();
plan.test();
这些实用程序还在框架中用于测试分布式 状态机功能。请注意,您可以将多台计算机添加到一个计划中。 如果您添加多台计算机,您还可以选择 将事件发送到特定计算机、随机计算机或所有计算机。
前面的测试示例使用以下 Hamcrest 导入:
预期结果的所有可能选项都记录在 Javadoc 中。StateMachineTestPlanStepBuilder. |
Eclipse 建模支持
支持使用 UI 建模定义状态机配置 通过 Eclipse Papyrus 框架。
在 Eclipse 向导中,您可以使用 UML 图创建新的 Papyrus 模型
语言。在此示例中,它名为simple-machine.那么你
有一个选项可以从各种图表类型中进行选择,并且您必须选择一个StateMachine
Diagram.
我们想创建一台具有两种状态 (S1和S2),其中S1是初始状态。然后,我们需要创建 eventE1执行过渡
从S1自S2.在 Papyrus 中,机器看起来就像什么东西
以下示例:
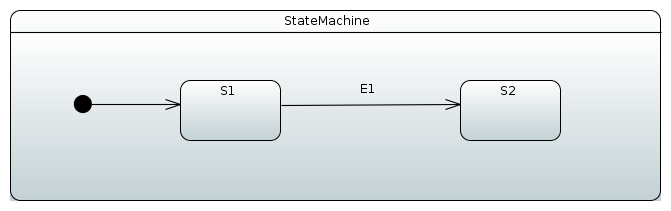
在后台,原始 UML 文件将类似于以下示例:
<?xml version="1.0" encoding="UTF-8"?>
<uml:Model xmi:version="20131001" xmlns:xmi="http://www.omg.org/spec/XMI/20131001" xmlns:uml="http://www.eclipse.org/uml2/5.0.0/UML" xmi:id="_AMP3IP8fEeW45bORGB4c_A" name="RootElement">
  <packagedElement xmi:type="uml:StateMachine" xmi:id="_AMRFQP8fEeW45bORGB4c_A" name="StateMachine">
    <region xmi:type="uml:Region" xmi:id="_AMRsUP8fEeW45bORGB4c_A" name="Region1">
      <transition xmi:type="uml:Transition" xmi:id="_chgcgP8fEeW45bORGB4c_A" source="_EZrg4P8fEeW45bORGB4c_A" target="_FAvg4P8fEeW45bORGB4c_A">
        <trigger xmi:type="uml:Trigger" xmi:id="_hs5jUP8fEeW45bORGB4c_A" event="_NeH84P8fEeW45bORGB4c_A"/>
      </transition>
      <transition xmi:type="uml:Transition" xmi:id="_egLIoP8fEeW45bORGB4c_A" source="_Fg0IEP8fEeW45bORGB4c_A" target="_EZrg4P8fEeW45bORGB4c_A"/>
      <subvertex xmi:type="uml:State" xmi:id="_EZrg4P8fEeW45bORGB4c_A" name="S1"/>
      <subvertex xmi:type="uml:State" xmi:id="_FAvg4P8fEeW45bORGB4c_A" name="S2"/>
      <subvertex xmi:type="uml:Pseudostate" xmi:id="_Fg0IEP8fEeW45bORGB4c_A"/>
    </region>
  </packagedElement>
  <packagedElement xmi:type="uml:Signal" xmi:id="_L01D0P8fEeW45bORGB4c_A" name="E1"/>
  <packagedElement xmi:type="uml:SignalEvent" xmi:id="_NeH84P8fEeW45bORGB4c_A" name="SignalEventE1" signal="_L01D0P8fEeW45bORGB4c_A"/>
</uml:Model>
打开已定义为 UML 的现有模型时,您有三个
文件:.di,.notation和.uml.如果模型不是在
eclipse 的会话中,它不了解如何打开一个实际的 state
图表。这是 Papyrus 插件中的一个已知问题,并且有一个简单的
解决方法。在 Papyrus 透视图中,您可以看到
您的模型。双击 Diagram StateMachine Diagram,它
指示 Eclipse 在其适当的 Papyrus 中打开此特定模型
modeling 插件。 |
用UmlStateMachineModelFactory
在项目中放置 UML 文件后,您可以将其导入到
使用StateMachineModelConfigurer哪里StateMachineModelFactory与模型关联。UmlStateMachineModelFactory是一家懂得
处理 Eclipse Papyrus_generated UML 结构。源 UML 文件可以
要么作为 Spring 给出Resource或作为普通位置字符串。
以下示例演示如何创建UmlStateMachineModelFactory:
@Configuration
@EnableStateMachine
public static class Config1 extends StateMachineConfigurerAdapter<String, String> {

	@Override
	public void configure(StateMachineModelConfigurer<String, String> model) throws Exception {
		model
			.withModel()
				.factory(modelFactory());
	}

	@Bean
	public StateMachineModelFactory<String, String> modelFactory() {
		return new UmlStateMachineModelFactory("classpath:org/springframework/statemachine/uml/docs/simple-machine.uml");
	}
}
像往常一样, Spring Statemachine 与 guard 和 作,这些作被定义为 bean。这些需要挂接到 UML 中 通过其内部建模结构。以下部分显示 如何在 UML 定义中定义自定义的 Bean 引用。 请注意,也可以手动注册特定方法 而不将它们定义为 bean。
如果UmlStateMachineModelFactory创建为 Bean,则其ResourceLoader自动连接以查找已注册的作,并且
警卫。您还可以手动定义StateMachineComponentResolver,然后使用它来查找这些
组件。工厂还具有 registerAction 和 registerGuard 方法,您可以使用它们来注册这些组件。了解更多
关于这个,请参阅用StateMachineComponentResolver.
UML 模型在实现(如 Spring Statemachine 本身。Spring Statemachine 留下了如何实现许多功能,并且 功能,直到实际实现。以下部分 通过 Spring Statemachine 如何基于 Eclipse Papyrus 插件。
用StateMachineComponentResolver
下一个示例展示了如何UmlStateMachineModelFactory定义为
一个StateMachineComponentResolver,它会注册myAction和myGuard函数。请注意,这些组件
不会创建为 Bean。下面的清单显示了该示例:
@Configuration
@EnableStateMachine
public static class Config2 extends StateMachineConfigurerAdapter<String, String> {

	@Override
	public void configure(StateMachineModelConfigurer<String, String> model) throws Exception {
		model
			.withModel()
				.factory(modelFactory());
	}

	@Bean
	public StateMachineModelFactory<String, String> modelFactory() {
		UmlStateMachineModelFactory factory = new UmlStateMachineModelFactory(
				"classpath:org/springframework/statemachine/uml/docs/simple-machine.uml");
		factory.setStateMachineComponentResolver(stateMachineComponentResolver());
		return factory;
	}

	@Bean
	public StateMachineComponentResolver<String, String> stateMachineComponentResolver() {
		DefaultStateMachineComponentResolver<String, String> resolver = new DefaultStateMachineComponentResolver<>();
		resolver.registerAction("myAction", myAction());
		resolver.registerGuard("myGuard", myGuard());
		return resolver;
	}

	public Action<String, String> myAction() {
		return new Action<String, String>() {

			@Override
			public void execute(StateContext<String, String> context) {
			}
		};
	}

	public Guard<String, String> myGuard() {
		return new Guard<String, String>() {

			@Override
			public boolean evaluate(StateContext<String, String> context) {
				return false;
			}
		};
	}
}
创建模型
我们首先创建一个空的状态机模型,如下图所示:
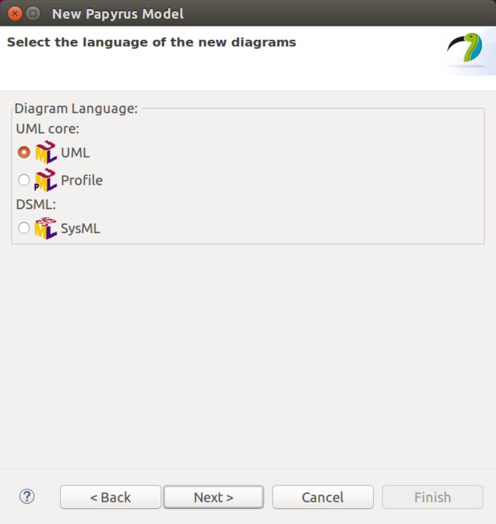
您可以先创建一个新模型并为其命名,如下图所示:
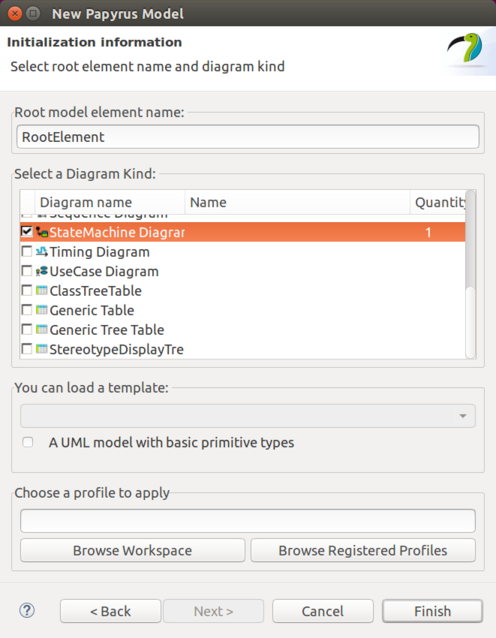
然后你需要选择 StateMachine Diagram,如下所示:
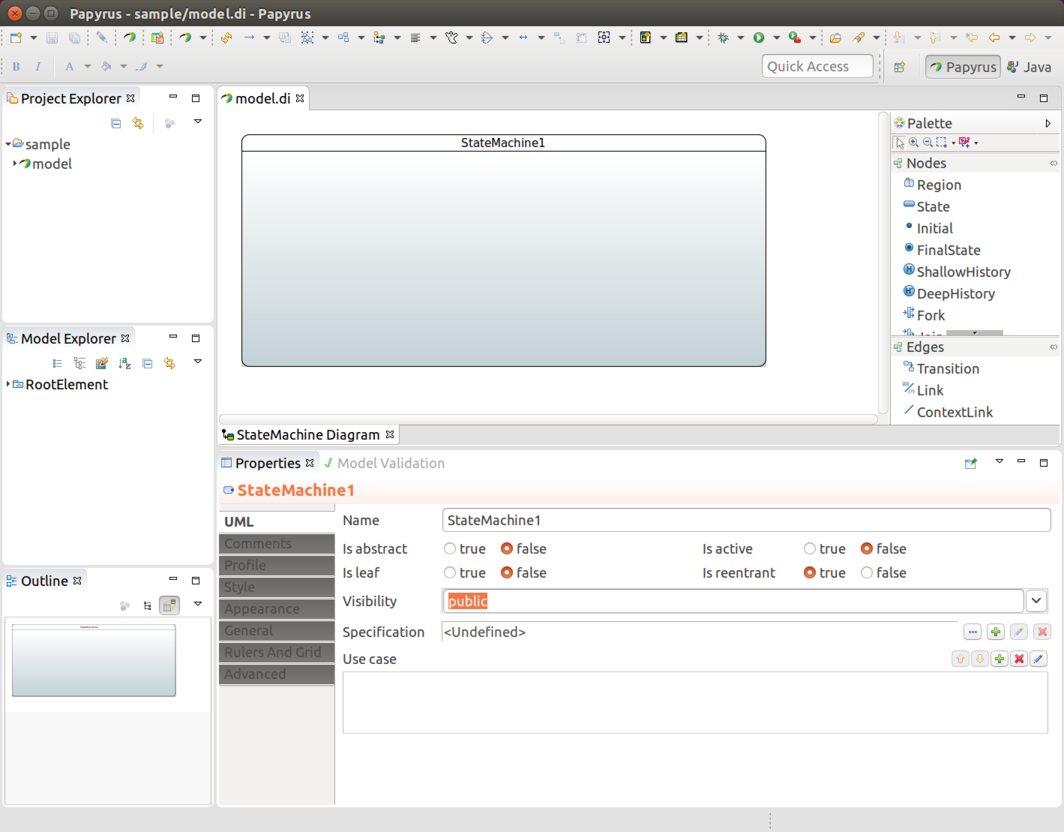
您最终会得到一个空的状态机。
在前面的图像中,您应该创建了一个名为model.
您应该得到三个文件:model.di,model.notation和model.uml.然后,您可以在任何其他
Eclipse 实例。此外,您还可以导入model.uml转换为
Spring Statemachine 的 Statemachine 中。
定义状态
状态标识符来自图中的组件名称。 您的计算机中必须有一个初始状态,您可以通过添加 一个根元素,然后绘制到您自己的初始状态的过渡, 如下图所示:
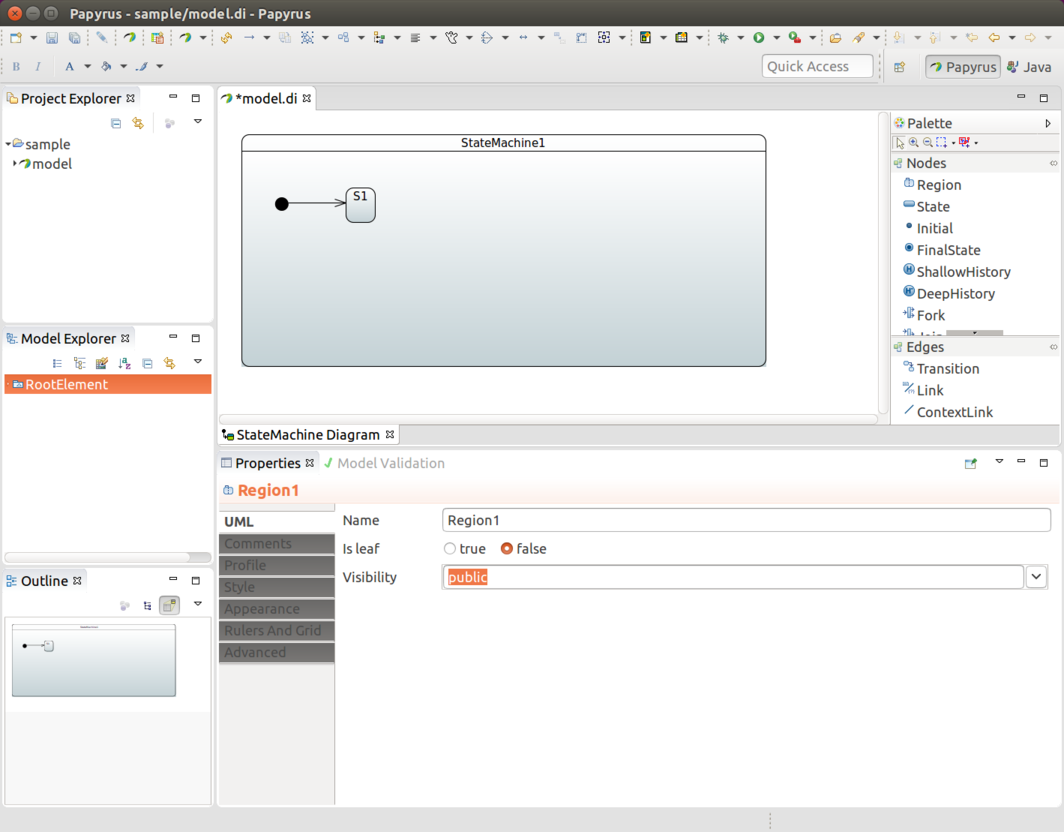
在上图中,我们添加了一个根元素和一个初始状态 (S1).然后我们画了一个过渡
表示S1是初始状态。
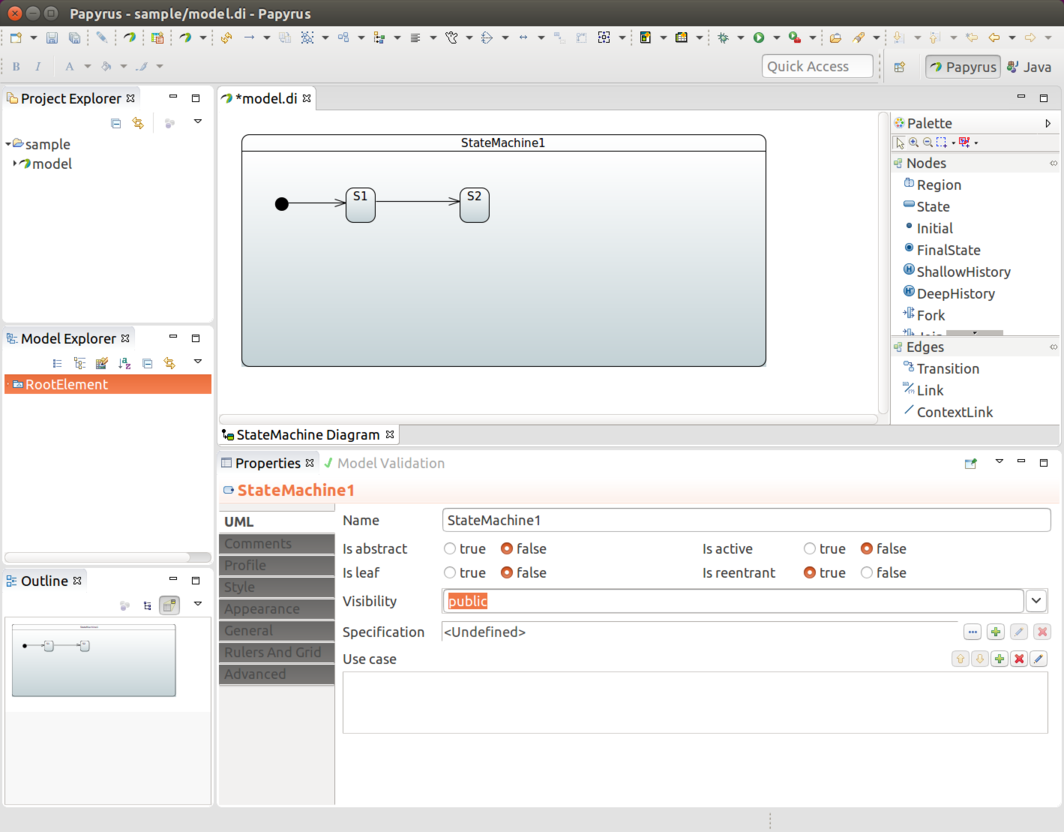
在上图中,我们添加了第二个状态 (S2) 并在
S1 和 S2(表示我们有两种状态)。
定义事件
要将事件与过渡关联,您需要创建一个 Signal
(E1,在本例中)。为此,请选择 RootElement → New Child → Signal。
下图显示了结果:
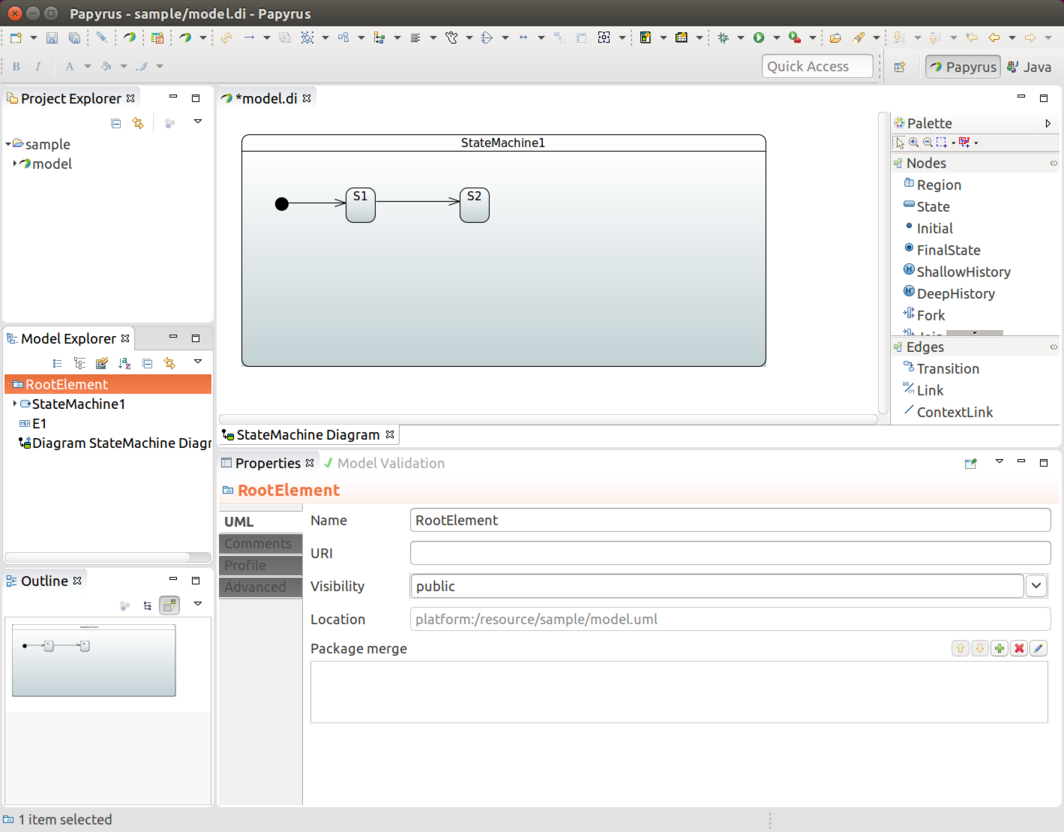
然后,您需要使用新的 Signal 创建一个 SignalEvent,E1.
为此,请选择 RootElement → New Child → SignalEvent。
下图显示了结果:
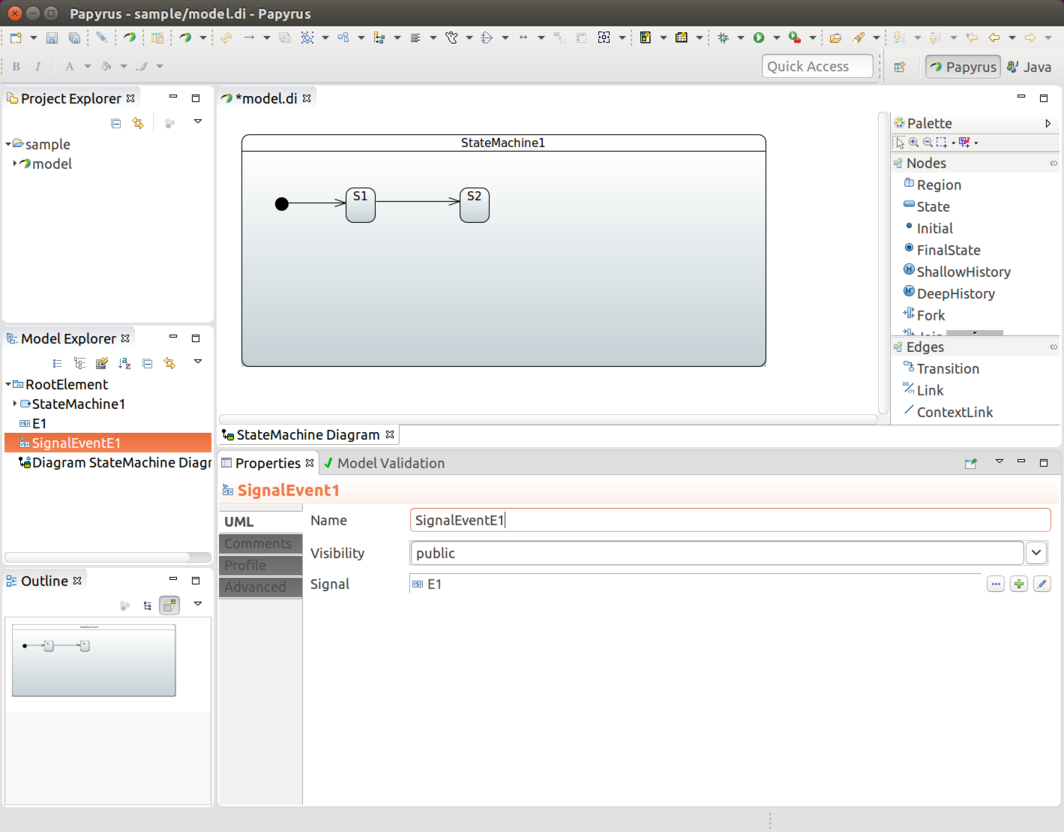
现在,您已经定义了一个SignalEvent,您可以使用它来关联
带有 transition 的 Trigger。有关更多信息,请参阅定义过渡。
定义过渡
您可以通过在
源状态和目标状态。在前面的图像中,我们有 stateS1和S2以及一个
两者之间的匿名过渡。我们想要关联事件E1随着这种转变。我们选择一个过渡,创建一个新的
trigger,并为此定义 SignalEventE1,如下图所示:
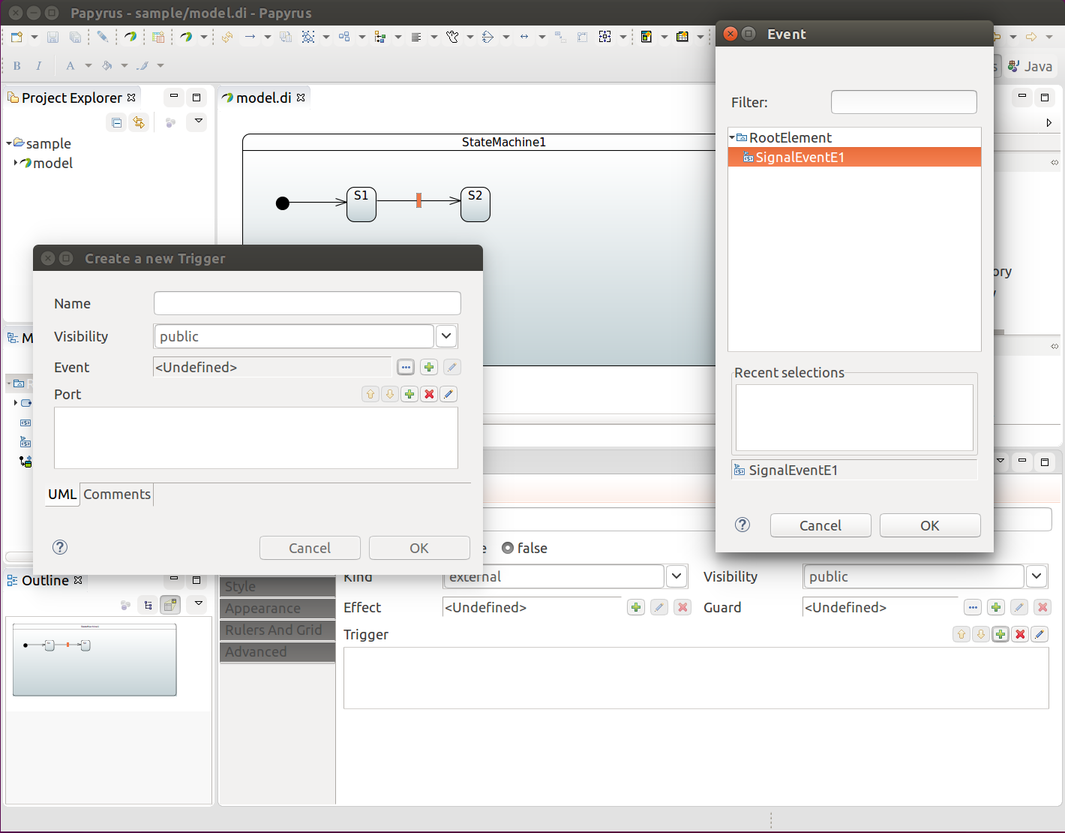
这为您提供了如下图所示的排列方式:
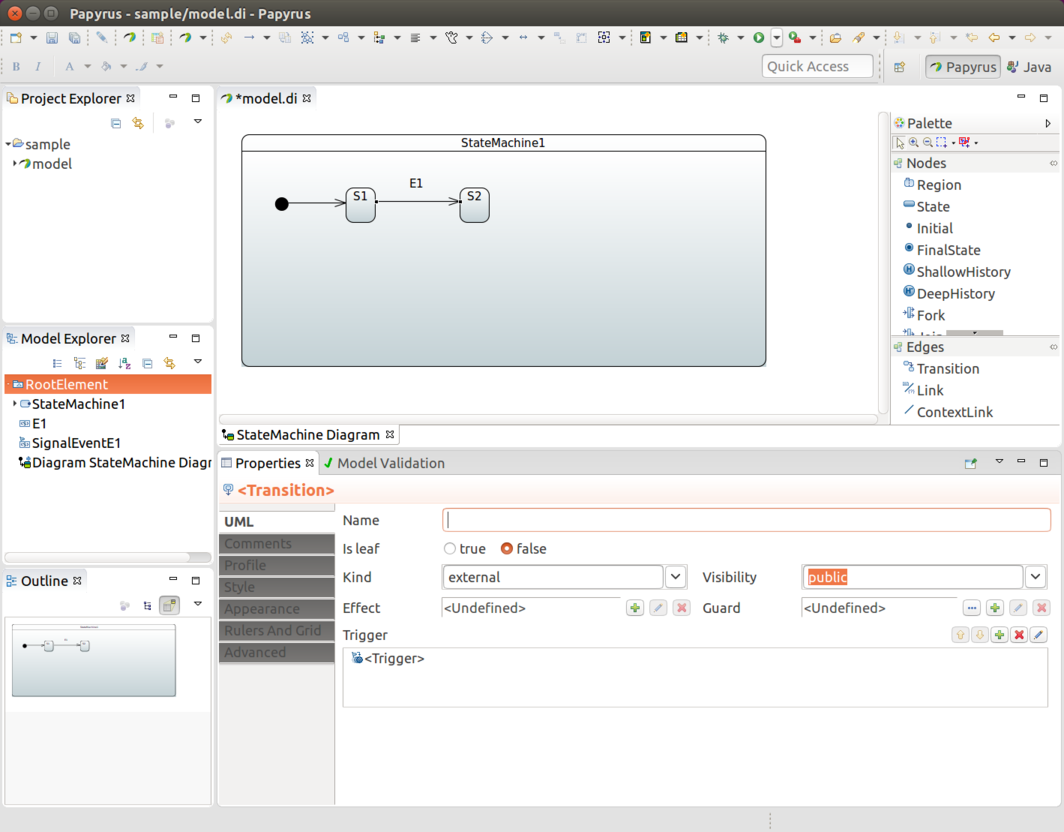
| 如果省略过渡的 SignalEvent,它将变为 匿名转换。 |
定义计时器
转换也可以基于定时事件发生。Spring Statemachine 支持两种类型的计时器,一种在 background 和 Ones 在 state 为 进入。
要将新的 TimeEvent 子项添加到 Model Explorer,请将 When 修改为 表达式定义为 LiteralInteger。它的值(以毫秒为单位)成为计时器。 Leave Is Relative false 使计时器连续触发。
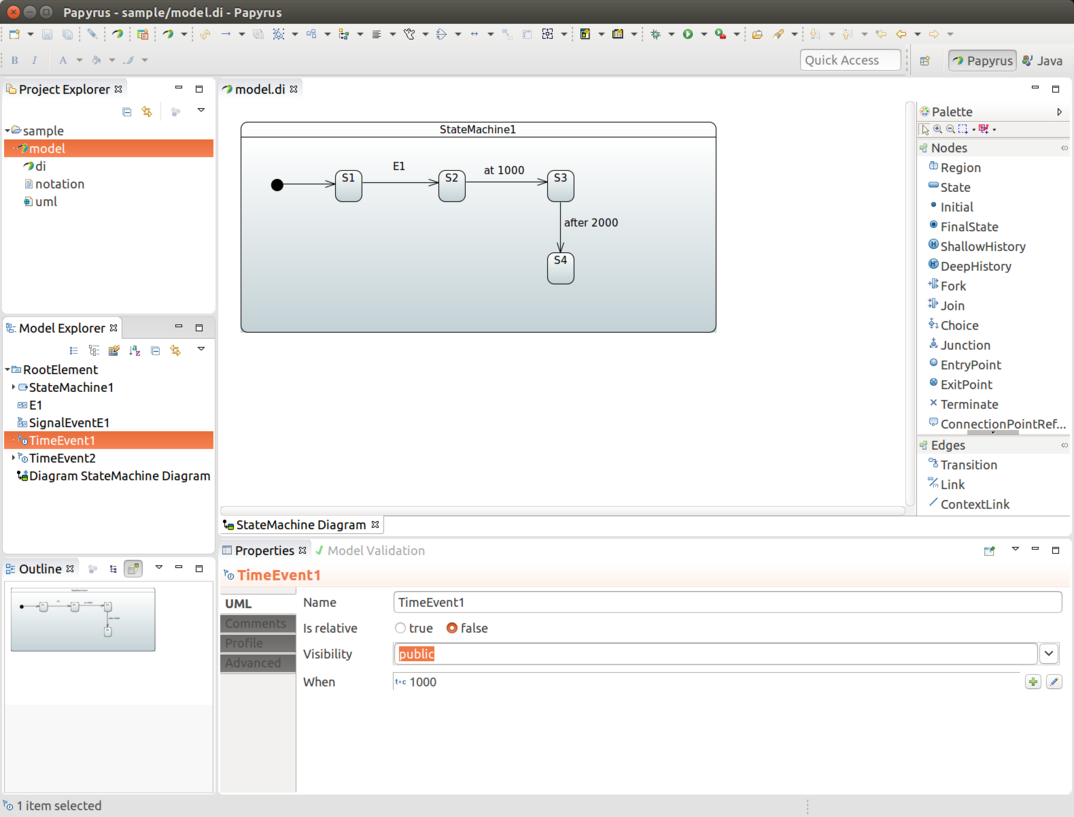
要定义一个在进入状态时触发的基于定时的事件,该过程恰好是 与前面描述相同,但将 Is Relative (相对) 设置为 true。下图 显示结果:

然后,用户可以选择这些定时事件之一,而不是 signal 事件。
定义选择
通过将一个传入过渡绘制到
CHOICE 状态并绘制从该状态到目标的多个传出过渡
国家。我们的StateConfigurer允许您定义
if/elseif/else 结构。但是,对于 UML,我们需要使用
用于传出转换的单个 Guard。
您必须确保为 transitions 定义的守卫不会重叠,以便 无论发生什么,在任何给定的 guard 中,只有一个守卫的计算结果为 TRUE 时间。这为 choice 分支提供了精确且可预测的结果 评估。此外,我们建议保留一个没有守卫的 transition ,以便保证至少一个过渡路径。 下图显示了使用三个分支进行选择的结果:
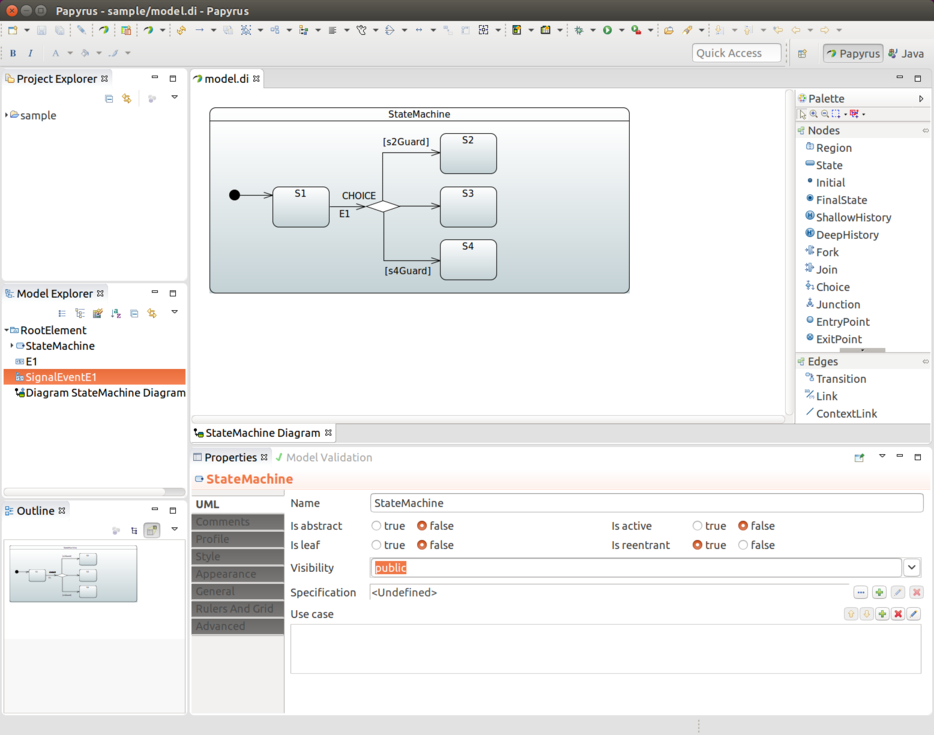
| Junction 的工作方式类似,只是它允许多个传入 转换。因此,与 Choice 相比,它的行为纯粹是 学术。选择 out-direction transition 的实际 logic 是完全相同的。 |
定义 Junction
请参阅 定义选择项。
定义入口点和出口点
您可以使用 EntryPoint 和 ExitPoint 创建受控的进入和退出
与具有子状态的 state 一起。在下面的状态图中,事件E1和E2通过进入和退出状态具有正常的状态行为S2,其中正常状态行为是通过进入初始状态来实现的S21.
使用事件E3将机器带入ENTRYEntryPoint 的 EntryPoint 中,然后
导致S22未激活初始状态S21随时。
同样,EXIT带事件的 ExitPointE4控制特定出口
进入状态S4,而S2将采用
计算机进入状态S3.当处于 状态S22,您可以从
事件E4和E2使计算机进入状态S3或S4,
分别。下图显示了结果:
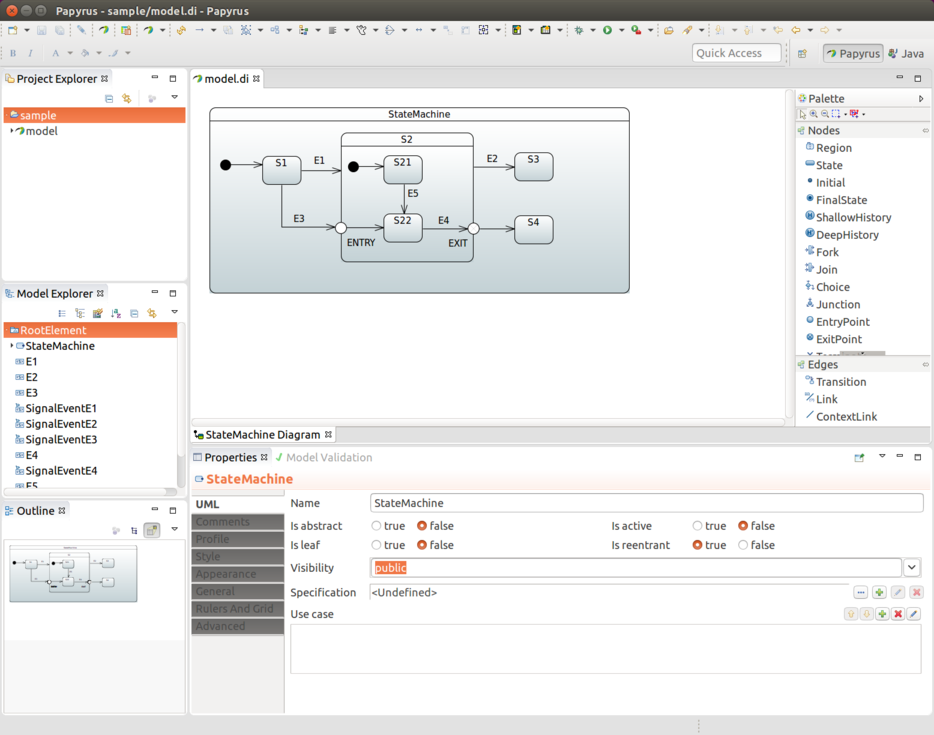
| 如果 state 被定义为子机引用,并且你需要使用入口点和出口点, 您必须在外部定义一个 ConnectionPointReference,并使用 其 Entry 和 Exit 引用设置为指向正确的 Entry 或 Exit 点 在 Submachine 引用中。只有在那之后,才有可能 定位从外部正确链接到内部的过渡 Sub-machine 引用。使用 ConnectionPointReference,您可能需要 从 Properties → Advanced → UML →查找这些设置 进入/退出。UML 规范允许您定义多个入口和出口。然而 对于状态机,只允许一个。 |
定义历史状态
在处理历史状态时,有三个不同的概念在起作用。 UML 定义了 Deep History 和 Shallow History。默认历史记录 当历史状态尚未知时,状态开始发挥作用。这些是 在以下各节中表示。
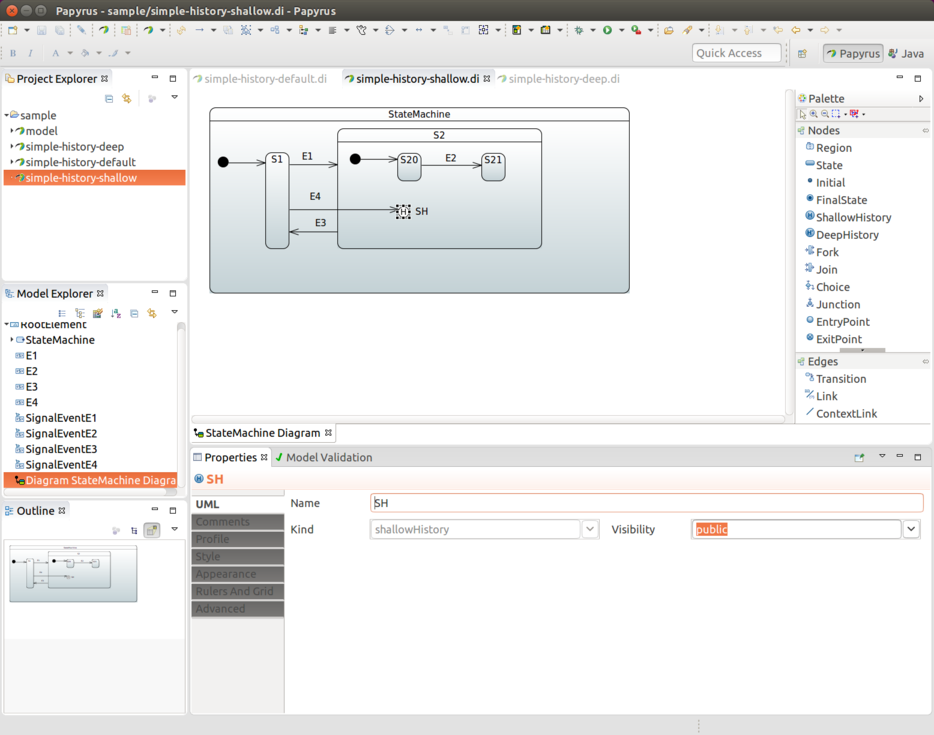
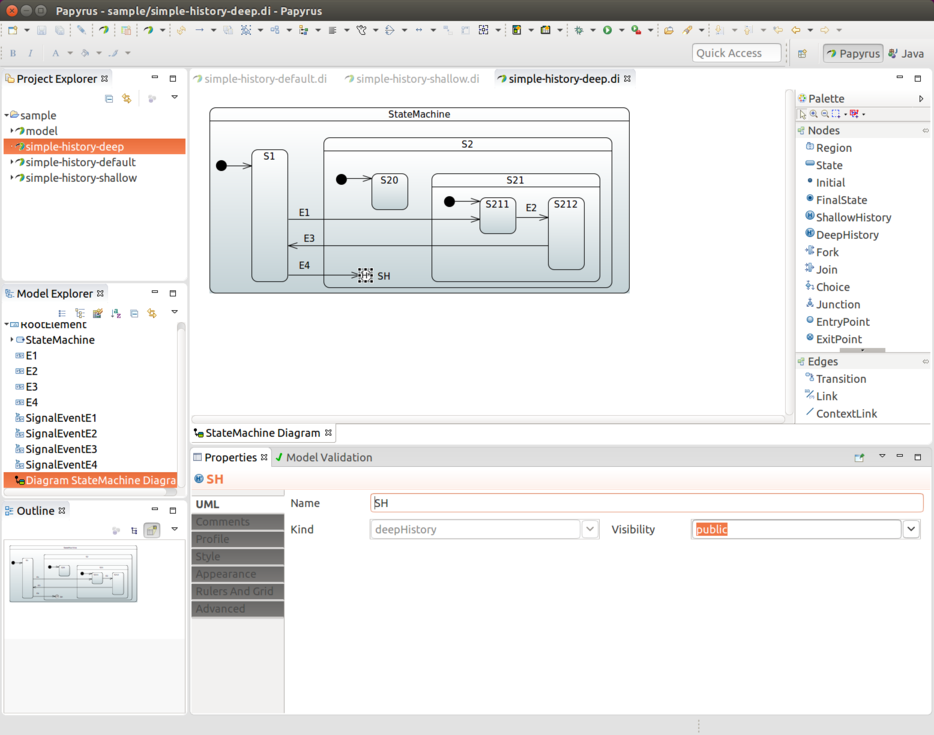
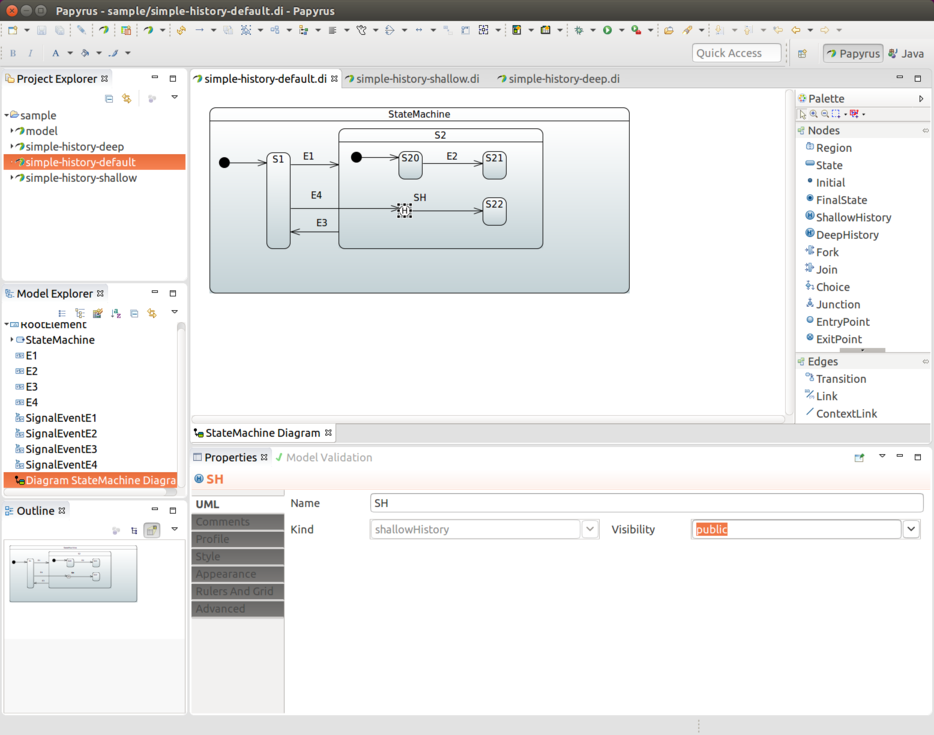
定义分叉和联接
Fork 和 Join 在 Papyrus 中都表示为条形。如图所示
在下一个图像中,您需要从FORK进入状态S2具有正交区域。JOIN则相反,其中
从 incoming transitions 中收集 join 状态。
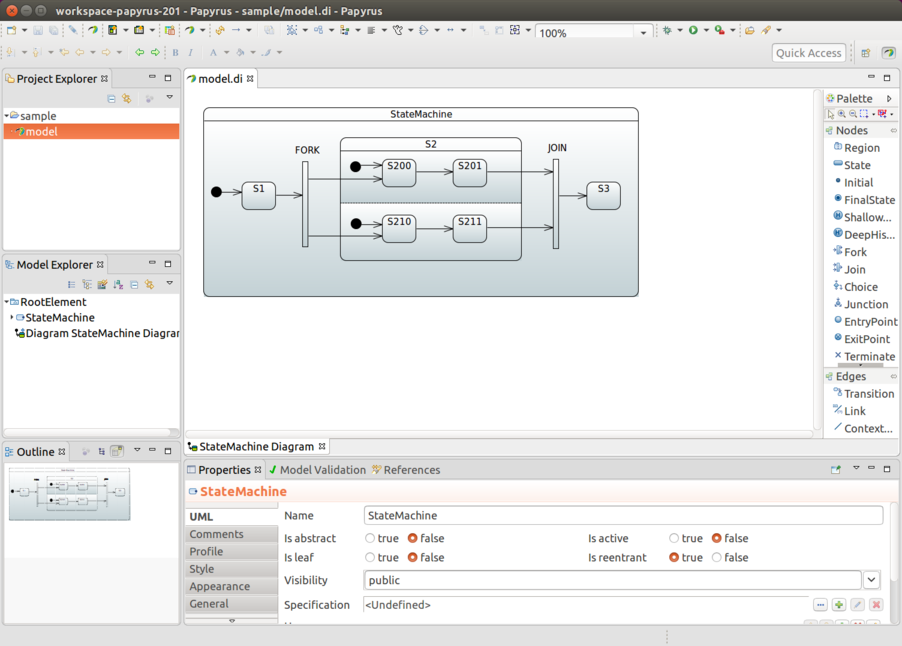
定义作
您可以使用行为来关联 Swtate 进入和退出作。 有关此内容的更多信息,请参见定义 Bean 引用。
使用初始作
定义了初始作(如配置作中所示) 在 UML 中,通过在转换中添加一个从初始状态引出的作 marker 添加到实际状态中。然后,当状态 machine 已启动。
定义守卫
您可以通过首先添加 Constraint,然后定义 其 Specification 指定为 OpaqueExpression,其工作方式相同 定义为定义 Bean 引用。
定义 Bean 引用
当您需要在任何 UML 效果中进行 bean 引用时,
action 或 guard 执行此作,您可以使用FunctionBehavior或OpaqueBehavior,其中定义的语言需要
是bean和语言体 msut 具有 bean 引用 ID。
定义 SPEL 引用
当你需要在
任何 UML 效果、作或守卫,都可以使用FunctionBehavior或OpaqueBehavior,其中定义的语言需要
是spel并且语言主体必须是 SPEL 表达式。
使用 Sub-Machine 引用
通常,当您使用子状态时,您会将它们绘制到 state 中 图表本身。图表可能会变得过于复杂和庞大,以至于无法 follow,因此我们也支持将子 state 定义为 state machine 参考。
要创建子计算机引用,必须首先创建一个新图表并为其命名 (例如,SubStateMachine Diagram)。下图显示了要使用的菜单选项:
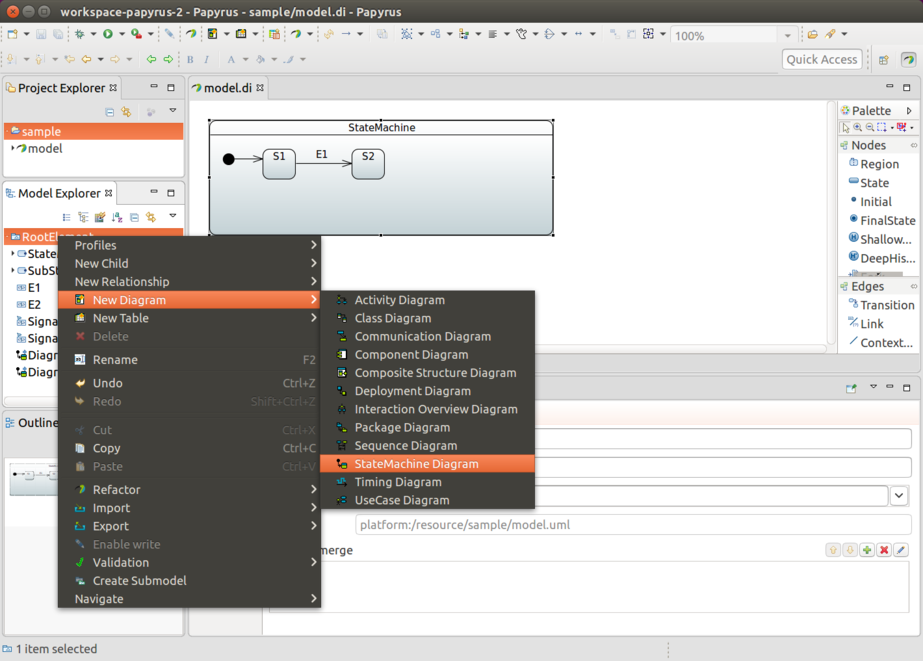
为新图表提供您需要的设计。 下图显示了一个简单的设计作为示例:
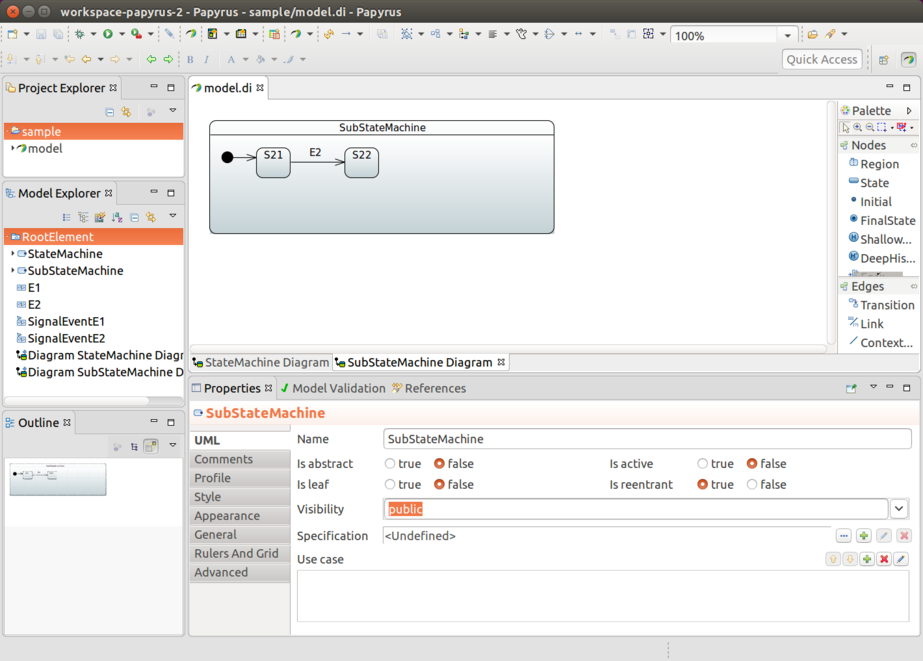
从您要链接的状态(在本例中为 m 状态)S2),单击Submachine字段并选择您关联的计算机(在我们的示例中,SubStateMachine).
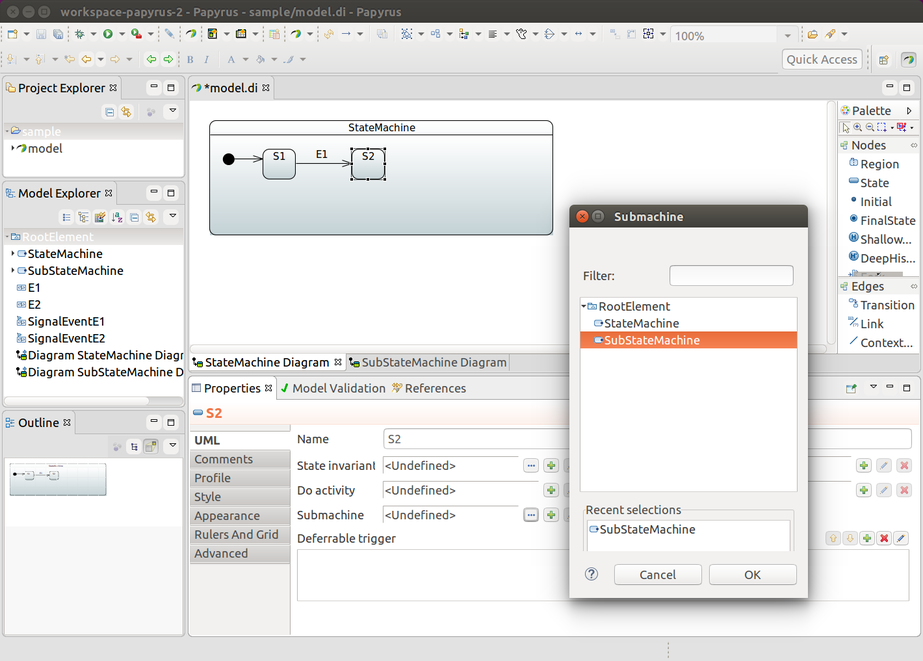
最后,在下图中,您可以看到该状态S2链接到SubStateMachine作为
子状态。
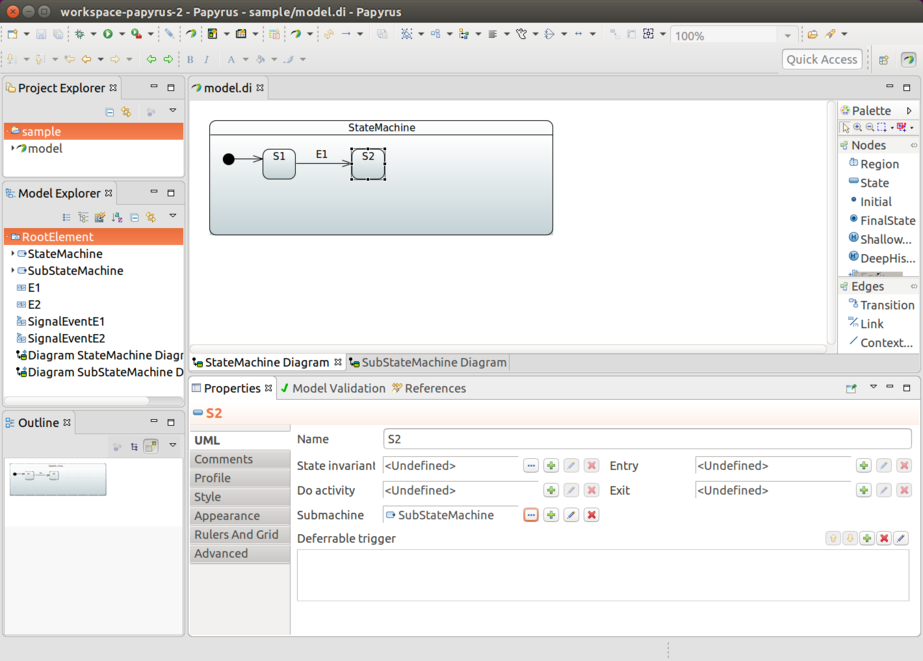
使用计算机导入
也可以在 uml 文件可以引用其他模型的地方使用导入功能。
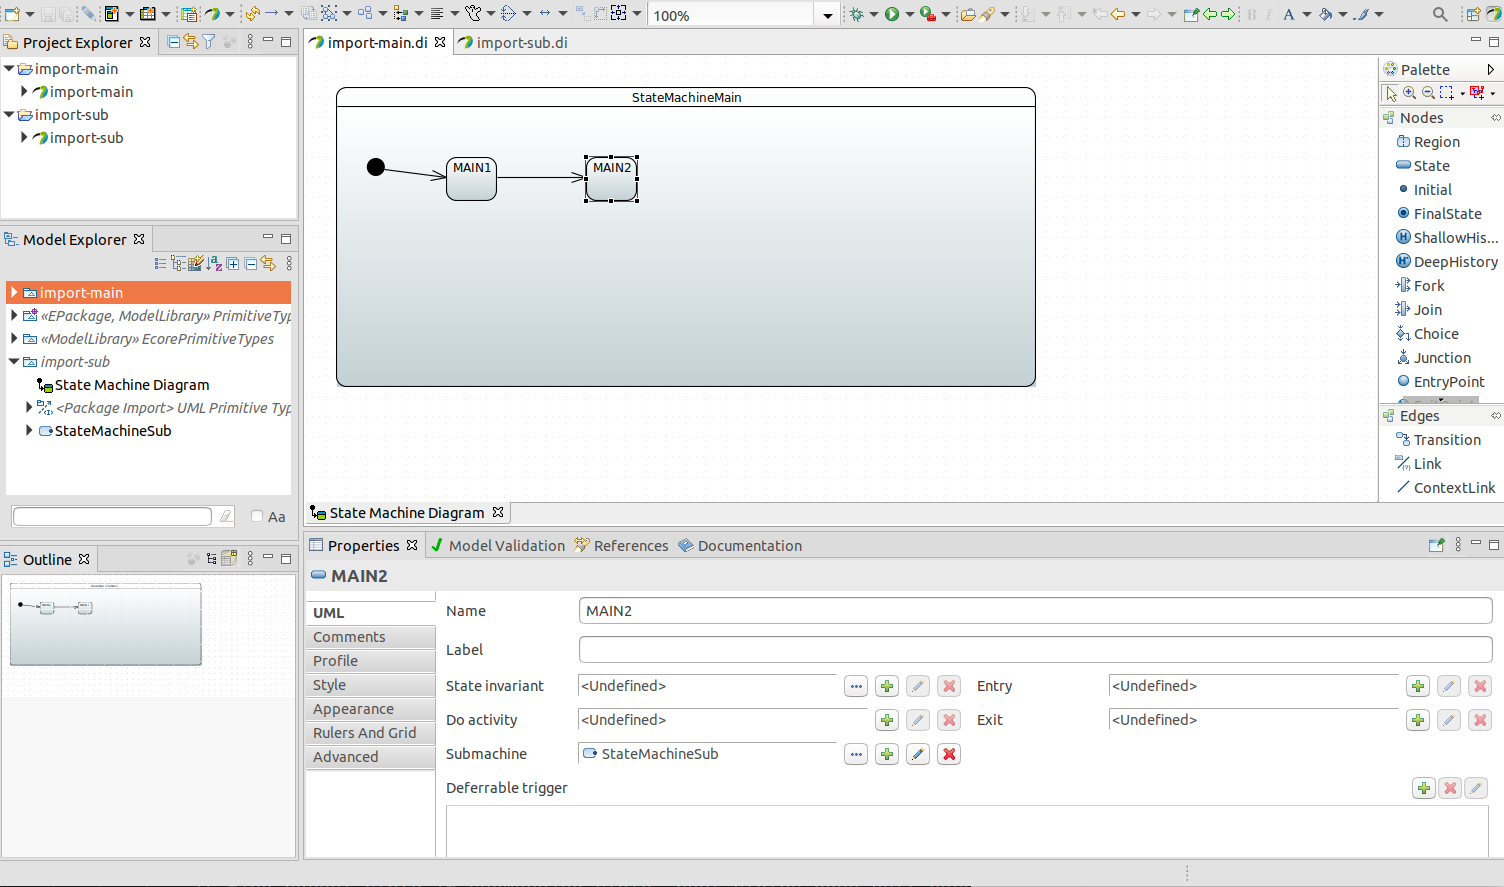
在UmlStateMachineModelFactory可以使用其他资源或位置
以定义引用模型文件。
@Configuration
@EnableStateMachine
public static class Config3 extends StateMachineConfigurerAdapter<String, String> {

	@Override
	public void configure(StateMachineModelConfigurer<String, String> model) throws Exception {
		model
			.withModel()
				.factory(modelFactory());
	}

	@Bean
	public StateMachineModelFactory<String, String> modelFactory() {
		return new UmlStateMachineModelFactory(
			"classpath:org/springframework/statemachine/uml/import-main/import-main.uml",
			new String[] { "classpath:org/springframework/statemachine/uml/import-sub/import-sub.uml" });
	}
}
| UML 模型中文件之间的链接需要是相对的,因为 否则,当模型文件从 classpath 添加到临时目录,以便 Eclipse 解析类可以 阅读这些。 |
存储库支持
本节包含与使用 'Spring Data Repositories 的 Spring Statemachine 中。
存储库配置
您可以将机器配置保留在外部 storage,可以从中按需加载它,而不是创建静态 配置。这 集成通过 Spring Data Repository 抽象工作。
我们创建了一个特殊的StateMachineModelFactory实现
叫RepositoryStateMachineModelFactory.它可以使用 base
存储库接口 (StateRepository,TransitionRepository,ActionRepository和GuardRepository) 和基本实体
接口 (RepositoryState,RepositoryTransition,RepositoryAction和RepositoryGuard).
由于实体和存储库在 Spring Data 中的工作方式,
从用户的角度来看,读取访问可以按原样完全抽象化
完成时间RepositoryStateMachineModelFactory.没有必要
了解存储库使用的实际映射实体类。
写入存储库始终依赖于使用实际的
特定于存储库的实体类。从计算机配置点
的观点,我们不需要知道这些,这意味着我们不需要知道
实际实现是 JPA、Redis 还是其他任何东西
Spring Data 支持的。使用实际的存储库相关
实体类在手动尝试编写新的
状态或转换到支持的存储库中。
的实体类RepositoryState和RepositoryTransition有一个machineId字段,该字段可供您使用,可用于
区分配置 — 例如,如果构建了机器
通过StateMachineFactory. |
实际的实现将在后面的部分中记录。 下图是存储库的 UML 等效状态图 配置。
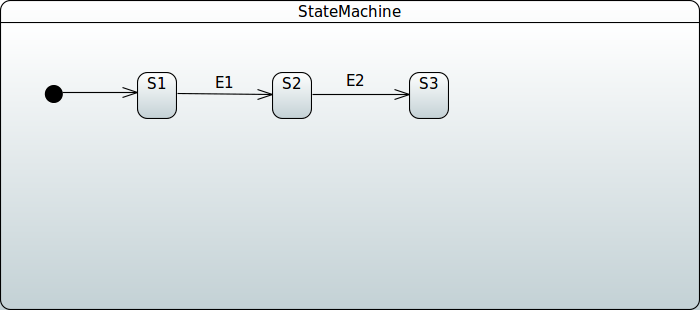
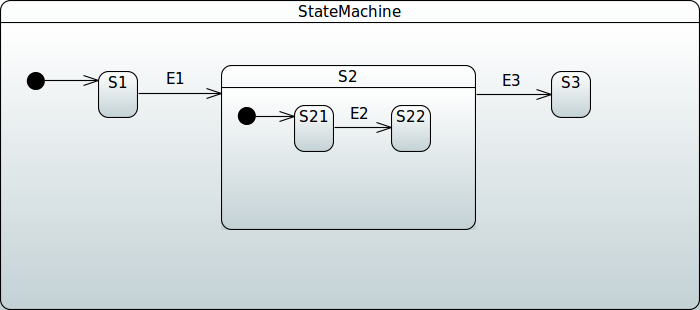
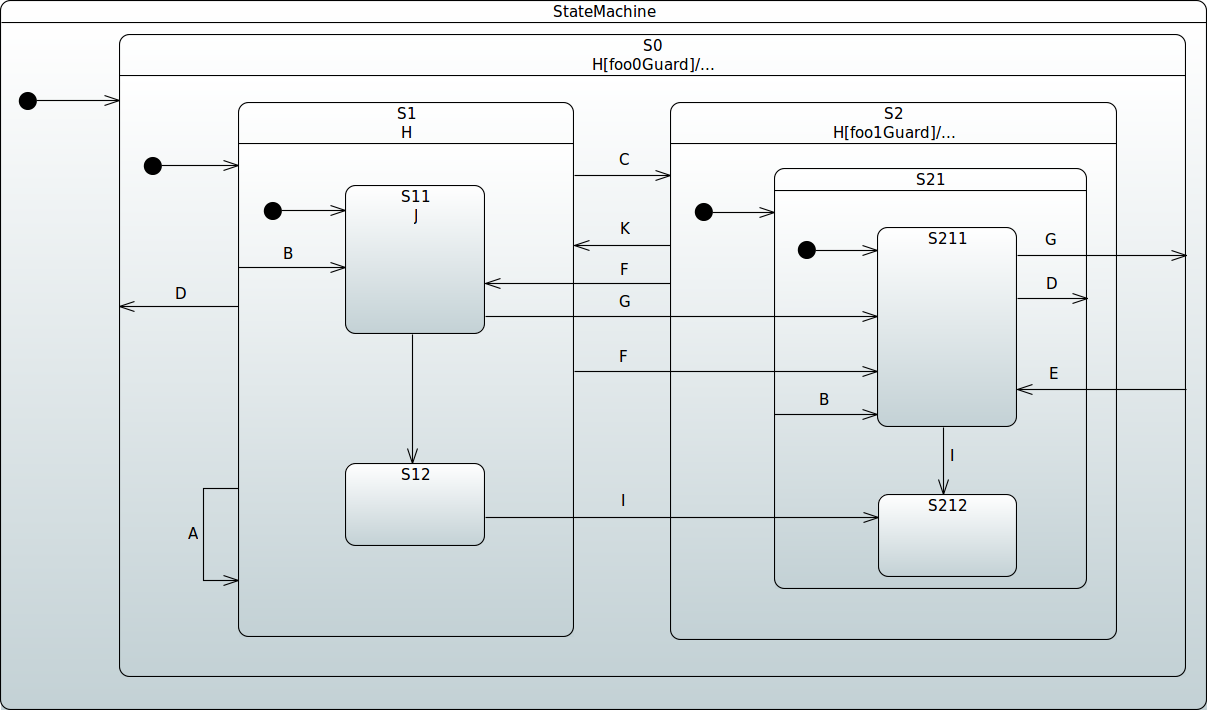
JPA
JPA 的实际存储库实现是JpaStateRepository,JpaTransitionRepository,JpaActionRepository,
和JpaGuardRepository,这些 API 由
实体类JpaRepositoryState,JpaRepositoryTransition,JpaRepositoryAction和JpaRepositoryGuard分别。
不幸的是,版本 '1.2.8' 不得不对 JPA 的实体进行更改
model 的 model 来使用。以前,生成的表名
始终具有前缀JPA_REPOSITORY_,派生自实体类
名字。由于这会导致数据库强加的中断问题
对数据库对象长度的限制,所有实体类都有
spesific definitions 强制使用表名。例如JPA_REPOSITORY_STATE现在是 'STATE' — 依此类推
ntity 类。 |
显示了手动更新 JPA 状态和转换的通用方法 在下面的示例中(相当于 SimpleMachine 中所示的机器):
@Autowired
StateRepository<JpaRepositoryState> stateRepository;

@Autowired
TransitionRepository<JpaRepositoryTransition> transitionRepository;

void addConfig() {
	JpaRepositoryState stateS1 = new JpaRepositoryState("S1", true);
	JpaRepositoryState stateS2 = new JpaRepositoryState("S2");
	JpaRepositoryState stateS3 = new JpaRepositoryState("S3");

	stateRepository.save(stateS1);
	stateRepository.save(stateS2);
	stateRepository.save(stateS3);

	JpaRepositoryTransition transitionS1ToS2 = new JpaRepositoryTransition(stateS1, stateS2, "E1");
	JpaRepositoryTransition transitionS2ToS3 = new JpaRepositoryTransition(stateS2, stateS3, "E2");

	transitionRepository.save(transitionS1ToS2);
	transitionRepository.save(transitionS2ToS3);
}
以下示例也等效于 SimpleSubMachine 中所示的计算机。
@Autowired
StateRepository<JpaRepositoryState> stateRepository;

@Autowired
TransitionRepository<JpaRepositoryTransition> transitionRepository;

void addConfig() {
	JpaRepositoryState stateS1 = new JpaRepositoryState("S1", true);
	JpaRepositoryState stateS2 = new JpaRepositoryState("S2");
	JpaRepositoryState stateS3 = new JpaRepositoryState("S3");

	JpaRepositoryState stateS21 = new JpaRepositoryState("S21", true);
	stateS21.setParentState(stateS2);
	JpaRepositoryState stateS22 = new JpaRepositoryState("S22");
	stateS22.setParentState(stateS2);

	stateRepository.save(stateS1);
	stateRepository.save(stateS2);
	stateRepository.save(stateS3);
	stateRepository.save(stateS21);
	stateRepository.save(stateS22);

	JpaRepositoryTransition transitionS1ToS2 = new JpaRepositoryTransition(stateS1, stateS2, "E1");
	JpaRepositoryTransition transitionS2ToS3 = new JpaRepositoryTransition(stateS21, stateS22, "E2");
	JpaRepositoryTransition transitionS21ToS22 = new JpaRepositoryTransition(stateS2, stateS3, "E3");

	transitionRepository.save(transitionS1ToS2);
	transitionRepository.save(transitionS2ToS3);
	transitionRepository.save(transitionS21ToS22);
}
首先,您必须访问所有存储库。 以下示例显示了如何执行此作:
@Autowired
StateRepository<JpaRepositoryState> stateRepository;

@Autowired
TransitionRepository<JpaRepositoryTransition> transitionRepository;

@Autowired
ActionRepository<JpaRepositoryAction> actionRepository;

@Autowired
GuardRepository<JpaRepositoryGuard> guardRepository;
其次,你可以创建动作和守卫。 以下示例显示了如何执行此作:
JpaRepositoryGuard foo0Guard = new JpaRepositoryGuard();
foo0Guard.setName("foo0Guard");

JpaRepositoryGuard foo1Guard = new JpaRepositoryGuard();
foo1Guard.setName("foo1Guard");

JpaRepositoryAction fooAction = new JpaRepositoryAction();
fooAction.setName("fooAction");

guardRepository.save(foo0Guard);
guardRepository.save(foo1Guard);
actionRepository.save(fooAction);
第三,您必须创建状态。 以下示例显示了如何执行此作:
JpaRepositoryState stateS0 = new JpaRepositoryState("S0", true);
stateS0.setInitialAction(fooAction);
JpaRepositoryState stateS1 = new JpaRepositoryState("S1", true);
stateS1.setParentState(stateS0);
JpaRepositoryState stateS11 = new JpaRepositoryState("S11", true);
stateS11.setParentState(stateS1);
JpaRepositoryState stateS12 = new JpaRepositoryState("S12");
stateS12.setParentState(stateS1);
JpaRepositoryState stateS2 = new JpaRepositoryState("S2");
stateS2.setParentState(stateS0);
JpaRepositoryState stateS21 = new JpaRepositoryState("S21", true);
stateS21.setParentState(stateS2);
JpaRepositoryState stateS211 = new JpaRepositoryState("S211", true);
stateS211.setParentState(stateS21);
JpaRepositoryState stateS212 = new JpaRepositoryState("S212");
stateS212.setParentState(stateS21);

stateRepository.save(stateS0);
stateRepository.save(stateS1);
stateRepository.save(stateS11);
stateRepository.save(stateS12);
stateRepository.save(stateS2);
stateRepository.save(stateS21);
stateRepository.save(stateS211);
stateRepository.save(stateS212);
第四,也是最后一点,您必须创建过渡。 以下示例显示了如何执行此作:
JpaRepositoryTransition transitionS1ToS1 = new JpaRepositoryTransition(stateS1, stateS1, "A");
transitionS1ToS1.setGuard(foo1Guard);

JpaRepositoryTransition transitionS1ToS11 = new JpaRepositoryTransition(stateS1, stateS11, "B");
JpaRepositoryTransition transitionS21ToS211 = new JpaRepositoryTransition(stateS21, stateS211, "B");
JpaRepositoryTransition transitionS1ToS2 = new JpaRepositoryTransition(stateS1, stateS2, "C");
JpaRepositoryTransition transitionS1ToS0 = new JpaRepositoryTransition(stateS1, stateS0, "D");
JpaRepositoryTransition transitionS211ToS21 = new JpaRepositoryTransition(stateS211, stateS21, "D");
JpaRepositoryTransition transitionS0ToS211 = new JpaRepositoryTransition(stateS0, stateS211, "E");
JpaRepositoryTransition transitionS1ToS211 = new JpaRepositoryTransition(stateS1, stateS211, "F");
JpaRepositoryTransition transitionS2ToS21 = new JpaRepositoryTransition(stateS2, stateS21, "F");
JpaRepositoryTransition transitionS11ToS211 = new JpaRepositoryTransition(stateS11, stateS211, "G");

JpaRepositoryTransition transitionS0 = new JpaRepositoryTransition(stateS0, stateS0, "H");
transitionS0.setKind(TransitionKind.INTERNAL);
transitionS0.setGuard(foo0Guard);
transitionS0.setActions(new HashSet<>(Arrays.asList(fooAction)));

JpaRepositoryTransition transitionS1 = new JpaRepositoryTransition(stateS1, stateS1, "H");
transitionS1.setKind(TransitionKind.INTERNAL);

JpaRepositoryTransition transitionS2 = new JpaRepositoryTransition(stateS2, stateS2, "H");
transitionS2.setKind(TransitionKind.INTERNAL);
transitionS2.setGuard(foo1Guard);
transitionS2.setActions(new HashSet<>(Arrays.asList(fooAction)));

JpaRepositoryTransition transitionS11ToS12 = new JpaRepositoryTransition(stateS11, stateS12, "I");
JpaRepositoryTransition transitionS12ToS212 = new JpaRepositoryTransition(stateS12, stateS212, "I");
JpaRepositoryTransition transitionS211ToS12 = new JpaRepositoryTransition(stateS211, stateS12, "I");

JpaRepositoryTransition transitionS11 = new JpaRepositoryTransition(stateS11, stateS11, "J");
JpaRepositoryTransition transitionS2ToS1 = new JpaRepositoryTransition(stateS2, stateS1, "K");

transitionRepository.save(transitionS1ToS1);
transitionRepository.save(transitionS1ToS11);
transitionRepository.save(transitionS21ToS211);
transitionRepository.save(transitionS1ToS2);
transitionRepository.save(transitionS1ToS0);
transitionRepository.save(transitionS211ToS21);
transitionRepository.save(transitionS0ToS211);
transitionRepository.save(transitionS1ToS211);
transitionRepository.save(transitionS2ToS21);
transitionRepository.save(transitionS11ToS211);
transitionRepository.save(transitionS0);
transitionRepository.save(transitionS1);
transitionRepository.save(transitionS2);
transitionRepository.save(transitionS11ToS12);
transitionRepository.save(transitionS12ToS212);
transitionRepository.save(transitionS211ToS12);
transitionRepository.save(transitionS11);
transitionRepository.save(transitionS2ToS1);
您可以在此处找到完整的示例。此示例还展示了如何 从具有 实体类的定义。
Redis
Redis 实例的实际存储库实现是RedisStateRepository,RedisTransitionRepository,RedisActionRepository,
和RedisGuardRepository,这些 API 由
实体类RedisRepositoryState,RedisRepositoryTransition,RedisRepositoryAction和RedisRepositoryGuard分别。
下一个示例显示了手动更新 Redis 状态和过渡的通用方法。 这相当于 SimpleMachine 中所示的机器。
@Autowired
StateRepository<RedisRepositoryState> stateRepository;

@Autowired
TransitionRepository<RedisRepositoryTransition> transitionRepository;

void addConfig() {
	RedisRepositoryState stateS1 = new RedisRepositoryState("S1", true);
	RedisRepositoryState stateS2 = new RedisRepositoryState("S2");
	RedisRepositoryState stateS3 = new RedisRepositoryState("S3");

	stateRepository.save(stateS1);
	stateRepository.save(stateS2);
	stateRepository.save(stateS3);


	RedisRepositoryTransition transitionS1ToS2 = new RedisRepositoryTransition(stateS1, stateS2, "E1");
	RedisRepositoryTransition transitionS2ToS3 = new RedisRepositoryTransition(stateS2, stateS3, "E2");

	transitionRepository.save(transitionS1ToS2);
	transitionRepository.save(transitionS2ToS3);
}
以下示例等效于 SimpleSubMachine 中显示的 machine:
@Autowired
StateRepository<RedisRepositoryState> stateRepository;

@Autowired
TransitionRepository<RedisRepositoryTransition> transitionRepository;

void addConfig() {
	RedisRepositoryState stateS1 = new RedisRepositoryState("S1", true);
	RedisRepositoryState stateS2 = new RedisRepositoryState("S2");
	RedisRepositoryState stateS3 = new RedisRepositoryState("S3");

	stateRepository.save(stateS1);
	stateRepository.save(stateS2);
	stateRepository.save(stateS3);


	RedisRepositoryTransition transitionS1ToS2 = new RedisRepositoryTransition(stateS1, stateS2, "E1");
	RedisRepositoryTransition transitionS2ToS3 = new RedisRepositoryTransition(stateS2, stateS3, "E2");

	transitionRepository.save(transitionS1ToS2);
	transitionRepository.save(transitionS2ToS3);
}
MongoDB 数据库
MongoDB 实例的实际存储库实现是MongoDbStateRepository,MongoDbTransitionRepository,MongoDbActionRepository,
和MongoDbGuardRepository,这些 API 由
实体类MongoDbRepositoryState,MongoDbRepositoryTransition,MongoDbRepositoryAction和MongoDbRepositoryGuard分别。
下一个示例显示了手动更新 MongoDB 的状态和转换的通用方法。 这相当于 SimpleMachine 中所示的机器。
@Autowired
StateRepository<MongoDbRepositoryState> stateRepository;

@Autowired
TransitionRepository<MongoDbRepositoryTransition> transitionRepository;

void addConfig() {
	MongoDbRepositoryState stateS1 = new MongoDbRepositoryState("S1", true);
	MongoDbRepositoryState stateS2 = new MongoDbRepositoryState("S2");
	MongoDbRepositoryState stateS3 = new MongoDbRepositoryState("S3");

	stateRepository.save(stateS1);
	stateRepository.save(stateS2);
	stateRepository.save(stateS3);

	MongoDbRepositoryTransition transitionS1ToS2 = new MongoDbRepositoryTransition(stateS1, stateS2, "E1");
	MongoDbRepositoryTransition transitionS2ToS3 = new MongoDbRepositoryTransition(stateS2, stateS3, "E2");

	transitionRepository.save(transitionS1ToS2);
	transitionRepository.save(transitionS2ToS3);
}
以下示例等效于 SimpleSubMachine 中所示的计算机。
@Autowired
StateRepository<MongoDbRepositoryState> stateRepository;

@Autowired
TransitionRepository<MongoDbRepositoryTransition> transitionRepository;

void addConfig() {
	MongoDbRepositoryState stateS1 = new MongoDbRepositoryState("S1", true);
	MongoDbRepositoryState stateS2 = new MongoDbRepositoryState("S2");
	MongoDbRepositoryState stateS3 = new MongoDbRepositoryState("S3");

	MongoDbRepositoryState stateS21 = new MongoDbRepositoryState("S21", true);
	stateS21.setParentState(stateS2);
	MongoDbRepositoryState stateS22 = new MongoDbRepositoryState("S22");
	stateS22.setParentState(stateS2);

	stateRepository.save(stateS1);
	stateRepository.save(stateS2);
	stateRepository.save(stateS3);
	stateRepository.save(stateS21);
	stateRepository.save(stateS22);

	MongoDbRepositoryTransition transitionS1ToS2 = new MongoDbRepositoryTransition(stateS1, stateS2, "E1");
	MongoDbRepositoryTransition transitionS2ToS3 = new MongoDbRepositoryTransition(stateS21, stateS22, "E2");
	MongoDbRepositoryTransition transitionS21ToS22 = new MongoDbRepositoryTransition(stateS2, stateS3, "E3");

	transitionRepository.save(transitionS1ToS2);
	transitionRepository.save(transitionS2ToS3);
	transitionRepository.save(transitionS21ToS22);
}
存储库持久性
除了将机器配置(如仓库配置中所示)存储在外部仓库中外,您还可以 将计算机持久保存到存储库中。
这StateMachineRepositoryinterface 是一个中央接入点,它
与机器持久互,并由 Entity 类提供支持RepositoryStateMachine.
JPA
JPA 的实际存储库实现是JpaStateMachineRepository,它由实体类JpaRepositoryStateMachine.
以下示例显示了为 JPA 保留计算机的通用方法:
@Autowired
StateMachineRepository<JpaRepositoryStateMachine> stateMachineRepository;

void persist() {

	JpaRepositoryStateMachine machine = new JpaRepositoryStateMachine();
	machine.setMachineId("machine");
	machine.setState("S1");
	// raw byte[] representation of a context
	machine.setStateMachineContext(new byte[] { 0 });

	stateMachineRepository.save(machine);
}
Redis
Redis 的实际存储库实现是RedisStateMachineRepository,它由实体类RedisRepositoryStateMachine.
以下示例显示了为 Redis 保留计算机的通用方法:
@Autowired
StateMachineRepository<RedisRepositoryStateMachine> stateMachineRepository;

void persist() {

	RedisRepositoryStateMachine machine = new RedisRepositoryStateMachine();
	machine.setMachineId("machine");
	machine.setState("S1");
	// raw byte[] representation of a context
	machine.setStateMachineContext(new byte[] { 0 });

	stateMachineRepository.save(machine);
}
MongoDB 数据库
MongoDB 的实际存储库实现是MongoDbStateMachineRepository,它由实体类MongoDbRepositoryStateMachine.
以下示例显示了为 MongoDB 持久保存计算机的通用方法:
@Autowired
StateMachineRepository<MongoDbRepositoryStateMachine> stateMachineRepository;

void persist() {

	MongoDbRepositoryStateMachine machine = new MongoDbRepositoryStateMachine();
	machine.setMachineId("machine");
	machine.setState("S1");
	// raw byte[] representation of a context
	machine.setStateMachineContext(new byte[] { 0 });

	stateMachineRepository.save(machine);
}